
VUPOINT PDS-ST410-VP
VuPoint Solutions Magic Wand Portable Scanner
વપરાશકર્તા માર્ગદર્શિકા
1. પરિચય
The VuPoint Solutions Magic Wand Portable Scanner is a compact and versatile device designed for scanning documents, photos, and other materials on the go. It allows you to convert physical documents and images into digital files (JPEG or PDF) quickly and efficiently, storing them on a Micro SD card for easy transfer to your computer.

Image: The VuPoint Solutions Magic Wand Portable Scanner, a sleek black handheld device.
2. પેકેજ સામગ્રી
કૃપા કરીને નીચેની વસ્તુઓ માટે પેકેજ તપાસો:
- VuPoint Solutions Magic Wand Portable Scanner
- યુએસબી કેબલ
- 2 x AA આલ્કલાઇન બેટરી
- રક્ષણાત્મક પાઉચ
- સફાઈ કાપડ
- વપરાશકર્તા માર્ગદર્શિકા (આ દસ્તાવેજ)
- Bonus OCR Software CD (for Windows OS only)

Image: A flat lay of the scanner's accessories including a black pouch, USB cable, two AA batteries, and a cleaning cloth.
3. ઉત્પાદન ઓવરview
Familiarize yourself with the various parts and controls of your Magic Wand Scanner:
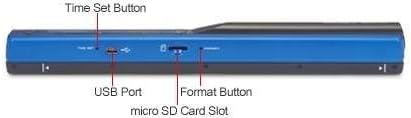
છબી: ક્લોઝ-અપ view of the scanner's side, highlighting the Time Set Button, USB Port, Micro SD Card Slot, and Format Button.
- એલસીડી ડિસ્પ્લે: Shows scanning status, resolution, and file ફોર્મેટ
- Power/Scan Button: Turns the device on/off and initiates scanning.
- DPI બટન: Toggles between 300, 600, and 900 DPI resolutions.
- JPG/PDF Button: Switches between JPEG and PDF file બંધારણો
- સમય સેટ બટન: Used to set the internal clock.
- યુએસબી પોર્ટ: For connecting to a computer to transfer files.
- માઇક્રો એસડી કાર્ડ સ્લોટ: Insert your Micro SD card (up to 32GB, not included) here.
- ફોર્મેટ બટન: Formats the inserted Micro SD card.
4. સેટઅપ
4.1 બેટરી ઇન્સ્ટોલેશન
- Locate the battery compartment on the scanner.
- Insert two (2) AA alkaline batteries, ensuring correct polarity (+/-).
- બેટરી કમ્પાર્ટમેન્ટ કવર સુરક્ષિત રીતે બંધ કરો.
૫.૨ માઇક્રો એસડી કાર્ડ ઇન્સ્ટોલેશન
A Micro SD card (up to 32GB) is required for storing scanned images and is not included with the scanner.
- Locate the Micro SD card slot on the side of the scanner.
- Insert the Micro SD card into the slot with the metal contacts facing down, until it clicks into place.
- કાર્ડ કાઢવા માટે, તેને ધીમેથી અંદર ધકેલી દો જ્યાં સુધી તે બહાર ન આવે.
4.3 પ્રારંભિક પાવર ચાલુ
Press and hold the Power/Scan button for a few seconds until the LCD display illuminates. The scanner is now ready for use.
5. ઓપરેટિંગ સૂચનાઓ
૬.૧ મૂળભૂત સ્કેનિંગ
- Ensure the scanner is powered on and a Micro SD card is inserted.
- Place the document or image you wish to scan on a flat, stable surface.
- Hold the scanner firmly with both hands. Position the scanner at the top edge of the document, ensuring the scanning area is aligned with the content.
- Press the Power/Scan button once to begin scanning. The 'SCAN' indicator will appear on the LCD.
- Slowly and steadily glide the scanner downwards across the document. Maintain even pressure and a straight path for best results.
- Once you reach the end of the document, press the Power/Scan button again to stop scanning. The 'SCAN' indicator will disappear.

Image: A hand holding the Magic Wand Scanner and gliding it over a document to perform a scan.
5.2 Resolution Settings (DPI)
The scanner supports three resolution settings:
- 300 DPI (Standard): Good for general documents, faster scanning.
- 600 DPI (High): Suitable for documents with smaller text or images requiring more detail.
- 900 DPI (Fine): Best for high-detail images and photos.
To change the resolution, press the ડીપીઆઈ button repeatedly until the desired setting (300, 600, or 900) is displayed on the LCD.
5.3 File ફોર્મેટ પસંદગી
You can choose to save your scans as either JPEG or PDF files.
- JPEG: Ideal for photos and images.
- PDF: Best for multi-page documents.
બદલવા માટે file format, press the JPG/PDF button. The current format will be shown on the LCD.
5.4 Scanning Tips for Best Results
- Ensure the scanning surface is completely flat and smooth.
- Keep the scanner straight and move it at a consistent speed. Uneven movement can result in distorted images.
- Make sure the image or document fits within the scanning guides of the scanner.
- For optimal clarity, clean the scanner's lens regularly with the provided cleaning cloth.

છબી: વિઝ્યુઅલ એક્સamples demonstrating the importance of a flat scanning surface and keeping the image within the scanner's guides for optimal results.
૩.૩૧ ટ્રાન્સફર Files થી કોમ્પ્યુટર
- Connect the scanner to your computer using the included USB cable.
- The scanner will be recognized as a removable storage device (similar to a USB drive).
- Navigate to the scanner's drive to access your scanned files, which are stored on the Micro SD card.
- કોપી અને પેસ્ટ કરો files to your computer's hard drive.
- Safely eject the scanner from your computer before disconnecting the USB cable.
5.6 Using OCR Software
The included Optical Character Recognition (OCR) software allows you to convert scanned documents into editable text files. This software is compatible with Windows operating systems only and is not supported on Mac OS.
- Install the OCR software from the provided CD onto your Windows computer.
- Follow the software's instructions to import your scanned PDF or JPEG documents.
- Use the software to convert the images into searchable and editable text formats, compatible with word processing and spreadsheet applications.
6. જાળવણી
૫.૧ સ્કેનરની સફાઈ
Regular cleaning ensures optimal scan quality:
- Use the provided cleaning cloth to gently wipe the scanning lens and the exterior of the scanner.
- Do not use liquid cleaners or abrasive materials, as they may damage the device.
6.2 બેટરી રિપ્લેસમેન્ટ
When the battery indicator on the LCD display shows low power, replace the AA batteries promptly to ensure continuous operation.
6.3 સંગ્રહ
When not in use, store the scanner in its protective pouch in a cool, dry place away from direct sunlight and extreme temperatures.
7. મુશ્કેલીનિવારણ
| સમસ્યા | સંભવિત કારણ | ઉકેલ |
|---|---|---|
| સ્કેનર ચાલુ થતું નથી. | બેટરી ઓછી છે અથવા ખોટી રીતે દાખલ કરેલી છે. | બેટરી બદલો અથવા યોગ્ય ધ્રુવીયતા સુનિશ્ચિત કરો. |
| Poor scan quality (blurry, distorted). | Uneven scanning speed, dirty lens, or non-flat surface. | Scan slowly and steadily. Clean the scanning lens. Ensure the document is on a flat surface. |
| ટ્રાન્સફર કરી શકાતું નથી fileકમ્પ્યુટર પર s. | USB cable not connected properly, Micro SD card not inserted correctly, or driver issue. | Ensure USB cable is securely connected. Re-insert Micro SD card (metal contacts facing down). Try a different USB port. |
| માઇક્રો SD કાર્ડ ઓળખાયું નથી. | Card inserted incorrectly or needs formatting. | Ensure Micro SD card is inserted with metal contacts facing down. Use the Format button on the scanner to format the card (this will erase all data). |
| OCR software not working. | Software is for Windows only, or installation issue. | Ensure you are using a Windows OS. Reinstall the OCR software. |
8. સ્પષ્ટીકરણો
| મોડેલનું નામ | જાદુઈ લાકડી |
| મોડલ નંબર | PDS-ST410-VP |
| સ્કેનર પ્રકાર | દસ્તાવેજ સ્કેનર |
| સેન્સર | A4 Color Contact Image Sensor (CIS) |
| ઠરાવ | 300 DPI (Standard), 600 DPI (High), 900 DPI (Fine) |
| Scanning Speed (A4) | High resolution color: ≤ 28 Sec High resolution mono: ≤ 14 Sec Standard resolution color: ≤ 8 Sec Standard resolution mono: ≤ 4 Sec |
| Max Scan Width | 8.27 inches (A4) |
| Max Scan Length | 98 ઇંચ સુધી |
| File ફોર્મેટ | JPEG, PDF |
| બાહ્ય મેમરી | Supports Micro SD card up to 32GB (not included) |
| એલસીડી ડિસ્પ્લેનું કદ | 0.787” x 0.59” |
| કનેક્ટિવિટી | યુએસબી 2.0 હાઇ સ્પીડ |
| પાવર સ્ત્રોત | 2 x AA બેટરી |
| બેટરી જીવન | ≥ 200 minutes (scanning) |
| ઓટો પાવર બંધ | Off / 3 minutes / 5 minutes |
| પરિમાણો (L x H x W) | 10 ”x 1.2” x 1.1 ”(25.4 cm x 3.05 cm x 2.79 cm) |
| વજન | 0.47 lbs (0.21 કિગ્રા) |
| ન્યૂનતમ સિસ્ટમ આવશ્યકતાઓ | Windows 7 or later (for OCR software) |
9. વોરંટી અને સપોર્ટ
For warranty information and technical support, please refer to the documentation included with your product or visit the official VuPoint Solutions webસાઇટ. વોરંટી દાવાઓ માટે ખરીદીના પુરાવા તરીકે તમારી ખરીદી રસીદ રાખો.
Ask a question about this manual
Ask about setup, troubleshooting, compatibility, parts, safety, or missing instructions. Manuals+ will review the question and use this page’s manual context to help answer it.