
પરિચય
This manual provides comprehensive instructions for the installation, operation, and maintenance of your ESUPPORT Blue LED Bar Light Rocker Toggle Switch. Designed for automotive applications, this ON/OFF switch features a blue LED indicator and is rated for DC 12V 20A or 24V 10A systems. Please read this manual thoroughly before installation and use to ensure proper function and safety.

Image: ESUPPORT Blue LED Bar Light Rocker Toggle Switch, front view.
સલામતી માહિતી
- Always disconnect the vehicle's battery before performing any electrical work to prevent short circuits and electrical shock.
- Ensure the switch's voltage and current ratings (DC 12V/20A or 24V/10A) are compatible with your application. Exceeding these ratings can cause damage or fire.
- Use appropriate gauge wiring for your application to handle the current load.
- Install an inline fuse on the positive power supply line to protect the circuit.
- If you are unsure about any part of the installation process, consult a qualified automotive electrician.
- The switch is rated IP65 waterproof, meaning it is protected against dust and low-pressure water jets. It is not designed for submersion.
ઉત્પાદન લક્ષણો
- ભાગtage & Current Rating: DC 12V/20A, 24V/10A.
- સામગ્રી: Constructed from durable ABS and environmental anti-retardant materials.
- પિન રૂપરેખાંકન: 5-pin design with an integrated blue LED lamp.
- ઓપરેશન: Simple ON/OFF rocker switch functionality.
- વોટરપ્રૂફ રેટિંગ: IP65, suitable for use in various environmental conditions.
- સુસંગતતા: Universal fitting, designed to fit most cars and vehicles.
પેકેજ સામગ્રી
- 1 x ESUPPORT Blue LED Bar Light Rocker Toggle Switch
સેટઅપ અને ઇન્સ્ટોલેશન
1. Physical Dimensions and Mounting
Before installation, ensure you have adequate space for the switch and prepare the mounting hole according to the specified dimensions.
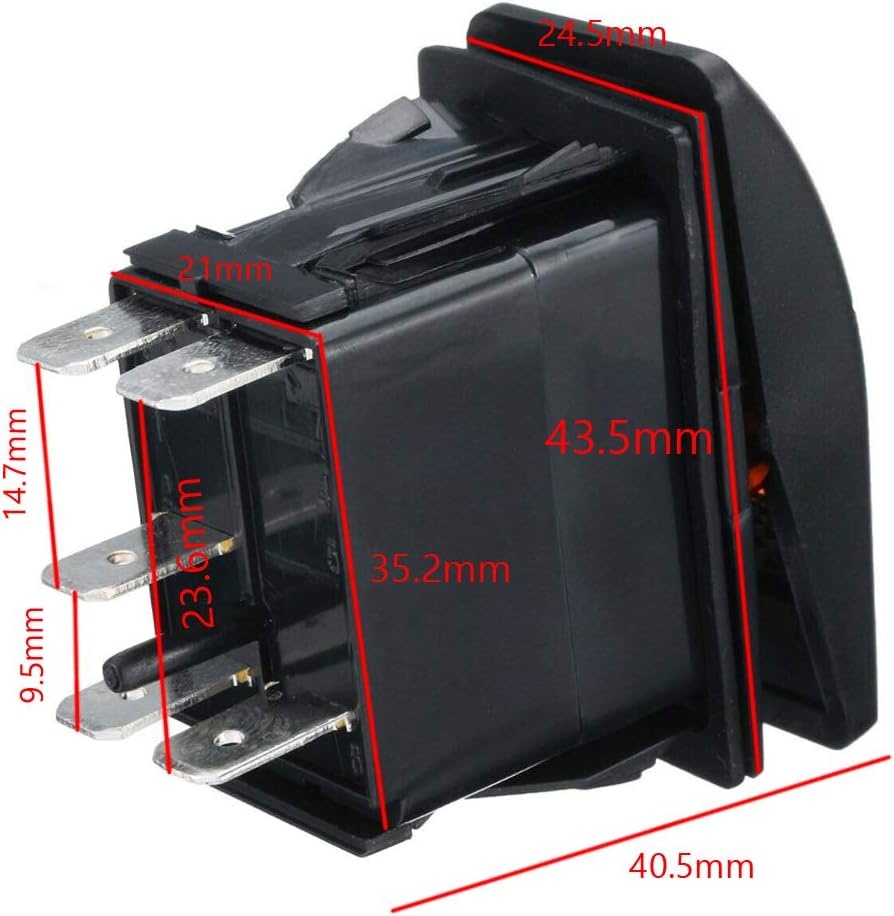
Image: Detailed dimensions of the rocker switch, showing overall size and pin lengths. The switch measures approximately 40.5mm in length, 24.5mm in width, and 43.5mm in depth (including pins).

Image: Recommended drill size for mounting the switch. The required panel cutout is approximately 37.2mm x 21.2mm.
- Choose a suitable location on your vehicle's dashboard or panel for installation.
- Using a template or marking, carefully cut a rectangular hole with dimensions of approximately 37.2mm x 21.2mm.
- Insert the switch into the cutout. The switch is designed for panel mounting and will snap into place.
2. વાયરિંગ સૂચનાઓ
The switch features 5 pins for various wiring configurations. Refer to the diagram below for standard wiring. Always ensure correct polarity and secure connections.
Image: Detailed wiring diagram for the 5-pin rocker switch, showing connections for power, ground, and load, along with internal LED illumination.
Standard 5-Pin Wiring Configuration:
- Pin 2 (+): Connect to the positive (+) power source (e.g., battery or ignition-switched 12V/24V). This is the main power input for the switch.
- Pin 3 (OUT): Connect to the positive (+) terminal of your accessory (e.g., LED light bar). This is the switched output.
- Pin 6 (+): Connect to the positive (+) power source. This pin powers the upper LED indicator when the switch is ON. It can be jumped from Pin 2.
- Pin 7 (-): Connect to chassis ground (-). This pin provides ground for the lower LED indicator (always on, if desired) and the upper LED indicator.
- Pin 8 (-): Connect to chassis ground (-). This pin provides ground for the main switch circuit. It can be jumped from Pin 7.
Common Wiring Scenarios:
- Accessory ON/OFF with LED Indicator ON when active:
- Connect Pin 2 to fused +12V/24V.
- Connect Pin 3 to the positive terminal of your accessory.
- Connect Pin 6 to Pin 2 (jumper wire).
- Connect Pin 7 and Pin 8 to chassis ground.
- Accessory ON/OFF with LED Indicator ON when active and a separate illumination for the switch text (e.g., from dash lights):
- Connect Pin 2 to fused +12V/24V.
- Connect Pin 3 to the positive terminal of your accessory.
- Connect Pin 6 to the positive (+) wire of your dash lights or a separate illumination circuit.
- Connect Pin 7 and Pin 8 to chassis ground.
શૉર્ટ સર્કિટને રોકવા માટે તમામ કનેક્શન સુરક્ષિત અને ઇન્સ્યુલેટેડ છે તેની ખાતરી કરો.

છબી: એક ભૂતપૂર્વample of the ESUPPORT rocker switch installed in a vehicle's dashboard, demonstrating its integrated appearance.
ઓપરેટિંગ સૂચનાઓ
The ESUPPORT Rocker Toggle Switch operates as a simple ON/OFF mechanism.

Image: Close-up of the switch face, showing the "LED LIGHT BAR" label and blue LED indicator.
- Once properly installed and wired, apply power to the circuit.
- Press the upper part of the rocker switch to the "ON" position. The integrated blue LED indicator will illuminate, and the connected accessory will activate.
- Press the lower part of the rocker switch to the "OFF" position. The blue LED indicator will turn off, and the connected accessory will deactivate.
જાળવણી
- સફાઈ: સોફ્ટનો ઉપયોગ કરો, ડીamp cloth to clean the surface of the switch. Avoid abrasive cleaners or solvents that could damage the plastic.
- નિરીક્ષણ: Periodically check wiring connections for tightness and signs of corrosion or damage.
- પાણી પ્રતિકાર: While rated IP65, avoid direct high-pressure water jets on the switch. Do not submerge the switch in water.

Image: Illustration highlighting the IP65 waterproof rating of the switch, indicating protection against splashes but not submersion.
મુશ્કેલીનિવારણ
| સમસ્યા | સંભવિત કારણ | ઉકેલ |
|---|---|---|
| Switch LED does not light up. | Incorrect wiring of LED pins (Pin 6, Pin 7). No power to Pin 2. Blown fuse. | Verify Pin 2 has power. Check Pin 6 and Pin 7 connections according to the wiring diagram. Inspect and replace fuse if necessary. |
| Connected accessory does not turn ON. | Incorrect wiring of Pin 3. No power to Pin 2. Accessory fault. Blown fuse. | Ensure Pin 2 has power. Verify Pin 3 is correctly connected to the accessory. Test the accessory independently. Inspect and replace fuse. |
| પેનલમાં સ્વિચ ઢીલો લાગે છે. | Mounting hole is too large. | Ensure the cutout dimensions match the recommended size (37.2mm x 21.2mm). If the hole is too large, consider using a mounting plate or replacing the panel. |
વિશિષ્ટતાઓ

Image: The side of the switch indicating its electrical ratings: 12V 20A DC and 24V 10A DC.
| લક્ષણ | વિગત |
|---|---|
| ઓપરેશન મોડ | ચાલું બંધ |
| વર્તમાન રેટિંગ | 20 Amps (at 12V DC), 10 Amps (at 24V DC) |
| સંચાલન ભાગtage | 12 Volts / 24 Volts DC |
| સંપર્ક પ્રકાર | સામાન્ય રીતે ખોલો |
| કનેક્ટર પ્રકાર | Quick Connect (5-Pin) |
| સ્વિચ પ્રકાર | રોકર |
| સામગ્રી | ABS & Environmental anti-retardant plastic |
| સર્કિટ પ્રકાર | 1-માર્ગ |
| માઉન્ટિંગ પ્રકાર | પેનલ માઉન્ટ |
| એક્ટ્યુએટર પ્રકાર | રોકર |
| ઇન્સ્યુલેશન પ્રતિકાર | ૧૦૦૦ મેગાઓહ્મ |
| હોદ્દાની સંખ્યા | 2 (ચાલુ/બંધ) |
| આંતરરાષ્ટ્રીય સુરક્ષા રેટિંગ | IP65 (ધૂળથી સુરક્ષિત, ઓછા દબાણવાળા પાણીના જેટ સામે સુરક્ષિત) |
| પ્રમાણપત્ર | CE |
| વાટtage (Max Load) | 240 watts (at 12V) / 240 watts (at 24V) |
વોરંટી માહિતી
ESUPPORT products are manufactured to high-quality standards. While specific warranty details may vary by retailer or region, generally, this product is covered against manufacturing defects for a limited period from the date of purchase. Please retain your proof of purchase for any warranty claims. For detailed warranty terms, refer to the retailer's policy where the product was purchased.
આધાર
For technical assistance, troubleshooting, or inquiries regarding your ESUPPORT product, please contact the seller or retailer from whom you purchased the item. They can provide specific support and guidance related to your purchase.
You may also visit the ESUPPORT brand page on Amazon for additional product information and support resources: ESUPPORT Amazon Store