1. પરિચય અને સલામતી માહિતી
Thank you for choosing the ANENG V8 Digital Multimeter. This device is designed for safe and accurate measurement of AC/DC voltage, AC/DC current, resistance, capacitance, frequency, temperature, diode, continuity, and battery testing. Please read this manual thoroughly before use to ensure proper operation and to prevent potential hazards.
1.1 સલામતી સાવચેતીઓ
- Always ensure the multimeter is in good working condition before use. Inspect test leads for damage.
- વોલ્યુમ લાગુ કરશો નહીંtage or current that exceeds the maximum rated values for the multimeter.
- વોલ્યુમ સાથે કામ કરતી વખતે અત્યંત સાવધાની રાખોtages above 36V DC or 25V AC RMS, as these can pose a shock hazard.
- હંમેશા સર્કિટથી પાવર ડિસ્કનેક્ટ કરો અને બધા હાઇ-વોલ્યુમ ડિસ્ચાર્જ કરોtagપ્રતિકાર, સાતત્ય, ડાયોડ અથવા કેપેસીટન્સ માપતા પહેલા e કેપેસીટર્સ.
- Ensure the rotary switch is in the correct position for the desired measurement before connecting the test leads to the circuit.
- Do not operate the multimeter in explosive gas, vapor, or dusty environments.
- ચોક્કસ રીડિંગ્સ સુનિશ્ચિત કરવા માટે જ્યારે ઓછી બેટરી સૂચક દેખાય ત્યારે તાત્કાલિક બેટરી બદલો.
2. ઉત્પાદન ઓવરview
2.1 પેકેજ સામગ્રી
The ANENG V8 Digital Multimeter package typically includes the following items:
- ANENG V8 Digital Multimeter
- ટેસ્ટ લીડ્સ (લાલ અને કાળા)
- તાપમાન ચકાસણી
- કેસ વહન
- વપરાશકર્તા માર્ગદર્શિકા

Image: ANENG V8 Digital Multimeter with its standard accessories, including test leads, a temperature probe, and a protective carrying case.
૨.૨ નિયંત્રણો અને પ્રદર્શન
The multimeter features an 8000-count LCD backlight display for clear readings in various lighting conditions. Key controls include a rotary switch for function selection and buttons for range, data hold, and other features.

છબી: વિગતવાર view of the multimeter's front panel, highlighting the LCD screen, the central rotary selector, and various control buttons.
3. સેટઅપ
3.1 બેટરી ઇન્સ્ટોલેશન
The ANENG V8 Digital Multimeter is powered by batteries. To install or replace batteries:
- ખાતરી કરો કે મલ્ટિમીટર બંધ છે અને બધા ટેસ્ટ લીડ્સ ડિસ્કનેક્ટ કરો.
- ઉપકરણની પાછળ બેટરી કમ્પાર્ટમેન્ટ કવર શોધો.
- Use a screwdriver to loosen the screw(s) securing the battery cover.
- કવર દૂર કરો.
- Insert new batteries, observing the correct polarity (+ and -) as indicated inside the compartment. The device typically uses AA batteries.
- બેટરી કવર બદલો અને તેને સ્ક્રુ(ઓ) વડે સુરક્ષિત કરો.
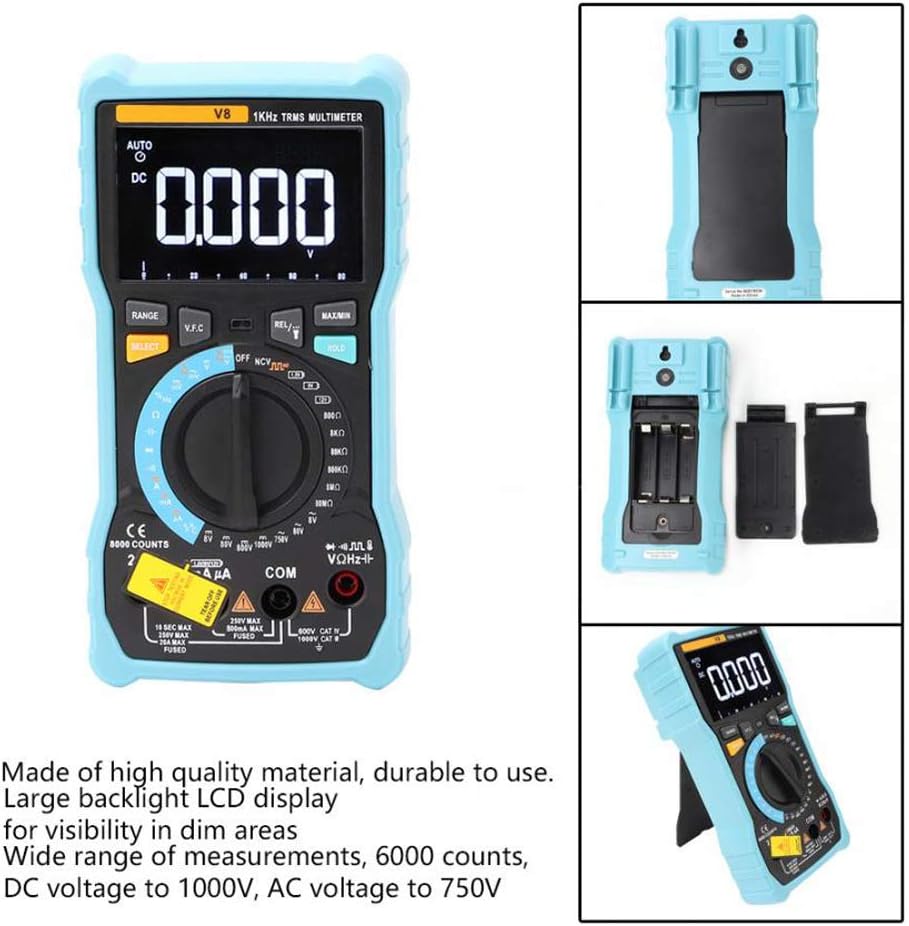
છબી: પાછળનો ભાગ view of the multimeter with the battery compartment open, illustrating the correct placement for three AA batteries.
4. ઓપરેટિંગ સૂચનાઓ
Before any measurement, ensure the test leads are correctly inserted into the input jacks and the rotary switch is set to the appropriate function.
4.1 Measuring DC/AC Voltage
- Set the rotary switch to the 'V–' (DC Voltage) or 'V~' (AC Voltage) સ્થિતિ.
- લાલ ટેસ્ટ લીડને 'VΩmA' જેક સાથે અને કાળા ટેસ્ટ લીડને 'COM' જેક સાથે જોડો.
- તમે જે સર્કિટ અથવા ઘટકને માપવા માંગો છો તેની સમાંતર ટેસ્ટ લીડ્સને જોડો.
- ભાગ વાંચોtagડિસ્પ્લે પર e મૂલ્ય.
4.2 Measuring DC/AC Current
- Set the rotary switch to the 'A–' (DC Current) or 'A~' (AC Current) position. For milliampere (mA) or microampere (µA) measurements, select the corresponding range.
- For current up to 800mA, connect the red test lead to the 'VΩmA' jack. For current up to 20A, connect the red test lead to the '20A' jack. Connect the black test lead to the 'COM' jack.
- Disconnect power to the circuit. Open the circuit where you want to measure current. Connect the multimeter in series with the circuit.
- સર્કિટ પર પાવર લગાવો અને ડિસ્પ્લે પર વર્તમાન મૂલ્ય વાંચો.
4.3 પ્રતિકાર માપવા
- Set the rotary switch to the 'Ω' (Resistance) position.
- લાલ ટેસ્ટ લીડને 'VΩmA' જેક સાથે અને કાળા ટેસ્ટ લીડને 'COM' જેક સાથે જોડો.
- Ensure the circuit is de-energized and all capacitors are discharged. Connect the test leads across the component to be measured.
- ડિસ્પ્લે પર પ્રતિકાર મૂલ્ય વાંચો.
૫.૬ એનસીવી (નોન-કોન્ટેક્ટ વોલ્યુમtage) તપાસ
- Set the rotary switch to the 'NCV' position.
- Move the top end of the multimeter near the conductor or outlet.
- The multimeter will emit an audible beep and the NCV indicator light will flash if AC voltage is detected, indicating the presence of live voltagશારીરિક સંપર્ક વિના.
4.5 તાપમાન માપન
- Set the rotary switch to the '°C/°F' (Temperature) position.
- Connect the temperature probe to the 'VΩmA' and 'COM' jacks, observing polarity if applicable.
- Place the tip of the temperature probe on or near the object whose temperature you wish to measure.
- ડિસ્પ્લે પર તાપમાન મૂલ્ય વાંચો.
4.6 અન્ય કાર્યો
- ક્ષમતા: Set the rotary switch to the 'F' position. Connect leads across the discharged capacitor.
- આવર્તન/ફરજ ચક્ર: Set the rotary switch to the 'Hz/%' position. Connect leads to the signal source.
- ડાયોડ ટેસ્ટ: Set the rotary switch to the 'Diode' position. Connect leads across the diode.
- સાતત્ય પરીક્ષણ: Set the rotary switch to the 'Continuity' position. Connect leads across the circuit. An audible beep indicates continuity.
- બેટરી ટેસ્ટ: Set the rotary switch to the 'Battery' position. Connect leads to the battery terminals (1.5V, 9V, or 12V).
- ડેટા હોલ્ડ: ડિસ્પ્લે પર વર્તમાન રીડિંગ ફ્રીઝ કરવા માટે 'હોલ્ડ' બટન દબાવો. રિલીઝ કરવા માટે ફરીથી દબાવો.
- Backlight/Flashlight: Press the backlight button to turn on/off the display backlight or flashlight.
- ઓટો પાવર બંધ: The multimeter will automatically power off after a period of inactivity to conserve battery life.
5. જાળવણી
5.1 સફાઈ
જાહેરાત સાથે કેસ સાફ કરોamp કાપડ અને હળવા ડિટર્જન્ટનો ઉપયોગ કરો. ઘર્ષક અથવા દ્રાવકનો ઉપયોગ કરશો નહીં. ઇનપુટ ટર્મિનલ્સને ગંદકી અને ભેજથી મુક્ત રાખો.
5.2 ફ્યુઝ રિપ્લેસમેન્ટ
જો વર્તમાન માપન કાર્ય નિષ્ફળ જાય, તો ફ્યુઝને બદલવાની જરૂર પડી શકે છે. સાચા ફ્યુઝ પ્રકાર અને રેટિંગ માટે સ્પષ્ટીકરણોનો સંદર્ભ લો. ફ્યુઝ રિપ્લેસમેન્ટ ફક્ત લાયક કર્મચારીઓ દ્વારા જ કરવું જોઈએ.
5.3 સંગ્રહ
When not in use for extended periods, remove the batteries to prevent leakage and store the multimeter in a dry, cool place.
6. મુશ્કેલીનિવારણ
- કોઈ ડિસ્પ્લે નથી: બેટરી ઇન્સ્ટોલેશન અને ચાર્જ તપાસો. જો જરૂરી હોય તો બેટરી બદલો.
- ખોટા વાંચન: Ensure the rotary switch is set to the correct function and range. Check test lead connections. Verify battery charge.
- વર્તમાન માપન કામ કરતું નથી: Check the fuse. Replace if blown (refer to fuse replacement section).
- NCV શોધી શકાતું નથી: Ensure the NCV function is selected and the multimeter is close enough to the AC voltage સ્ત્રોત.
7. સ્પષ્ટીકરણો
| પરિમાણ | મૂલ્ય |
|---|---|
| ડિસ્પ્લે | બેકલાઇટ સાથે 8000 કાઉન્ટ્સ એલસીડી |
| ડીસી વોલ્યુમtage (V) | 8.000V / 80.00V / 800.0V / 1000V |
| ડીસી વોલ્યુમtage (mV) | 800mV |
| એસી વોલ્યુમtage (V) | 8.000 વી / 80.00 વી / 750 વી |
| એસી વોલ્યુમtage (mV) | 800mV |
| DC કરંટ (A) | 8.000A/20.00A |
| DC કરંટ (mA) | 8.000mA / 80.00mA / 800.0mA |
| ડીસી કરંટ (µA) | 800µA / 8000µA |
| એસી કરંટ (A) | 8.000A/20.00A |
| AC કરંટ (mA) | 8.000mA / 80.00mA / 800.0mA |
| એસી કરંટ (µA) | 800µA / 8000µA |
| પ્રતિકાર | 800.0Ω / 8.000kΩ / 80.00kΩ / 800.0kΩ / 8.000MΩ / 80.00MΩ |
| ક્ષમતા | 9.999nF / 99.99nF / 999.9nF / 9.999µF / 99.99µF / 999.9µF / 9.999mF / 99.99mF |
| આવર્તન | 9.999Hz / 99.99Hz / 999.9Hz / 9.999kHz / 99.99kHz / 999.9kHz / 9.999MHz |
| ફરજ ચક્ર | 1% ~ 99% |
| તાપમાન શ્રેણી | -20°C ~ 1000°C (-4°F ~ 1832°F) |
| બેટરી ટેસ્ટ | 1.5 વી / 9 વી / 12 વી |
| રેન્જિંગ | સ્વત / / મેન્યુઅલ |
| અપડેટ દર | 3 વખત/સેકન્ડ |
| સાચું RMS | હા |
| ડેટા હોલ્ડ | હા |
| બેકલાઇટ/ફ્લેશલાઇટ | હા |
| ઓછી બેટરી ચેતવણી | હા |
| ઓટો પાવર બંધ | હા |
| સામગ્રી | ABS / PVC |
| પાવર સ્ત્રોત | બેટરી સંચાલિત |
8. વોરંટી અને સપોર્ટ
This product is covered by a standard manufacturer's warranty against defects in materials and workmanship. Please refer to the warranty card included with your purchase for specific terms and conditions. For technical support or service inquiries, please contact your retailer or the manufacturer's customer service department.
૧૦. સત્તાવાર ઉત્પાદન વિડિઓઝ
આ સમયે એમ્બેડ કરવા માટે વિક્રેતા તરફથી કોઈ સત્તાવાર ઉત્પાદન વિડિઓઝ ઉપલબ્ધ નથી.