
1. પરિચય
The Raspberry Pi Zero 2 W is a compact, high-performance single-board computer designed for a wide range of applications, from embedded systems to IoT projects. It features a powerful quad-core processor and integrated wireless connectivity, making it a versatile tool for developers and hobbyists.
મુખ્ય લક્ષણો:
- Broadcom BCM2710A1, quad-core 64-bit SoC (Arm Cortex-A53 @ 1GHz)
- 512MB RAM (DDR2 SDRAM)
- Integrated Wi-Fi (2.4GHz 802.11 b/g/n)
- Integrated Bluetooth 4.2 / Bluetooth Low Energy (BLE)
- Mini HDMI port for video output
- Two Micro USB ports (one for power, one for data/OTG)
- MicroSD card slot for operating system and storage
- 40-pin GPIO header for expansion
- CSI-2 કેમેરા કનેક્ટર

આકૃતિ 1: ઓવરview of the Raspberry Pi Zero 2 W board, showcasing its compact size and various ports and components.
2. સેટઅપ માર્ગદર્શિકા
Follow these steps to set up your Raspberry Pi Zero 2 W:
- માઇક્રોએસડી કાર્ડ તૈયાર કરો:
The Raspberry Pi Zero 2 W requires an operating system installed on a microSD card. Download the desired OS image (e.g., Raspberry Pi OS Lite) from the official Raspberry Pi website. Use an imaging tool like Raspberry Pi Imager to write the OS image to a microSD card (minimum 8GB recommended).
- Connect Display (Optional):
If you require a graphical interface, connect a display to the Mini HDMI port using a Mini HDMI to HDMI adapter or cable. Ensure your display is powered on.
- Connect Peripherals (Optional):
For initial setup or desktop use, you may need to connect a keyboard and mouse. Use a Micro USB OTG (On-The-Go) cable to connect a USB hub to the data Micro USB port (labeled 'USB'). Then, connect your keyboard and mouse to the USB hub.
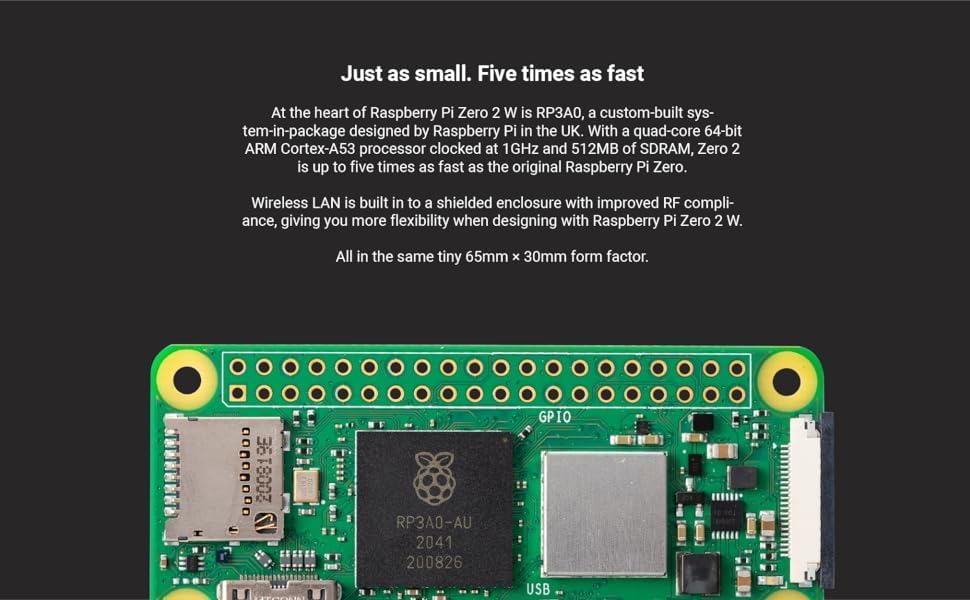
Figure 2: Raspberry Pi Zero 2 W connected to essential peripherals like a keyboard and mouse for initial configuration.
- માઇક્રોએસડી કાર્ડ દાખલ કરો:
Carefully insert the prepared microSD card into the microSD card slot on the Raspberry Pi Zero 2 W.
- પાવર લાગુ કરો:
Connect a 5V power supply to the power Micro USB port (labeled 'PWR IN'). The Raspberry Pi Zero 2 W will begin to boot. Observe the activity LED for boot status.

આકૃતિ 3: વિગતવાર view of the Micro USB ports on the Raspberry Pi Zero 2 W, indicating the power input and data/OTG ports.
3. ઓપરેશન
Once your Raspberry Pi Zero 2 W has successfully booted, you can interact with it based on the installed operating system. Most users will interact via a command-line interface (CLI) or a graphical desktop environment (if a full OS like Raspberry Pi OS Desktop is installed).
મૂળભૂત ઉપયોગ:
- Accessing the Desktop: If you installed a desktop version of Raspberry Pi OS, the desktop environment will load automatically.
- કમાન્ડ લાઇન ઇન્ટરફેસ (CLI): For headless setups or advanced users, access the CLI via SSH (Secure Shell) from another computer on the same network. Ensure SSH is enabled on your Raspberry Pi.
- વાયરલેસ કનેક્ટિવિટી: The integrated Wi-Fi and Bluetooth allow for network access and peripheral connections without external adapters. Configure Wi-Fi through the OS settings or command line.
- GPIO પિન: The 40-pin GPIO header provides a versatile interface for connecting sensors, actuators, and other electronic components for custom projects. Refer to the official Raspberry Pi documentation for GPIO pinout and programming guides.
4. જાળવણી
Proper maintenance ensures the longevity and optimal performance of your Raspberry Pi Zero 2 W.
- સૉફ્ટવેર અપડેટ્સ: Regularly update your operating system and installed software to ensure security and access to the latest features. Use commands like
sudo apt updateઅનેsudo apt full-upgradeon Debian-based systems. - પાવર સપ્લાય: Always use a stable 5V power supply with sufficient current (e.g., 2.5A) to prevent power-related issues.
- ભૌતિક વાતાવરણ: Keep the board in a clean, dry environment. Avoid extreme temperatures and humidity. Consider a protective case for long-term use.
- સલામત શટડાઉન: Always shut down the Raspberry Pi Zero 2 W gracefully through the operating system (e.g.,
sudo shutdown now) before disconnecting power to prevent data corruption on the microSD card.
5. મુશ્કેલીનિવારણ
તમને આવી શકે તેવી સામાન્ય સમસ્યાઓના ઉકેલો અહીં આપેલા છે:
- No Power/Boot:
Ensure the power supply is correctly connected to the 'PWR IN' Micro USB port and provides adequate voltage and current. Check the power LED on the board; if it's not lit, there might be a power issue. Verify the microSD card is properly inserted and contains a valid OS image.
- કોઈ ડિસ્પ્લે આઉટપુટ નથી:
Confirm the Mini HDMI cable and adapter are securely connected to both the Raspberry Pi and the display. Test with a different Mini HDMI cable or display if possible. Ensure the display is set to the correct input source. Some users have reported issues with analog video output on older firmware; ensure your OS is up to date if using composite video.
- વાઇ-ફાઇ/બ્લુટુથ કનેક્ટિવિટી સમસ્યાઓ:
Check your OS settings to ensure Wi-Fi and Bluetooth are enabled and configured correctly. Verify your network credentials. Ensure there are no physical obstructions or excessive distance from your wireless access point.
- Peripherals Not Detected:
If using a USB hub, ensure it is powered and connected to the 'USB' Micro USB port via an OTG cable. Test peripherals directly if possible or with a different hub. Ensure the OS has the necessary drivers (usually included with Raspberry Pi OS).
6. ટેકનિકલ વિશિષ્ટતાઓ
| લક્ષણ | વિગત |
|---|---|
| પ્રોસેસર | Broadcom BCM2710A1, quad-core 64-bit SoC (Arm Cortex-A53 @ 1GHz) |
| રેમ | 512MB DDR2 SDRAM |
| વાયરલેસ કનેક્ટિવિટી | 2.4GHz 802.11 b/g/n Wi-Fi, Bluetooth 4.2 / BLE |
| વિડિઓ આઉટપુટ | Mini HDMI, Composite video (via test points) |
| યુએસબી પોર્ટ્સ | 1x Micro USB (Power In), 1x Micro USB (Data/OTG) |
| સંગ્રહ | માઇક્રોએસડી કાર્ડ સ્લોટ |
| GPIO | 40-pin GPIO header (unsoldered) |
| કેમેરા કનેક્ટર | CSI-2 કેમેરા કનેક્ટર |
| પરિમાણો | 65mm x 30mm x 5mm (2.6" x 1.18" x 0.2") |
| ઓપરેટિંગ સિસ્ટમ | Linux (e.g., Raspberry Pi OS) |
7. વોરંટી અને સપોર્ટ
For warranty information and technical support, please refer to the official Raspberry Pi webસાઇટ પર જાઓ અથવા તમારા રિટેલરનો સંપર્ક કરો. કોઈપણ વોરંટી દાવા માટે ખરીદીનો પુરાવો રાખો.
સત્તાવાર રાસ્પબેરી પી Webસાઇટ: www.raspberrypi.org


