
1. પરિચય
This manual provides detailed instructions for the safe and efficient operation of your InFocus P120 INL412 Multimedia Projector (Model INL4128). Please read this manual thoroughly before using the projector and keep it for future reference. This projector is designed for high-quality image projection, suitable for various applications including presentations, home entertainment, and gaming.
2. સલામતી માહિતી
પ્રોજેક્ટરને નુકસાન થતું અટકાવવા અને વપરાશકર્તાની સલામતી સુનિશ્ચિત કરવા માટે નીચેની સલામતી સાવચેતીઓનું પાલન કરો:
- વેન્ટિલેશન: Ensure adequate ventilation around the projector. Do not block ventilation openings. Maintain a minimum distance of 30 cm (12 inches) from walls or other objects.
- પાવર સ્ત્રોત: ફક્ત ઉલ્લેખિત પાવર સપ્લાય અને વોલ્યુમનો ઉપયોગ કરોtage. Connect the power cord securely.
- ઉષ્મા: The projector generates heat during operation. Do not touch the projector's vents or exhaust areas directly after use.
- પ્રકાશ આઉટપુટ: જ્યારે lamp is on, as the intense light can cause eye damage.
- પ્લેસમેન્ટ: Place the projector on a stable, level surface. Avoid placing it in direct sunlight, near heat sources, or in areas with high humidity or dust.
- સફાઈ: સફાઈ કરતા પહેલા પાવર કોર્ડ ડિસ્કનેક્ટ કરો. નરમ, સૂકા કપડાનો ઉપયોગ કરો. પ્રવાહી અથવા એરોસોલ ક્લીનર્સનો ઉપયોગ કરશો નહીં.
- સર્વિસિંગ: પ્રોજેક્ટરની જાતે સર્વિસ કરવાનો પ્રયાસ કરશો નહીં. બધી સર્વિસિંગ લાયકાત ધરાવતા સેવા કર્મચારીઓને સોંપો.
3. ઉત્પાદન ઓવરview
3.1 Top Panel and Lens Area
The top panel features the control buttons for basic operation and the lens area with focus and zoom adjustments.

આકૃતિ 3.1: ટોચ view of the InFocus P120 INL412 projector, highlighting the control panel on the right and the lens adjustment area on the left. The InFocus logo is visible on the top surface.
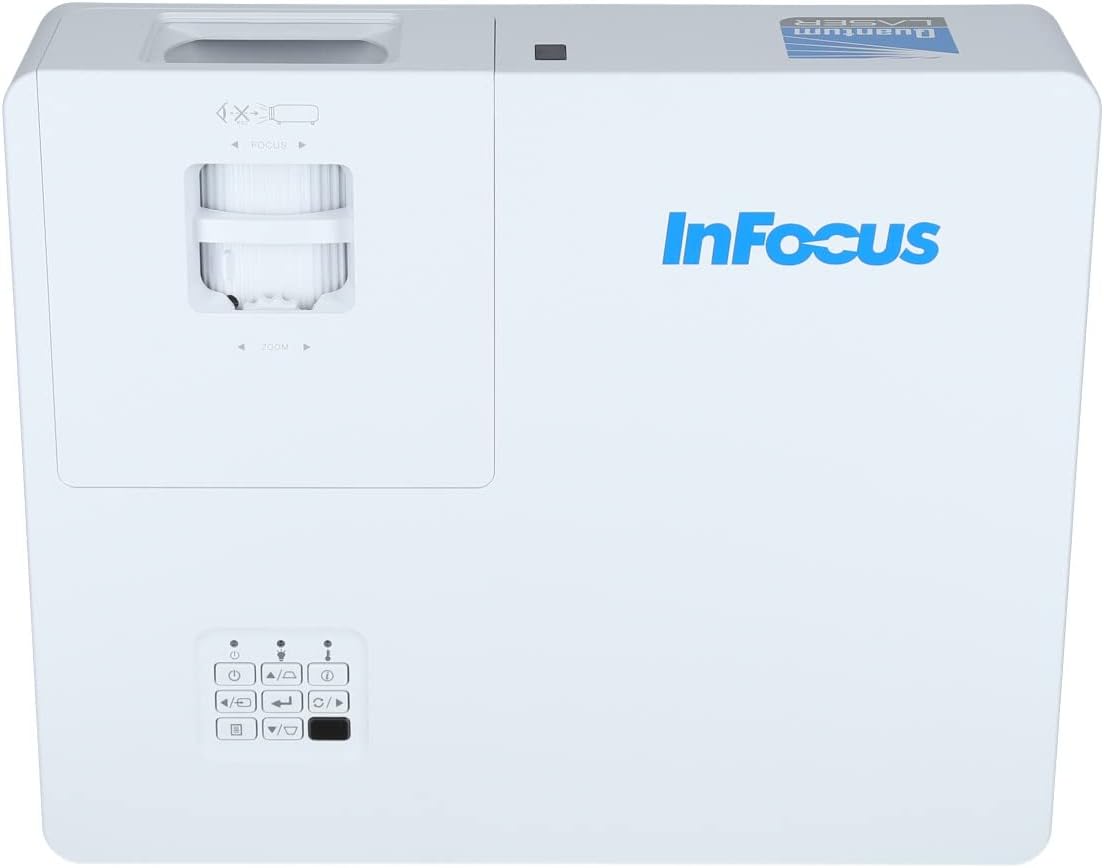
આકૃતિ 3.2: નજીક view of the projector's top panel, showing the focus and zoom rings near the lens opening and the array of control buttons for power, menu, source selection, and navigation.
3.2 રીઅર પેનલ કનેક્શન્સ
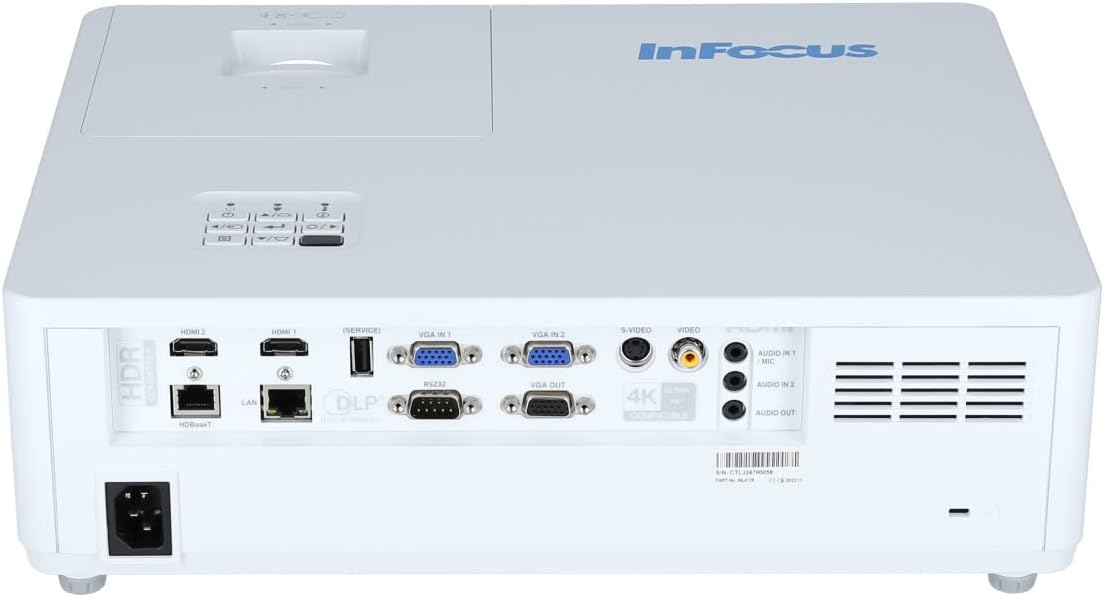
The rear panel provides various input and output ports for connecting external devices.

Figure 3.3: Rear panel of the InFocus P120 INL412 projector, displaying a comprehensive array of connectivity options including HDMI (x2), USB, S-Video, Ethernet (LAN), VGA In (x2), VGA Out, RS232, and Audio In/Out ports. The power input is located on the bottom left.
મુખ્ય પોર્ટમાં શામેલ છે:
- HDMI 1 અને 2: For connecting high-definition digital video and audio sources.
- યુએસબી: For connecting USB devices, potentially for media playback or firmware updates.
- S-વિડિયો: For connecting older video sources.
- VGA IN 1 & 2: For connecting computers or other devices with VGA output.
- VGA આઉટ: For connecting to an external monitor.
- ઇથરનેટ (LAN): નેટવર્ક કનેક્ટિવિટી અને નિયંત્રણ માટે.
- Audio IN 1 & 2 / Audio OUT: For analog audio connections.
- આરએસ 232: For serial control.
- પાવર ઇનપુટ: AC પાવર કોર્ડ કનેક્ટ કરવા માટે.
3.3 Front and Side Panels
The front panel houses the projection lens and front ventilation, while the side panels feature additional ventilation grilles.

આકૃતિ 3.4: ફ્રન્ટ view of the InFocus P120 INL412 projector, displaying the main projection lens on the right and the extensive front ventilation grille on the left, crucial for heat dissipation.
આકૃતિ 3.5: બાજુ view of the InFocus P120 INL412 projector, illustrating the side ventilation grilles that contribute to maintaining optimal operating temperature.
4. સેટઅપ
૪.૧ પ્રોજેક્ટર પ્લેસમેન્ટ
Position the projector on a stable, flat surface or mount it securely. Ensure the projector is within the optimal projection distance for your screen size. Maintain clear space around the projector for proper ventilation.
4.2 કનેક્ટિંગ ઉપકરણો
Before connecting any cables, ensure the projector and all source devices are powered off.
- HDMI કનેક્શન: Connect an HDMI cable from your source device (e.g., laptop, Blu-ray player, gaming console) to either the HDMI 1 or HDMI 2 port on the projector.
- VGA કનેક્શન: Connect a VGA cable from your computer to either VGA IN 1 or VGA IN 2. For audio, connect a separate audio cable from your computer's audio output to the corresponding Audio IN port on the projector.
- યુએસબી કનેક્શન: Insert a USB drive into the USB port for media playback (if supported by firmware) or service functions.
- ઇથરનેટ (LAN) કનેક્શન: Connect an Ethernet cable to the LAN port for network control or updates.
- ઓડિયો આઉટપુટ: If using external speakers, connect an audio cable from the Audio OUT port on the projector to your audio system.
4.3 પાવર કનેક્શન
Connect the power cord to the projector's power input and then plug the other end into a grounded electrical outlet.
5. ઓપરેટિંગ સૂચનાઓ
5.1 પાવરિંગ ચાલુ/બંધ
- પાવર ચાલુ: દબાવો શક્તિ button on the projector's control panel or the remote control. The power indicator light will change.
- પાવર બંધ: દબાવો શક્તિ button again. A confirmation message may appear. Press the button a second time to confirm shutdown. Allow the projector to cool down before unplugging it.
૪.૩ ફોકસ અને ઝૂમ ગોઠવવું
Rotate the focus ring around the lens until the image appears sharp and clear. Use the zoom ring to adjust the image size to fit your screen.
૬.૨ ઇનપુટ સ્ત્રોત પસંદ કરવો
દબાવો સ્ત્રોત button on the control panel or remote control to cycle through available input sources (HDMI 1, HDMI 2, VGA 1, VGA 2, S-Video, USB). Select the input corresponding to your connected device.
5.4 મેનુ નેવિગેશન
નો ઉપયોગ કરો મેનુ button to access the on-screen display (OSD) menu. Use the arrow buttons to navigate through menu options and the દાખલ કરો પસંદ કરવા માટે બટન. દબાવો મેનુ ફરીથી બહાર નીકળવા માટે.
6. જાળવણી
૭.૧ લેન્સ સાફ કરવું
Gently wipe the lens with a soft, lint-free cloth specifically designed for optical surfaces. Do not use abrasive cleaners or excessive force, as this can scratch the lens.
6.2 Cleaning the Projector Exterior
Use a soft, dry cloth to clean the projector's casing. For stubborn dirt, dampen the cloth slightly with water, then wipe dry immediately. Avoid getting liquids into the projector's openings.
6.3 Ventilation Care
Regularly check the projector's ventilation grilles for dust accumulation. Use a soft brush or a vacuum cleaner with a brush attachment to gently remove dust from the vents to ensure proper airflow and prevent overheating.
7. મુશ્કેલીનિવારણ
૭.૧ કોઈ છબી પ્રદર્શિત નથી
- ખાતરી કરો કે પ્રોજેક્ટર ચાલુ છે અને પાવર ઇન્ડિકેટર લાઇટ મજબૂત છે.
- Verify that the video cable (HDMI, VGA, etc.) is securely connected to both the projector and the source device.
- Check that the correct input source is selected on the projector.
- Confirm that the source device (laptop, player) is powered on and outputting a signal.
7.2 Image is Blurry or Out of Focus
- છબી શાર્પ ન થાય ત્યાં સુધી પ્રોજેક્ટર લેન્સ પર ફોકસ રિંગ ગોઠવો.
- Ensure the projector is at the correct distance from the screen.
- Clean the projector lens if it appears dirty.
7.3 કોઈ અવાજ નથી
- If using HDMI, ensure the source device's audio output is set to HDMI.
- If using VGA, ensure a separate audio cable is connected from the source to the projector's Audio IN port.
- પ્રોજેક્ટર અને સોર્સ ડિવાઇસ બંને પર વોલ્યુમ સેટિંગ્સ તપાસો.
- If using external speakers, ensure they are properly connected to the Audio OUT port and powered on.
8. સ્પષ્ટીકરણો
| લક્ષણ | વિગત |
|---|---|
| બ્રાન્ડ | ઇનફોકસ |
| ઉત્પાદક | ફોકસમાં |
| મોડેલનું નામ | P120 INL412 |
| મોડલ નંબર | INL4128 |
| વર્ષ | 2023 |
| હાર્ડવેર ઇંટરફેસ | Ethernet, HDMI, S-Video, USB |
| વસ્તુઓની સંખ્યા | 1 |
| પાસા રેશિયો | 16:9 |
| વાટtage | 341 વોટ |
| બેટરી સમાવાયેલ | ના |
| બેટરી જરૂરી છે | ના |
| ફોર્મ ફેક્ટર | ડેસ્કટોપ |
| માઉન્ટિંગ પ્રકાર | ટેબલ માઉન્ટ |
| રીમોટ કંટ્રોલ શામેલ છે | હા |
| ઉત્પાદન પરિમાણો | 56.13 x 46.48 x 25.15 સેમી |
| વસ્તુનું વજન | 5.5 કિગ્રા |
| મહત્તમ છબી કદ | 308.28 ઇંચ |
| ન્યૂનતમ છબી કદ | 910.63 મિલીમીટર |
| પ્રથમ ઉપલબ્ધ તારીખ | 5 જાન્યુઆરી, 2022 |
9. વોરંટી અને સપોર્ટ
For warranty information and technical support, please refer to the documentation included with your purchase or visit the official InFocus webસાઇટ. વોરંટી દાવાઓ માટે તમારી ખરીદીનો પુરાવો રાખો.


