1. પરિચય
This manual provides instructions for the safe operation, maintenance, and troubleshooting of your FLEX 24V Brushless Cordless 1/2-Inch Hammer Drill Turbo Mode Kit, model FX1271T-2B. Please read this manual thoroughly before using the tool to ensure proper and safe operation.
The FLEX FX1271T-2B is a powerful 24V brushless cordless hammer drill designed for demanding drilling and driving applications. It features a 1/2-inch full-metal ratcheting chuck, two-speed settings, a Turbo Mode for increased speed, and an anti-kickback safety feature. This kit includes the drill, a 2.5Ah Lithium-Ion Battery, a 5.0Ah Lithium-Ion Battery, and a 160W Fast Charger.
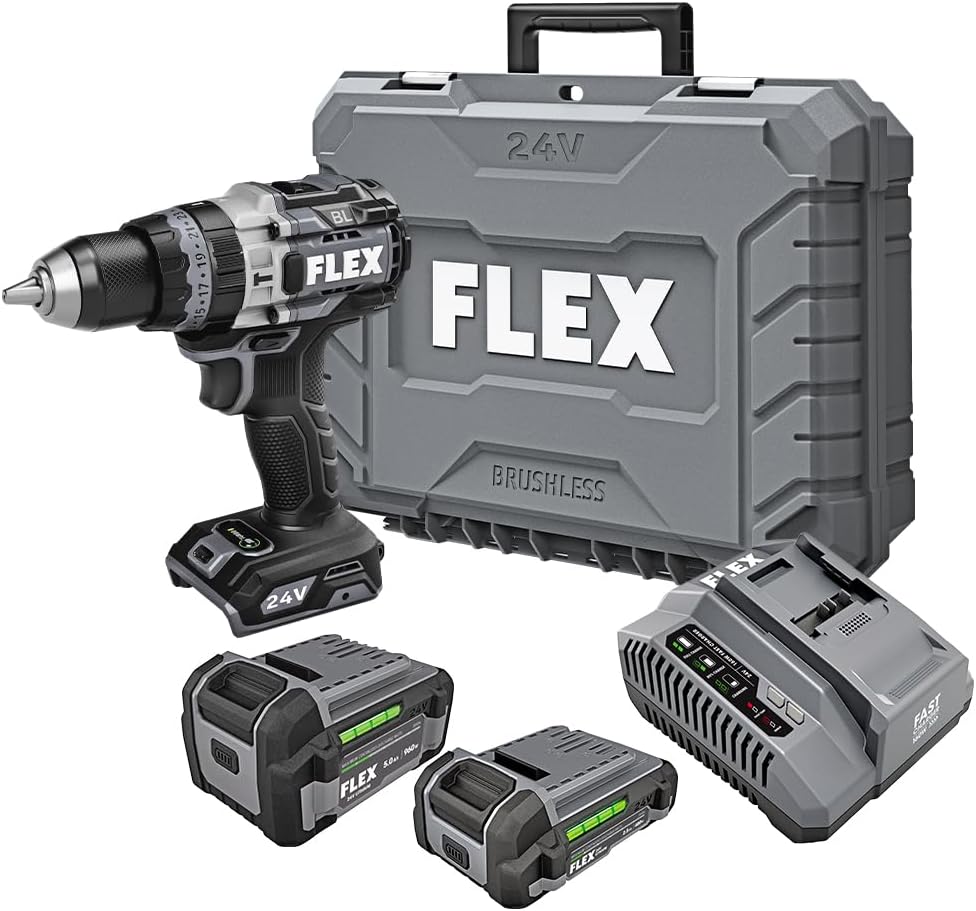
Figure 1: FLEX 24V Brushless Cordless 1/2-Inch Hammer Drill Kit (FX1271T-2B) including drill, two batteries, charger, and carrying case.
2. સામાન્ય સલામતી સૂચનાઓ
ચેતવણી: આ પાવર ટૂલ સાથે પૂરી પાડવામાં આવેલ તમામ સુરક્ષા ચેતવણીઓ, સૂચનાઓ, ચિત્રો અને વિશિષ્ટતાઓ વાંચો. નીચે સૂચિબદ્ધ તમામ સૂચનાઓનું પાલન કરવામાં નિષ્ફળતાના પરિણામે ઇલેક્ટ્રિક આંચકો, આગ અને/અથવા ગંભીર ઈજા થઈ શકે છે.
2.1 કાર્ય ક્ષેત્રની સલામતી
- કાર્યક્ષેત્રને સ્વચ્છ અને સારી રીતે પ્રકાશિત રાખો. અવ્યવસ્થિત અથવા અંધારાવાળા વિસ્તારો અકસ્માતોને આમંત્રણ આપે છે.
- વિસ્ફોટક વાતાવરણમાં, જેમ કે જ્વલનશીલ પ્રવાહી, વાયુઓ અથવા ધૂળની હાજરીમાં પાવર ટૂલ્સનું સંચાલન કરશો નહીં. પાવર ટૂલ્સ સ્પાર્ક બનાવે છે જે ધૂળ અથવા ધૂમાડાને સળગાવી શકે છે.
- પાવર ટૂલ ચલાવતી વખતે બાળકો અને નજીકના લોકોને દૂર રાખો. વિચલિત થવાથી તમે નિયંત્રણ ગુમાવી શકો છો.
2.2 ઇલેક્ટ્રિકલ સલામતી
- પાવર ટૂલ પ્લગ આઉટલેટ સાથે મેળ ખાતા હોવા જોઈએ. કોઈપણ રીતે પ્લગને ક્યારેય સંશોધિત કરશો નહીં. માટીવાળા (ગ્રાઉન્ડેડ) પાવર ટૂલ્સ સાથે કોઈપણ એડેપ્ટર પ્લગનો ઉપયોગ કરશો નહીં. અસંશોધિત પ્લગ અને મેચિંગ આઉટલેટ્સ ઇલેક્ટ્રિક શોકનું જોખમ ઘટાડશે.
- પાઈપો, રેડિએટર્સ, રેન્જ અને રેફ્રિજરેટર્સ જેવી માટીવાળી અથવા જમીનવાળી સપાટી સાથે શરીરના સંપર્કને ટાળો. જો તમારું શરીર માટી અથવા ગ્રાઉન્ડેડ હોય તો ઇલેક્ટ્રિક શોકનું જોખમ વધારે છે.
- વરસાદ અથવા ભીની સ્થિતિમાં પાવર ટૂલ્સને ખુલ્લા પાડશો નહીં. પાવર ટૂલમાં પાણી પ્રવેશવાથી ઇલેક્ટ્રિક શોકનું જોખમ વધશે.
2.3 વ્યક્તિગત સલામતી
- હંમેશા આંખનું રક્ષણ કરો. સલામતી ચશ્મા, ગોગલ્સ અથવા ફેસ શીલ્ડનો ઉપયોગ કરો.
- લાંબા સમય સુધી સાધન ચલાવતી વખતે શ્રવણ સુરક્ષા પહેરો.
- યોગ્ય રીતે વસ્ત્ર. છૂટક કપડાં કે ઘરેણાં ન પહેરો. તમારા વાળ અને કપડાંને ફરતા ભાગોથી દૂર રાખો.
- સાવચેત રહો, તમે શું કરી રહ્યા છો તે જુઓ અને પાવર ટૂલ ચલાવતી વખતે સામાન્ય સમજનો ઉપયોગ કરો.
2.4 સાધનનો ઉપયોગ અને કાળજી
- પાવર ટૂલ પર દબાણ કરશો નહીં. તમારી એપ્લિકેશન માટે યોગ્ય પાવર ટૂલનો ઉપયોગ કરો.
- કોઈપણ ગોઠવણો કરવા, એક્સેસરીઝ બદલતા અથવા પાવર ટૂલ્સ સ્ટોર કરતા પહેલા પાવર ટૂલમાંથી બેટરી પેકને ડિસ્કનેક્ટ કરો.
- નિષ્ક્રિય પાવર ટૂલ્સને બાળકોની પહોંચની બહાર સ્ટોર કરો અને પાવર ટૂલ અથવા આ સૂચનાઓથી અજાણ વ્યક્તિઓને પાવર ટૂલ ચલાવવાની મંજૂરી આપશો નહીં.
- પાવર ટૂલ્સ અને એસેસરીઝની જાળવણી કરો. મૂવિંગ પાર્ટ્સનું મિસલાઈનમેન્ટ અથવા બાઈન્ડિંગ, ભાગોનું તૂટવું અને પાવર ટૂલની કામગીરીને અસર કરી શકે તેવી અન્ય કોઈપણ સ્થિતિ માટે તપાસો.
2.5 બેટરી ટૂલનો ઉપયોગ અને કાળજી
- ઉત્પાદક દ્વારા ઉલ્લેખિત ચાર્જરથી જ રિચાર્જ કરો. એક પ્રકારના બેટરી પેક માટે યોગ્ય ચાર્જર જ્યારે બીજા બેટરી પેક સાથે ઉપયોગમાં લેવામાં આવે ત્યારે આગ લાગવાનું જોખમ ઊભું કરી શકે છે.
- પાવર ટૂલ્સનો ઉપયોગ ફક્ત ખાસ નિયુક્ત બેટરી પેક સાથે કરો. કોઈપણ અન્ય બેટરી પેકનો ઉપયોગ ઈજા અને આગનું જોખમ ઉભું કરી શકે છે.
- જ્યારે બેટરી પેક ઉપયોગમાં ન હોય, ત્યારે તેને અન્ય ધાતુની વસ્તુઓથી દૂર રાખો, જેમ કે પેપર ક્લિપ્સ, સિક્કા, ચાવીઓ, નખ, સ્ક્રૂ અથવા અન્ય નાની ધાતુની વસ્તુઓ, જે એક ટર્મિનલથી બીજા ટર્મિનલ સાથે જોડાણ કરી શકે છે. બેટરી ટર્મિનલને એકસાથે ટૂંકાવી દેવાથી બળી શકે છે અથવા આગ લાગી શકે છે.
- અપમાનજનક સ્થિતિમાં, બેટરીમાંથી પ્રવાહી બહાર નીકળી શકે છે; સંપર્ક ટાળો. જો આકસ્મિક રીતે સંપર્ક થાય, તો પાણીથી ફ્લશ કરો. જો પ્રવાહી આંખોનો સંપર્ક કરે છે, તો તબીબી સહાય પણ લો. બેટરીમાંથી બહાર નીકળેલું પ્રવાહી બળતરા અથવા બળી શકે છે.
3. ઘટકો સમાવાયેલ
Your FLEX 24V Brushless Cordless 1/2-Inch Hammer Drill Kit (FX1271T-2B) includes the following items:
- FLEX 24V Brushless Cordless 1/2-Inch Hammer Drill
- (1) FLEX 24V 2.5Ah Lithium-Ion Battery (FX0111-1)
- (1) FLEX 24V 5.0Ah Lithium-Ion Battery (FX0121-1)
- FLEX 160W Fast Charger
- સહાયક હેન્ડલ
- કેસ વહન

Figure 2: The FLEX Advantage highlights the included 2.5Ah and 5.0Ah Lithium-Ion batteries, emphasizing their power, runtime, and fast charging capabilities.
4. સેટઅપ અને પ્રારંભિક ઉપયોગ
4.1 બેટરી ચાર્જ કરી રહી છે
- Connect the 160W Fast Charger to a standard power outlet.
- બેટરી પેકને ચાર્જર પર ત્યાં સુધી સ્લાઇડ કરો જ્યાં સુધી તે જગ્યાએ ક્લિક ન થાય.
- The charger's indicator lights will show the charging status. A fully charged battery will be indicated by a solid green light.
- એકવાર સંપૂર્ણ ચાર્જ થઈ ગયા પછી, ચાર્જરમાંથી બેટરી દૂર કરો.
4.2.૧ બેટરી સ્થાપિત કરી રહ્યા છીએ
- Align the battery pack with the battery port on the base of the drill handle.
- Slide the battery into the port until it locks securely into place. Ensure it is fully seated to prevent accidental dislodgement during operation.
- બેટરી દૂર કરવા માટે, બેટરી પેકની બાજુઓ પરના રિલીઝ બટન(ઓ) દબાવો અને તેને બહાર સ્લાઇડ કરો.
૪.૧ સહાયક હેન્ડલ જોડવું
For improved control and safety, especially during high-torque applications or hammer drilling, attach the auxiliary handle.
- સહાયક હેન્ડલ cl ઢીલું કરોamp તેને ઘડિયાળની વિરુદ્ધ દિશામાં ફેરવીને.
- Slide the handle over the front of the drill body, positioning it to your preferred angle.
- CL સજ્જડamp by rotating it clockwise until the handle is securely fastened.

Figure 3: The drill with the auxiliary handle attached, providing enhanced control and stability, particularly when the anti-kickback feature engages.
4.4 Installing Drill Bits or Accessories
- સલામતી માટે ખાતરી કરો કે ડ્રિલ બંધ છે અને બેટરી દૂર કરવામાં આવી છે.
- Grip the rear collar of the 1/2-inch full-metal ratcheting chuck and rotate the front collar counter-clockwise to open the chuck jaws.
- ડ્રિલ બીટ અથવા સહાયકને ચક જડબામાં સંપૂર્ણપણે દાખલ કરો.
- Rotate the front collar clockwise to tighten the chuck jaws firmly around the bit. The ratcheting mechanism will provide an audible click when securely tightened.
- Gently pull on the bit to ensure it is properly secured.

Figure 4: Detail of the 1/2-inch full-metal ratcheting chuck, designed for secure bit retention and durability.
5. ઓપરેટિંગ સૂચનાઓ
૬.૧ પાવર ચાલુ/બંધ અને ગતિ નિયંત્રણ
- ટ્રિગર સ્વિચ: Squeeze the trigger switch to turn the drill on. Release it to turn the drill off.
- ચલ ગતિ: The trigger switch is pressure-sensitive, allowing for variable speed control. Pressing the trigger further increases the speed.
- ફોરવર્ડ/રિવર્સ સિલેક્ટર: Located above the trigger, push the selector left for forward rotation (drilling/driving) and right for reverse rotation (removing screws). Center position locks the trigger for safety.
5.2 Gear Selection (2-Speed)
The drill features a 2-speed gearbox for optimal performance across various applications.
- ગિયર ૧ (ઓછી ગતિ, ઉચ્ચ ટોર્ક): Slide the gear selector switch to position '1'. Ideal for driving screws, drilling large holes, or applications requiring maximum torque.
- ગિયર 2 (હાઈ સ્પીડ, લોઅર ટોર્ક): Slide the gear selector switch to position '2'. Suitable for fast drilling of smaller holes in wood or metal.
NOTE: Always ensure the drill is stopped before changing gear settings to prevent damage to the gearbox.
5.3 Mode Selection (Drill, Drive, Hammer Drill)
Rotate the collar behind the chuck to select the desired operating mode:
- ડ્રિલ મોડ (ડ્રિલ આઇકન): For drilling holes in wood, metal, and plastics.
- Drive Mode (Screw Icon): For driving screws. The clutch settings (numbered ring) allow you to adjust the torque to prevent over-driving screws or damaging materials.
- હેમર ડ્રિલ મોડ (હેમર આઇકન): For drilling into masonry, brick, and concrete. This mode combines rotary action with a hammering motion.
5.4 ટર્બો મોડ
The Turbo Mode button, located on top of the drill, provides an immediate increase in speed for faster results when needed.
- દબાવો ટર્બો button during operation to engage maximum speed.
- Release the button to return to the previously selected speed setting.

Figure 5: The Turbo Mode button, when pressed, provides increased speed for rapid task completion.
5.5 Anti-Kickback Feature
The drill is equipped with an advanced anti-kickback braking technology. If the drill bit binds during operation, the system will detect the sudden rotational force and rapidly stop the motor to reduce the risk of kickback and potential injury.
૫.૪ ઇન્ટિગ્રેટેડ એલઇડી લાઇટ
An LED light is integrated into the drill to illuminate the work area, improving visibility in dimly lit conditions. The light activates when the trigger is pressed.

Figure 6: The integrated LED light provides illumination for improved visibility in dark work environments.
5.7 Drilling into Masonry (Hammer Drill Mode)
When drilling into masonry, brick, or concrete:
- Select Hammer Drill Mode.
- Ensure the auxiliary handle is securely attached and held firmly with both hands.
- Use appropriate masonry drill bits.
- Apply steady, firm pressure to the drill, allowing the hammering action to break up the material.

Figure 7: The FLEX hammer drill in action, demonstrating its capability to drill into tough materials with 1,400 in-lbs of torque.
6. જાળવણી
6.1 સફાઈ
- કોઈપણ સફાઈ અથવા જાળવણી કરતા પહેલા હંમેશા બેટરી પેકને ડિસ્કનેક્ટ કરો.
- વેન્ટિલેશન છિદ્રોમાંથી ધૂળ અને કાટમાળ સાફ કરવા માટે નરમ બ્રશ અથવા સંકુચિત હવાનો ઉપયોગ કરો.
- જાહેરાત સાથે ટૂલ હાઉસિંગ સાફ કરોamp કાપડ કઠોર રસાયણો અથવા ઘર્ષક ક્લીનર્સનો ઉપયોગ કરશો નહીં.
- યોગ્ય બીટ ગ્રિપિંગ સુનિશ્ચિત કરવા માટે ચક જડબાને સ્વચ્છ અને કાટમાળ મુક્ત રાખો.
6.2 સંગ્રહ
- ટૂલ, બેટરી અને ચાર્જરને સીધા સૂર્યપ્રકાશ અને ભેજથી દૂર ઠંડી, સૂકી જગ્યાએ સંગ્રહિત કરો.
- Ensure batteries are partially charged (not fully depleted or fully charged for long-term storage) before storing.
- Store the tool in its carrying case to protect it from damage.
7. મુશ્કેલીનિવારણ
| સમસ્યા | સંભવિત કારણ | ઉકેલ |
|---|---|---|
| ડ્રીલ શરૂ થતી નથી. | બેટરી ચાર્જ થયેલ નથી અથવા ખોટી રીતે ઇન્સ્ટોલ કરેલી નથી. Forward/Reverse selector in center (locked) position. | Charge battery and ensure it is securely installed. Move selector to forward or reverse position. |
| ઓપરેશન દરમિયાન વીજળીનો અભાવ. | બેટરી ચાર્જ ઓછો છે. ઓવરલોડ સુરક્ષા સક્રિય. | બેટરી રિચાર્જ કરો. Reduce pressure on the tool; allow it to cool down. |
| ચકમાં બીટ સરકી જાય છે. | ચક પૂરતો કડક થયો નથી. ચકના જડબા ગંદા અથવા ઘસાઈ ગયા છે. | ચકને મજબૂત રીતે ફરીથી સજ્જડ કરો. ચક જડબા સાફ કરો. જો સમસ્યા ચાલુ રહે, તો ચકને બદલવાની જરૂર પડી શકે છે. |
| અતિશય કંપન અથવા અવાજ. | ક્ષતિગ્રસ્ત અથવા વાંકી ડ્રિલ બીટ. છૂટક ઘટકો. | Replace drill bit. Check for loose screws or parts. If problem persists, discontinue use and contact service. |
8. સ્પષ્ટીકરણો
| લક્ષણ | વિગત |
|---|---|
| મોડલ નંબર | FX1271T-2B |
| ભાગtage | 24 વોલ્ટ |
| ચક માપ | ૧/૨-ઇંચ |
| ચકનો પ્રકાર | Full-Metal Ratcheting |
| મહત્તમ ટોર્ક | 1400 ઇંચ પાઉન્ડ |
| મહત્તમ રોટેશનલ સ્પીડ | 2500 RPM |
| ઝડપની સંખ્યા | 2 |
| બેટરી ક્ષમતા (શામેલ) | 2.5 Ah, 5.0 Ah Lithium-Ion |
| Charger Type (Included) | 160W ફાસ્ટ ચાર્જર |
| ખાસ લક્ષણો | Turbo Mode, Anti-Kickback, LED Light, Brushless Motor |
| વસ્તુનું વજન | ૧૧.૭૩ પાઉન્ડ (કિટ) |
| ઉત્પાદન પરિમાણો | 7.2"L x 4"W x 10"H (Tool) |
| શારકામ ક્ષમતા (લાકડું) | 2 ઇંચ |
| શારકામ ક્ષમતા (ધાતુ) | 2 ઇંચ |
9. વોરંટી અને સપોર્ટ
૮.૧ ફ્લેક્સ લિમિટેડ લાઇફટાઇમ વોરંટી
This FLEX tool is protected by the FLEX Limited Lifetime Warranty. To qualify for this warranty, you must register your new FLEX tool, battery, or charger within 30 days of purchase through December 31, 2025. Registration can be completed at registermyFLEX.com.
Please refer to the official FLEX website or your product packaging for full terms and conditions of the warranty.
9.2 ગ્રાહક સપોર્ટ
For technical assistance, replacement parts, or warranty claims, please contact FLEX customer support. Contact information can typically be found on the FLEX official webસાઇટ પર અથવા તમારા ઉત્પાદન પેકેજિંગ પર.
When contacting support, please have your model number (FX1271T-2B) and purchase date available.