
1. પરિચય
This manual provides essential information for the safe and effective operation of your Mastech MS8301A Digital Multimeter. Please read this manual thoroughly before using the device to ensure proper functionality and to prevent potential hazards. Keep this manual for future reference.
2. સલામતી માહિતી
Always adhere to the following safety precautions to avoid electric shock or personal injury, and to prevent damage to the multimeter or the equipment under test.
- સૂચનાઓ વાંચો: Understand all instructions and safety information before use.
- રેટેડ વોલ્યુમtage: રેટ કરેલ વોલ્યુમ કરતાં વધુ અરજી કરશો નહીંtage, as marked on the multimeter, between the terminals or between any terminal and ground.
- ટેસ્ટ લીડ્સ: Inspect test leads for damaged insulation or exposed metal. Replace if damaged.
- Circuit Disconnection: Disconnect the circuit power and discharge all high-voltagપ્રતિકાર, સાતત્ય, ડાયોડ અથવા કેપેસીટન્સનું પરીક્ષણ કરતા પહેલા e કેપેસિટર્સ.
- કાર્ય પસંદગી: ખાતરી કરો કે ફંક્શન સ્વીચ માપન માટે યોગ્ય સ્થિતિમાં છે.
- લાઈવ સર્કિટ્સ: Do not measure current on a live circuit with the test leads connected in parallel.
- સંચાલન પર્યાવરણ: Do not operate the multimeter in explosive gas, vapor, or damp વાતાવરણ
- વ્યક્તિગત રક્ષણાત્મક સાધનો: Always wear appropriate personal protective equipment, such as safety glasses, when working with electrical circuits.
- સલામતી રેટિંગ: This device is rated for CAT III 600V. Do not exceed this rating.
3. ઉત્પાદન ઓવરview
3.1 લક્ષણો
The Mastech MS8301A Digital Multimeter offers a range of features for various electrical measurements:
- પ્રદર્શન: 2000 ગણતરીઓ
- ડેટા હોલ્ડ: અનુકૂળ રેકોર્ડિંગ માટે પ્રદર્શિત વાંચનને સ્થિર કરે છે.
- Battery Tester: For 1.5V and 9V batteries.
- કોમ્પેક્ટ ડિઝાઇન: Product Size: 150mm x 74mm x 48mm (5.9" x 2.9" x 1.7")
- હલકો: Product Weight: 220g (0.48lb)

Image: Detailed features and specifications of the Mastech MS8301A multimeter, including display count, data hold, battery test function, and physical dimensions.
3.2 ઘટકો
The Mastech MS8301A package typically includes the following components:
- Mastech MS8301A Digital Multimeter Unit
- ટેસ્ટ લીડ્સ (લાલ અને કાળા)
- AAA Batteries (2x1.5V)
- Calibration Certificate (if applicable)
- ઝડપી પ્રારંભ માર્ગદર્શિકા
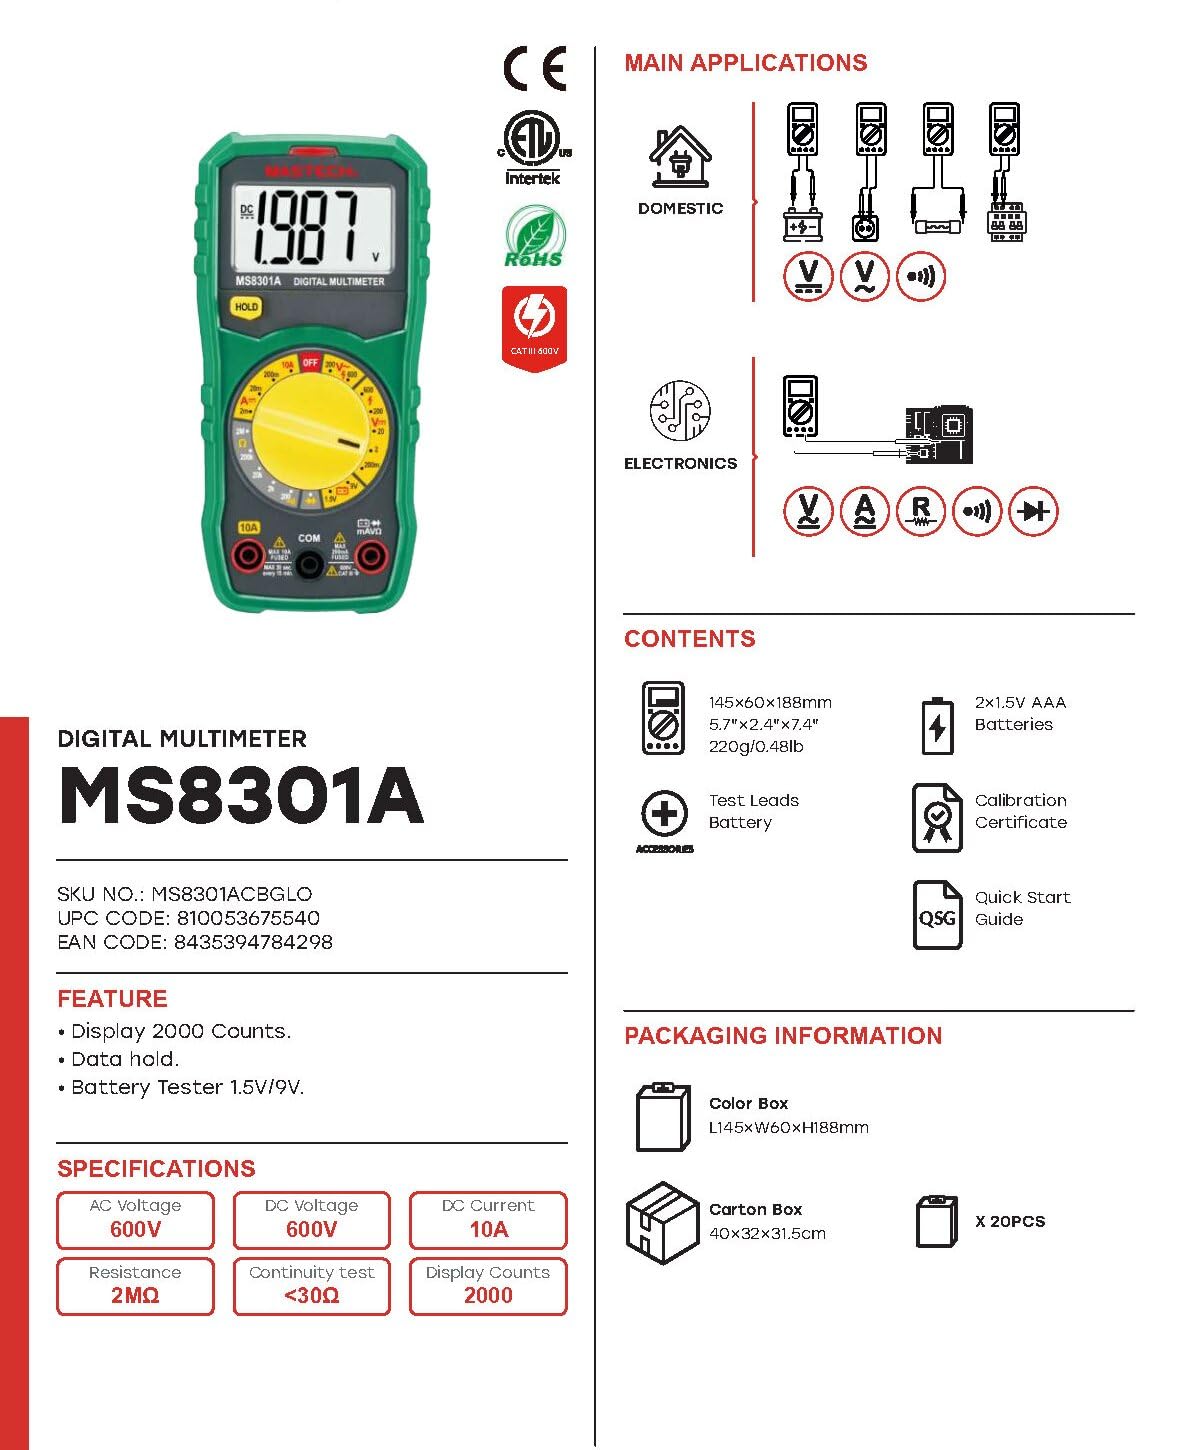
Image: The Mastech MS8301A Digital Multimeter showing its front panel, rotary switch, display, input jacks, and a list of included accessories such as test leads and batteries.
4. સેટઅપ
4.1 બેટરી ઇન્સ્ટોલેશન
- ખાતરી કરો કે મલ્ટિમીટર બંધ છે અને કોઈપણ ટેસ્ટ લીડ ડિસ્કનેક્ટ કરો.
- મલ્ટિમીટરની પાછળ બેટરી કમ્પાર્ટમેન્ટ કવર શોધો.
- રિટેનિંગ સ્ક્રૂ(ઓ) ખોલો અને કવર દૂર કરો.
- Insert two 1.5V AAA batteries, observing the correct polarity (+ and -) as indicated inside the compartment.
- બેટરી કમ્પાર્ટમેન્ટ કવર બદલો અને તેને સ્ક્રુ(ઓ) વડે સુરક્ષિત કરો.
૬.૨ કનેક્ટિંગ ટેસ્ટ લીડ્સ
Connect the test leads to the appropriate input jacks on the multimeter:
- દાખલ કરો કાળો પરીક્ષણ લીડ માં COM (common) jack.
- મોટાભાગના માપ માટે (વોલ્યુમtage, Resistance, Diode, Continuity, Temperature, Battery Test), insert the લાલ પરીક્ષણ લીડ માં VΩmA જેક
- For high current measurements (up to 10A), insert the લાલ પરીક્ષણ લીડ માં 10A જેક
5. ઓપરેટિંગ સૂચનાઓ
Before taking any measurement, ensure the test leads are correctly connected and the rotary switch is set to the desired function.
૫.૪.૫ ડીસી વોલ્યુમ માપવાtage (V=)
- Set the rotary switch to the desired V= range (e.g., 20V for measuring up to 20V DC).
- લાલ ટેસ્ટ લીડને સર્કિટની પોઝિટિવ (+) બાજુ અને કાળા ટેસ્ટ લીડને નેગેટિવ (-) બાજુ સાથે જોડો.
- ભાગ વાંચોtagડિસ્પ્લે પર e મૂલ્ય.
૫.૪.૬ એસી વોલ્યુમ માપવાtage (V~)
- Set the rotary switch to the desired V~ range (e.g., 200V for measuring up to 200V AC).
- એસી વોલ્યુમ પર ટેસ્ટ લીડ્સને જોડોtage સ્ત્રોત.
- ભાગ વાંચોtagડિસ્પ્લે પર e મૂલ્ય.
5.3 Measuring DC Current (A=)
- મહત્વપૂર્ણ: Disconnect power to the circuit before connecting the multimeter in series.
- Set the rotary switch to the desired A= range (e.g., 200mA or 10A). Remember to move the red lead to the 10A jack for high current.
- Open the circuit where current is to be measured.
- Connect the multimeter in series with the circuit, ensuring the current flows through the multimeter.
- સર્કિટ પર પાવર લગાવો અને ડિસ્પ્લે પર વર્તમાન મૂલ્ય વાંચો.
૩.૩ પ્રતિકાર માપન (Ω)
- મહત્વપૂર્ણ: પ્રતિકાર માપતા પહેલા ખાતરી કરો કે સર્કિટ ડી-એનર્જાઇઝ્ડ છે અને બધા કેપેસિટર્સ ડિસ્ચાર્જ થયેલ છે.
- Set the rotary switch to the desired Ω શ્રેણી
- માપવાના ઘટક પર ટેસ્ટ લીડ્સ જોડો.
- ડિસ્પ્લે પર પ્રતિકાર મૂલ્ય વાંચો.
૪.૫ ડાયોડ ટેસ્ટ (→|)
- મહત્વપૂર્ણ: ખાતરી કરો કે ડાયોડ સર્કિટથી ડિસ્કનેક્ટ થયેલ છે.
- રોટરી સ્વીચને સેટ કરો ડાયોડ ટેસ્ટ સ્થિતિ
- લાલ ટેસ્ટ લીડને એનોડ સાથે અને કાળા ટેસ્ટ લીડને ડાયોડના કેથોડ સાથે જોડો. ડિસ્પ્લે ફોરવર્ડ વોલ્યુમ બતાવશેtage ડ્રોપ.
- Reverse the leads. The display should show "OL" (Open Loop) for a good diode.
૪.૬ સાતત્ય કસોટી ())))
- મહત્વપૂર્ણ: ખાતરી કરો કે સર્કિટ ડી-એનર્જાઇઝ્ડ છે.
- રોટરી સ્વીચને સેટ કરો સાતત્ય પરીક્ષણ સ્થિતિ
- Connect the test leads across the component or wire to be tested.
- જો પ્રતિકાર આશરે 30Ω થી નીચે હોય, તો બઝર વાગશે, જે સાતત્ય દર્શાવે છે. ડિસ્પ્લે પ્રતિકાર મૂલ્ય પણ બતાવશે.
5.7 Battery Test (1.5V/9V)
- રોટરી સ્વીચને સેટ કરો 1.5 વી or 9V battery test position, corresponding to the battery type.
- Connect the red test lead to the positive (+) terminal of the battery and the black test lead to the negative (-) terminal.
- બેટરી વોલ્યુમ વાંચોtagડિસ્પ્લે પર e.
5.8 ડેટા હોલ્ડ
Press the "HOLD" button to freeze the current reading on the display. Press it again to release the hold function and resume live readings.
6. સ્પષ્ટીકરણો
| માપન | શ્રેણી | ઠરાવ |
|---|---|---|
| ડીસી વોલ્યુમtage | ૬૦૦.૦ એમવી / ૬.૦૦૦ વી / ૬૦.૦૦ વી / ૬૦૦.૦ વી / ૧૦૦૦ વી | 100µV / 1mV / 10mV / 100mV / 1V |
| એસી વોલ્યુમtage | 200V / 600V | 100mV / 1V |
| ડીસી વર્તમાન | 2mA / 20mA / 200mA / 10A | 1µA / 10µA / 100µA / 10mA |
| પ્રતિકાર | 200Ω / 2kΩ / 20kΩ / 200kΩ / 2MΩ | 0.1Ω / 1Ω / 10Ω / 100Ω / 1kΩ |
| સાતત્ય પરીક્ષણ | Buzzer sounds at <30Ω | - |
| ડાયોડ ટેસ્ટ | ફોરવર્ડ વોલ્યુમtage ડ્રોપ | - |
| બેટરી ટેસ્ટ | 1.5V / 9V | - |
સામાન્ય સ્પષ્ટીકરણો
- પ્રદર્શન: 2000 ગણતરીઓ
- પાવર સપ્લાય: 2 x 1.5V AAA બેટરી
- પરિમાણો: 150mm x 74mm x 48mm (5.9" x 2.9" x 1.7")
- વજન: 220g (0.48lb)
- સલામતી રેટિંગ: કેટ III 600 વી
- સામગ્રી: એક્રેલોનિટ્રિલ બ્યુટાડીન સ્ટાયરીન (ABS)
- રંગ: વાદળી

Image: A table detailing manual ranging specifications for various Mastech digital multimeters, including the MS8301A, showing display counts, safety ratings, and measurement capabilities.
7. જાળવણી
7.1 બેટરી રિપ્લેસમેન્ટ
When the battery low indicator appears on the display, replace the batteries immediately to ensure accurate readings. Follow the steps outlined in Section 4.1 for battery installation.
7.2 સફાઈ
જાહેરાત સાથે કેસ સાફ કરોamp કાપડ અને હળવા ડિટર્જન્ટનો ઉપયોગ કરો. ઘર્ષક પદાર્થો અથવા દ્રાવકોનો ઉપયોગ કરશો નહીં. ઉપયોગ કરતા પહેલા ખાતરી કરો કે મલ્ટિમીટર સંપૂર્ણપણે સુકાઈ ગયું છે.
7.3 સંગ્રહ
If the multimeter is not used for an extended period, remove the batteries to prevent leakage and damage to the device. Store in a cool, dry place away from direct sunlight.
8. મુશ્કેલીનિવારણ
| સમસ્યા | સંભવિત કારણ | ઉકેલ |
|---|---|---|
| કોઈ ડિસ્પ્લે નહીં અથવા ઝાંખું ડિસ્પ્લે નહીં | Dead or low batteries; incorrect battery polarity. | બેટરી બદલો; બેટરી ઓરિએન્ટેશન તપાસો. |
| "OL" (ઓવરલોડ) પ્રદર્શિત થયું | Measurement exceeds selected range; open circuit. | Select a higher range; check for open circuit in the component or leads. |
| ખોટું વાંચન | Incorrect function selected; poor test lead connection; damaged test leads. | Verify function switch position; ensure secure lead connection; inspect and replace damaged leads. |
| કોઈ સાતત્ય બીપ નથી | Open circuit; resistance too high. | Check for breaks in the circuit; ensure resistance is below 30Ω. |
9. વોરંટી અને સપોર્ટ
Mastech products are designed for reliability and performance. For specific warranty information, please refer to the warranty card included with your product or contact Mastech customer support. Keep your purchase receipt as proof of purchase.
For technical support or service inquiries, please visit the official Mastech webસાઇટ પર જાઓ અથવા તેમના અધિકૃત સેવા કેન્દ્રોનો સંપર્ક કરો.