
Truman TM-I VISION PRO
Truman TM-I VISION PRO Satellite Receiver User Manual
Model: TM-I VISION PRO | Brand: Truman
1. પરિચય
1.1 ઉત્પાદન ઓવરview
The Truman TM-I VISION PRO is a Full HD digital satellite receiver designed to provide a comprehensive entertainment experience. It features a powerful Sunplus 1506HV processor, ensuring smooth performance and high-quality video output. With multiple connectivity options including USB, HDMI, and Ethernet, it offers versatility for various home entertainment setups. The device supports Full HD resolution, multi-language interfaces, and includes parental control features for a family-friendly viewing environment. It also comes with a one-year activated IPTV service.

આકૃતિ 1.1: ફ્રન્ટ view of the Truman TM-I VISION PRO Satellite Receiver, showing its compact design and front-facing USB ports.
1.2 પેકેજ સામગ્રી
કૃપા કરીને ખાતરી કરો કે નીચે સૂચિબદ્ધ બધી વસ્તુઓ તમારા પેકેજમાં શામેલ છે:
- Truman TM-I VISION PRO Satellite Receiver
- પાવર એડેપ્ટર
- માનક રીમોટ કંટ્રોલ
- Digital LED Lens
- HDMI કેબલ
- સૂચના માર્ગદર્શિકા

Figure 1.2: Marketing image highlighting key features such as Wi-Fi, Ultra HD support, ISO 9001 certification, and 5G compatibility.
2. સલામતી માહિતી
To ensure safe operation and prevent damage, please read and adhere to the following safety guidelines:
- ઉપકરણને પાણી અથવા ભેજ માટે ખુલ્લા કરશો નહીં.
- Avoid placing the receiver in direct sunlight or near heat sources.
- ઓવરહિટીંગને રોકવા માટે ઉપકરણની આસપાસ યોગ્ય વેન્ટિલેશનની ખાતરી કરો.
- ફક્ત પ્રદાન કરેલ પાવર એડેપ્ટરનો ઉપયોગ કરો.
- ઉપકરણ જાતે ખોલવાનો કે રિપેર કરવાનો પ્રયાસ કરશો નહીં. લાયક સેવા કર્મચારીઓનો સંપર્ક કરો.
- ઉપકરણ અને એસેસરીઝને બાળકોની પહોંચથી દૂર રાખો.
- વીજળીના તોફાન દરમિયાન અથવા લાંબા સમય સુધી ઉપયોગ ન કરવામાં આવે ત્યારે પાવર પ્લગ ડિસ્કનેક્ટ કરો.
3. સેટઅપ
૨.૨ રીસીવરને કનેક્ટ કરવું
- સેટેલાઇટ એન્ટેના કનેક્ટ કરો: Connect your satellite dish cable to the "LNB IN" port on the back of the receiver.
- Connect to TV (HDMI): Use the provided HDMI cable to connect the receiver's HDMI OUT port to an available HDMI IN port on your television.

Figure 3.1: The included HDMI cable for connecting the receiver to your television.
- પાવર કનેક્ટ કરો: Connect the power adapter to the DC IN port on the receiver, then plug the adapter into a wall outlet.
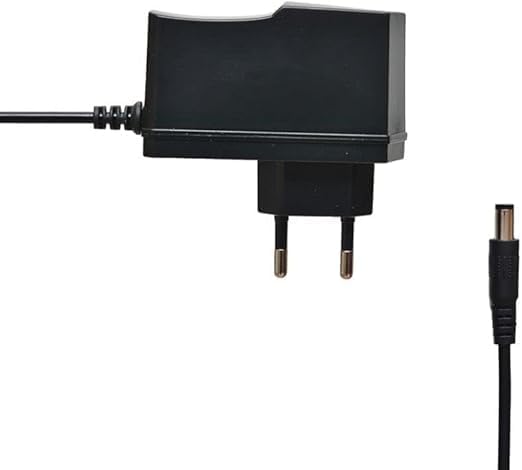
Figure 3.2: The power adapter supplied with the receiver.
- Connect Digital LED Lens: Plug the digital LED lens into its dedicated port on the receiver. This lens displays channel numbers and receives remote control signals.
- Optional: Connect Ethernet/USB: If you plan to use wired internet or external storage, connect an Ethernet cable to the LAN port or a USB drive to one of the USB ports.

આકૃતિ 3.3: પાછળ view of the receiver showing the LNB IN, HDMI OUT, USB, Ethernet, and DC IN ports.
૨.૫ પ્રારંભિક સેટઅપ વિઝાર્ડ
Upon first power-on, the receiver will guide you through an initial setup wizard:
- ભાષા પસંદગી: Choose your preferred language for the on-screen display.
- સમય ઝોન સેટિંગ: તમારા પ્રદેશ માટે યોગ્ય સમય ઝોન સેટ કરો.
- એન્ટેના સેટઅપ: Select your satellite (e.g., Nilesat, Hotbird) and configure LNB settings if necessary.
- ચેનલ સ્કેન: Perform an automatic or manual channel scan to find available TV and radio channels.
- Network Setup (Optional): Configure Wi-Fi or Ethernet connection for internet-based features like IPTV.
4. ઓપરેટિંગ સૂચનાઓ
4.1 મૂળભૂત કાર્યો
- પાવર ચાલુ/બંધ: દબાવો પાવર રીમોટ કંટ્રોલ પરનું બટન.
- ચેનલ નેવિગેશન: નો ઉપયોગ કરો સીએચ + / સીએચ- buttons to change channels sequentially, or enter the channel number directly using the numeric keypad.
- વોલ્યુમ નિયંત્રણ: નો ઉપયોગ કરો VOL + / VOL- વોલ્યુમ સમાયોજિત કરવા માટે બટનો.
- મ્યૂટ: દબાવો મૌન button to silence the audio.
- મેનુ એક્સેસ: દબાવો મેનુ સેટિંગ્સ અને સુવિધાઓ માટે મુખ્ય મેનુને ઍક્સેસ કરવા માટે બટન.
- ઓકે બટન: Confirms selections in menus or displays channel information during viewing
- બહાર નીકળો: દબાવો બહાર નીકળો button to return to the previous screen or live TV.
4.2 અદ્યતન સુવિધાઓ
- પેરેંટલ કંટ્રોલ: Access the Parental Control menu to set age restrictions for channels or lock specific programs. A default PIN (usually 0000 or 1234) may be required.
- બહુ-ભાષા સપોર્ટ: Change audio languages (if available) or subtitle languages via the audio/subtitle options in the menu.
- આઈપીટીવી: The receiver includes a pre-activated IPTV service for one year. Access this feature through the main menu. Ensure your receiver is connected to the internet for IPTV functionality.
- યુએસબી મીડિયા પ્લેબેક: Insert a USB drive into one of the USB ports to play media files (videos, music, photos) or record TV programs.
- સૉફ્ટવેર અપડેટ: Regularly check for software updates via USB or network to ensure optimal performance and access to new features. (Refer to Section 5.2 for details).
5. જાળવણી
5.1 સફાઈ
To clean the receiver, disconnect it from the power supply. Use a soft, dry cloth to wipe the exterior. Do not use liquid cleaners or abrasive materials.
5.2 સોફ્ટવેર અપડેટ્સ
Keeping your receiver's software updated is crucial for performance and security. Updates can be performed via USB or over the network (if connected to the internet).
- યુએસબી અપડેટ: Download the latest firmware (.bin file) from the official Truman website to a USB flash drive. Insert the USB drive into the receiver and navigate to the "System Update" or "Software Upgrade" option in the menu. Follow the on-screen instructions.
- નેટવર્ક અપડેટ: If your receiver is connected to the internet, navigate to the "Network Upgrade" or "Online Update" option in the system settings. The receiver will check for available updates and prompt you to install them.
સાવધાન: Do not power off the receiver during a software update, as this may cause permanent damage.
6. મુશ્કેલીનિવારણ
If you encounter issues with your Truman TM-I VISION PRO, refer to the following common problems and solutions:
| સમસ્યા | સંભવિત કારણ | ઉકેલ |
|---|---|---|
| નો પાવર | પાવર એડેપ્ટર કનેક્ટેડ નથી; પાવર આઉટલેટ ખામીયુક્ત છે. | Ensure power adapter is securely connected to the receiver and a working power outlet. |
| No Signal / Black Screen | Antenna cable loose; Incorrect satellite selected; TV input not set to HDMI. | Check antenna cable connection. Verify satellite settings in menu. Ensure TV input is set to the correct HDMI port. |
| રીમોટ કંટ્રોલ કામ કરતું નથી | Batteries low/dead; Obstruction between remote and receiver's LED lens. | Replace remote control batteries. Ensure clear line of sight to the digital LED lens. |
| Frozen Picture / Lagging | Weak signal; Overheating; Software issue. | Check signal strength in menu. Ensure proper ventilation. Try a software update or factory reset (last resort). |
| IPTV Not Working | No internet connection; IPTV service expired. | Verify internet connection (Ethernet or Wi-Fi). Contact support if service is within the one-year period and still not working. |
7. સ્પષ્ટીકરણો
| લક્ષણ | વિગત |
|---|---|
| મોડલ | TM-I VISION PRO |
| પ્રોસેસર | Sunplus 1506HV |
| બોક્સ પ્રકાર | Full HD Digital |
| ફ્લેશ મેમરી | 4 MB (SPI SOP8/SOIC8) |
| વિડિઓ આઉટપુટ | HDMI (Full HD Resolution Support) |
| ઓડિયો આઉટપુટ મોડ | Stereo (Dolby Digital, DTS, PCM supported) |
| કનેક્ટિવિટી | યુએસબી, એચડીએમઆઈ, ઇથરનેટ |
| સુસંગત ઉપકરણો | ટેલિવિઝન, પર્સનલ કોમ્પ્યુટર |
| ખાસ લક્ષણો | User-friendly display, Remote Control, Multi-language support, Parental Control, 1-year IPTV activation. |
| વસ્તુનું વજન | 10 ગ્રામ |
| ઉત્પાદક | ટ્રુમેન |
8. વોરંટી અને સપોર્ટ
For warranty information, please refer to the warranty card included with your product or contact your point of purchase. The receiver includes a 1-year activated IPTV service.
For technical support or further assistance, please contact Truman customer service or visit their official website. Contact details are typically provided in the product packaging or on the manufacturer's webસાઇટ
Ask a question about this manual
Ask about setup, troubleshooting, compatibility, parts, safety, or missing instructions. Manuals+ will review the question and use this page’s manual context to help answer it.