પરિચય
This manual provides essential information for setting up, operating, maintaining, and troubleshooting your Microsoft Surface Pro 3. The Surface Pro 3 is a versatile device designed to function as both a tablet and a laptop, powered by the Windows 10 operating system.
It features a 12-inch high-resolution screen, ample internal storage, dual HD cameras, and robust connectivity options, including a full-size USB 3.0 port. Its integrated kickstand allows for comfortable viewing in various positions, and the magnesium frame ensures a lightweight and durable design.
સલામતી માહિતી
- ઉપકરણને અતિશય તાપમાન, સીધો સૂર્યપ્રકાશ અથવા ઉચ્ચ ભેજના સંપર્કમાં ન લાવો.
- ઉપકરણને પડતું મૂકવાનું કે ગંભીર અસર થવાનું ટાળો.
- Use only Microsoft-approved power adapters and accessories.
- Keep the device away from liquids. In case of liquid contact, power off immediately and seek professional assistance.
- ઉપકરણને જાતે ડિસએસેમ્બલ કરવાનો કે રિપેર કરવાનો પ્રયાસ કરશો નહીં. આ વોરંટી રદ કરી શકે છે અને નુકસાન પહોંચાડી શકે છે.
- ઓવરહિટીંગ અટકાવવા માટે ઉપકરણનો ઉપયોગ કરતી વખતે યોગ્ય વેન્ટિલેશનની ખાતરી કરો.
સેટઅપ
1. અનબોક્સિંગ અને પ્રારંભિક નિરીક્ષણ
Carefully remove the Surface Pro 3 and all accessories from the packaging. Inspect the device for any visible damage. Retain the packaging for future transport or service needs.
2. પાવર ચાલુ અને પ્રારંભિક સેટઅપ
- Connect the power supply to the Surface Pro 3 and a power outlet.
- Press the power button located on the top edge of the device.
- Follow the on-screen prompts to complete the Windows 10 initial setup, including language selection, network connection, and user account creation.
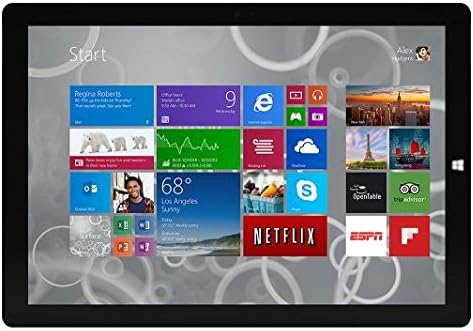
Figure 1: Windows 10 Start Screen during initial setup.
This image shows the Microsoft Surface Pro 3 screen displaying the Windows 10 Start menu, characterized by a grid of live tiles representing various applications and services. This is typically seen during the initial setup or when navigating the operating system.
3. Attaching Accessories (Sold Separately)
The Surface Pro 3 is compatible with various accessories, such as the Surface Type Cover keyboard and the Surface Pen, which are sold separately.
- Surface Type Cover: Align the magnetic connector of the Type Cover with the bottom edge of the Surface Pro 3 until it clicks into place.
- સરફેસ પેન: The Surface Pen can be magnetically attached to the side of the Surface Pro 3 for storage. For initial pairing, follow the instructions provided with the pen.
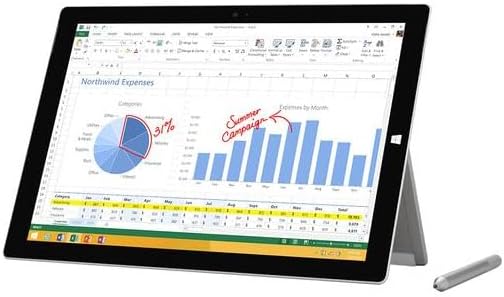
Figure 2: Surface Pro 3 with optional Surface Pen.
This image illustrates the Microsoft Surface Pro 3 in use, displaying an Excel spreadsheet on its screen. A Surface Pen is positioned next to the device, highlighting its compatibility for precise input and navigation.
4. Expanding Storage with a MicroSD Card
You can expand the internal storage of your Surface Pro 3 using a microSD card (sold separately).
- Locate the microSD card slot on the side of the Surface Pro 3, typically behind the kickstand.
- Insert the microSD card into the slot until it clicks into place.
- The device will automatically detect the card. You may need to format it if it's a new card or if prompted by the system.

Figure 3: MicroSD card slot.
This close-up image shows the microSD card slot on the side of the Microsoft Surface Pro 3, with a microSD card partially inserted, demonstrating how to expand the device's storage.
ઓપરેટિંગ સૂચનાઓ
1. વિન્ડોઝ 10 નેવિગેટ કરવું
- પ્રારંભ મેનૂ: Click the Windows icon in the bottom-left corner to access applications, settings, and power options.
- ટચસ્ક્રીન: Use gestures for navigation, zooming, and scrolling.
- Edge Browser: Utilize the pre-installed Edge browser for web browsing, which includes features for marking up web પૃષ્ઠો

Figure 4: Using the Surface Pro 3 for productivity.
This image depicts the Microsoft Surface Pro 3 in an active use scenario, showcasing a note-taking application open on its screen. The display features handwritten notes, diagrams, and sketches, illustrating the device's capability for creative and productive tasks.
2. ઇન્ટિગ્રેટેડ કિકસ્ટેન્ડનો ઉપયોગ કરવો
The multi-position kickstand allows you to adjust the viewing angle for optimal comfort, whether you are typing, watching videos, or drawing.
- Gently pull the kickstand out from the back of the device.
- Adjust it to your desired angle. The kickstand offers a wide range of positions for versatility.
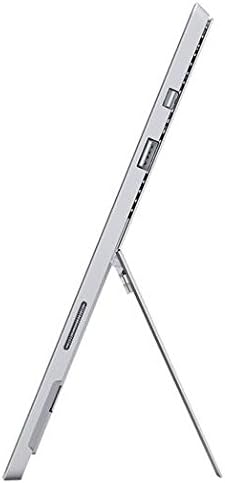
Figure 5: Adjustable kickstand.
આ છબી એક બાજુ પૂરી પાડે છે view of the Microsoft Surface Pro 3, clearly showing its integrated kickstand extended to support the device at an angle, demonstrating its versatile viewક્ષમતાઓ.
3. કેમેરા કાર્યક્ષમતા
The Surface Pro 3 is equipped with 5.0MP front and rear cameras.
- Open the Camera application from the Start Menu.
- Switch between front and rear cameras as needed for photos or video calls.

Figure 6: Front camera.
This close-up image focuses on the front-facing camera and associated sensors located at the top edge of the Microsoft Surface Pro 3 screen.
4. કનેક્ટિવિટી
The full-size USB 3.0 port allows for connecting various peripherals and transferring data.
- Insert USB devices (e.g., flash drives, external hard drives, printers) into the USB 3.0 port.
- The device also supports Wi-Fi (802.11a/b/g/n/ac) for wireless internet connectivity.
જાળવણી
1. Cleaning Your Surface Pro 3
- નરમ, લિન્ટ-ફ્રી કાપડનો ઉપયોગ કરો ડીampપાણીથી અથવા ખાસ ઇલેક્ટ્રોનિક્સ માટે રચાયેલ સ્ક્રીન ક્લીનરથી ભરેલું.
- કઠોર રસાયણો, ઘર્ષક ક્લીનર્સ અથવા એરોસોલ સ્પ્રેનો ઉપયોગ કરવાનું ટાળો.
- Gently wipe the screen and exterior surfaces.
2. સોફ્ટવેર અપડેટ્સ
Regularly check for and install Windows updates to ensure your device has the latest security patches and performance improvements.
- પર જાઓ સેટિંગ્સ > અપડેટ અને સુરક્ષા > વિન્ડોઝ અપડેટ.
- "અપડેટ્સ માટે તપાસો" પર ક્લિક કરો અને ઉપલબ્ધ અપડેટ્સ ઇન્સ્ટોલ કરો.
3. સંગ્રહ વ્યવસ્થાપન
To maintain optimal performance, manage your device's storage space.
- નિયમિતપણે બિનજરૂરી કાઢી નાખો files અને કાર્યક્રમો.
- Utilize cloud storage services or external drives for large files.
- Consider using the Disk Cleanup tool in Windows to remove temporary files.
મુશ્કેલીનિવારણ
આ વિભાગ તમારા સરફેસ પ્રો 3 સાથે તમને આવી શકે તેવી સામાન્ય સમસ્યાઓને સંબોધિત કરે છે.
ઉપકરણ ચાલુ નથી
- ખાતરી કરો કે પાવર સપ્લાય ઉપકરણ અને કાર્યરત પાવર આઉટલેટ બંને સાથે સુરક્ષિત રીતે જોડાયેલ છે.
- એક અલગ પાવર આઉટલેટ અજમાવો.
- Press and hold the power button for 10-15 seconds to perform a forced shutdown, then press it again to restart.
વાઇ-ફાઇ કનેક્ટિવિટી સમસ્યાઓ
- વિન્ડોઝ સેટિંગ્સમાં Wi-Fi સક્ષમ છે કે નહીં તે તપાસો.
- તમારા Wi-Fi રાઉટરને ફરીથી શરૂ કરો.
- નેટવર્ક ભૂલી જાઓ અને ફરીથી પાસવર્ડ દાખલ કરીને ફરીથી કનેક્ટ કરો.
- વિન્ડોઝ નેટવર્ક ટ્રબલશૂટર ચલાવો.
ધીમી કામગીરી
- બેકગ્રાઉન્ડમાં ચાલતી બિનજરૂરી એપ્લિકેશનો બંધ કરો.
- કોઈપણ બાકી Windows અપડેટ્સ માટે તપાસો અને ઇન્સ્ટોલ કરો.
- ખાતરી કરો કે તમારી પાસે પૂરતી ખાલી સ્ટોરેજ જગ્યા છે.
- વાયરસ સ્કેન ચલાવો.
For more detailed troubleshooting or issues not covered here, please refer to the official Microsoft Support webસાઇટ અથવા ગ્રાહક સેવાનો સંપર્ક કરો.
વિશિષ્ટતાઓ
| લક્ષણ | વિગત |
|---|---|
| મોડલ | Microsoft Surface 1631 Pro 3 |
| ઓપરેટિંગ સિસ્ટમ | વિન્ડોઝ 10 |
| સ્ક્રીન માપ | 12 ઇંચ |
| સ્ક્રીન રીઝોલ્યુશન | 2160 x 1440 |
| પ્રોસેસર | ઇન્ટેલ કોર i3 1.5 GHz |
| રેમ | 4 જીબી |
| આંતરિક સંગ્રહ | 128 GB Flash Storage |
| ગ્રાફિક્સ કોપ્રોસેસર | ઇન્ટેલ એચડી ગ્રાફિક્સ |
| કેમેરા | 5.0MP Front and Rear |
| વાયરલેસ પ્રકાર | 802.11b, 802.11a, 802.11g |
| બંદરો | Full-size USB 3.0 |
| વસ્તુનું વજન | 1.8 પાઉન્ડ |
| ઉત્પાદન પરિમાણો | 11.5 x 0.36 x 7.93 ઇંચ |
| રંગ | ચાંદી |
વોરંટી અને આધાર
Your Microsoft Surface Pro 3 comes with a standard manufacturer's warranty. For detailed warranty terms and conditions, please refer to the documentation included with your purchase or visit the official Microsoft support webસાઇટ
For technical assistance, troubleshooting guides, driver downloads, and service requests, please visit the માઈક્રોસોફ્ટ સરફેસ સપોર્ટ પૃષ્ઠ


