1. પરિચય
આ માર્ગદર્શિકા તમારા TOPGREENER TDOS5-JD ડ્યુઅલ લોડ મોશન સેન્સર સ્વિચના ઇન્સ્ટોલેશન, સંચાલન અને જાળવણી માટે વિગતવાર સૂચનાઓ પ્રદાન કરે છે. આ ઉપકરણ પેસિવ ઇન્ફ્રારેડ (PIR) ટેકનોલોજીનો ઉપયોગ કરીને ઓક્યુપન્સી અથવા ખાલી જગ્યા શોધના આધારે લાઇટ અને પંખા જેવા બે અલગ લોડને આપમેળે નિયંત્રિત કરવા માટે રચાયેલ છે. કૃપા કરીને ઇન્સ્ટોલેશન પહેલાં આ માર્ગદર્શિકાને સારી રીતે વાંચો અને યોગ્ય કાર્ય અને સલામતી સુનિશ્ચિત કરવા માટે ઉપયોગ કરો.
2. સલામતી માહિતી
- ચેતવણી: આગ, આંચકો અથવા મૃત્યુથી બચવા માટે, સર્કિટ બ્રેકર અથવા ફ્યુઝ બોક્સ પર પાવર બંધ કરો અને વાયરિંગ પહેલાં પાવર બંધ છે કે નહીં તે તપાસો.
- ઇન્સ્ટોલેશન લાયક ઇલેક્ટ્રિશિયન દ્વારા અથવા તમામ સ્થાનિક અને રાષ્ટ્રીય વિદ્યુત કોડ્સ અનુસાર થવું જોઈએ.
- આ ઉપકરણને જરૂરી છે a જમીન વાયર યોગ્ય કામગીરી માટે.
- આ ઉપકરણ કરે છે તટસ્થ વાયરની જરૂર નથી.
- આ ઉપકરણનો ઉપયોગ તેના નિર્દિષ્ટ રેટિંગ કરતાં વધુ લોડ સાથે કરશો નહીં.
- માત્ર ઇન્ડોર ઉપયોગ માટે.
3. પેકેજ સામગ્રી
- TOPGREENER TDOS5-JD ડ્યુઅલ લોડ મોશન સેન્સર સ્વિચ
- સૂચના માર્ગદર્શિકા
- માઉન્ટિંગ સ્ક્રૂ
- વાયર નટ્સ
4. ઉત્પાદન સુવિધાઓ
- ડ્યુઅલ લોડ કંટ્રોલ: એક જ યુનિટમાંથી બે અલગ લોડ (દા.ત., લાઇટ અને પંખો) ને કનેક્ટ કરો અને સ્વચાલિત કરો.
- પીર મોશન સેન્સર: ૧૮૦° ક્ષેત્ર સાથે ગતિ શોધે છે view, આગળ 40 ફૂટ અને બંને બાજુ 20 ફૂટ સુધી આવરી લે છે. અદ્યતન PIR ટેકનોલોજી ખોટા ટ્રિગર્સ ઘટાડવામાં મદદ કરે છે.
- વોક-થ્રુ સુવિધા: જો શરૂઆતના ટ્રિગરના 30 સેકન્ડની અંદર કોઈ વધુ ગતિ ન મળે તો 2.5 મિનિટ પછી લોડ આપમેળે બંધ થઈ જાય છે.
- બહુવિધ ઓપરેટિંગ મોડ્સ:
- ઓક્યુપન્સી સેન્સર મોડ (OCCS): ગતિ શોધાય ત્યારે લોડ આપમેળે ચાલુ થાય છે અને જ્યારે વિસ્તાર ખાલી હોય ત્યારે નિર્ધારિત સમય વિલંબ પછી બંધ થાય છે.
- ડ્યુઅલ ઓક્યુપન્સી મોડ (OCCD): બંને લોડ ઓક્યુપન્સી મોડમાં કાર્ય કરે છે.
- ખાલી જગ્યા સેન્સર મોડ (VACD): લોડ મેન્યુઅલી ચાલુ થાય છે અને જ્યારે વિસ્તાર ખાલી હોય ત્યારે નિર્ધારિત સમય વિલંબ પછી આપમેળે બંધ થાય છે.
- એડજસ્ટેબલ સમય વિલંબ: ૧૫ સેકન્ડ (ટેસ્ટ મોડ), ૫ મિનિટ, ૧૦ મિનિટ, ૨૦ મિનિટ અને ૩૦ મિનિટ માટે રૂપરેખાંકિત વિકલ્પો.
- કોઈ તટસ્થ વાયરની જરૂર નથી: જૂના ઘરો અથવા તટસ્થ વાયર વિનાના સ્થળોએ ઇન્સ્ટોલેશનને સરળ બનાવે છે.
- ગ્રાઉન્ડ વાયર જરૂરી: સલામત કામગીરી માટે જરૂરી.
- ઇલેક્ટ્રિકલ રેટિંગ્સ: ૧૨૦/૨૭૭VAC@૬૦Hz; ૮૦૦W ઇન્કેન્ડેસન્ટ/હેલોજન, ૧૫૦W LED/CFL, ૧/૪HP મોટર.
- અનુપાલન: શીર્ષક 20 અને શીર્ષક 24 નું પાલન કરે છે.
- ફક્ત એક-ધ્રુવ: સિંગલ-પોલ એપ્લિકેશનો માટે રચાયેલ છે.
5. સ્થાપન
તમે પ્રારંભ કરો તે પહેલાં: ખાતરી કરો કે સર્કિટ બ્રેકર પર પાવર બંધ છે. આ ઉપકરણ ફક્ત સિંગલ-પોલ ઇન્સ્ટોલેશન માટે છે અને તેને ગ્રાઉન્ડ વાયરની જરૂર છે.
- પાવર બંધ કરો: તમે જે સ્વીચ બદલી રહ્યા છો તેને નિયંત્રિત કરતું સર્કિટ બ્રેકર શોધો અને તેને બંધ કરો. વોલનો ઉપયોગ કરીને પાવર બંધ છે કે નહીં તે ચકાસો.tage પરીક્ષક.
- હાલની સ્વીચ દૂર કરો: વોલ પ્લેટ કાળજીપૂર્વક દૂર કરો અને વોલ બોક્સમાંથી હાલના સ્વીચને ખોલો. વાયરોને ડિસ્કનેક્ટ કરો.
- વાયર ઓળખો: તમારી પાસે એક લાઇન (હોટ) વાયર, બે લોડ વાયર (દરેક લોડ માટે એક, દા.ત., લાઇટ અને પંખો), અને એક ગ્રાઉન્ડ વાયર હોવો જોઈએ. આ સ્વીચને ન્યુટ્રલ વાયરની જરૂર નથી.
- સેન્સર સ્વિચને વાયર કરો: વાયર નટ્સનો ઉપયોગ કરીને દિવાલ બોક્સમાંથી વાયરને TDOS5-JD સ્વીચ પરના સંબંધિત વાયર સાથે જોડો.
- કનેક્ટ કરો લાઇન (ગરમ) વાયર દિવાલના બોક્સથી સ્વીચના લાઇન વાયર સુધી.
- કનેક્ટ કરો ૧ વાયર લોડ કરો (દા.ત., લાઇટ માટે) દિવાલ બોક્સથી સ્વીચના લોડ 1 વાયર સુધી.
- કનેક્ટ કરો ૧ વાયર લોડ કરો (દા.ત., પંખા માટે) દિવાલના બોક્સથી સ્વીચના લોડ 2 વાયર સુધી.
- કનેક્ટ કરો ગ્રાઉન્ડ વાયર દિવાલના બોક્સથી સ્વીચના ગ્રાઉન્ડ વાયર સુધી.
- સ્વિચ માઉન્ટ કરો: વાયરોને કાળજીપૂર્વક દિવાલના બોક્સમાં ફોલ્ડ કરો અને આપેલા સ્ક્રૂ વડે સ્વીચને સુરક્ષિત કરો. દિવાલ પ્લેટ જોડો.
- પાવર પુન Restસ્થાપિત કરો: સર્કિટ બ્રેકર પર પાવર પાછો ચાલુ કરો.
- વોર્મ-અપ સમયગાળો: ઇન્સ્ટોલેશન પછી, ઉપકરણને ગરમ થવા અને યોગ્ય રીતે કાર્ય કરે તે પહેલાં તેને માપાંકિત થવા માટે 1-2 મિનિટનો સમય આપો.
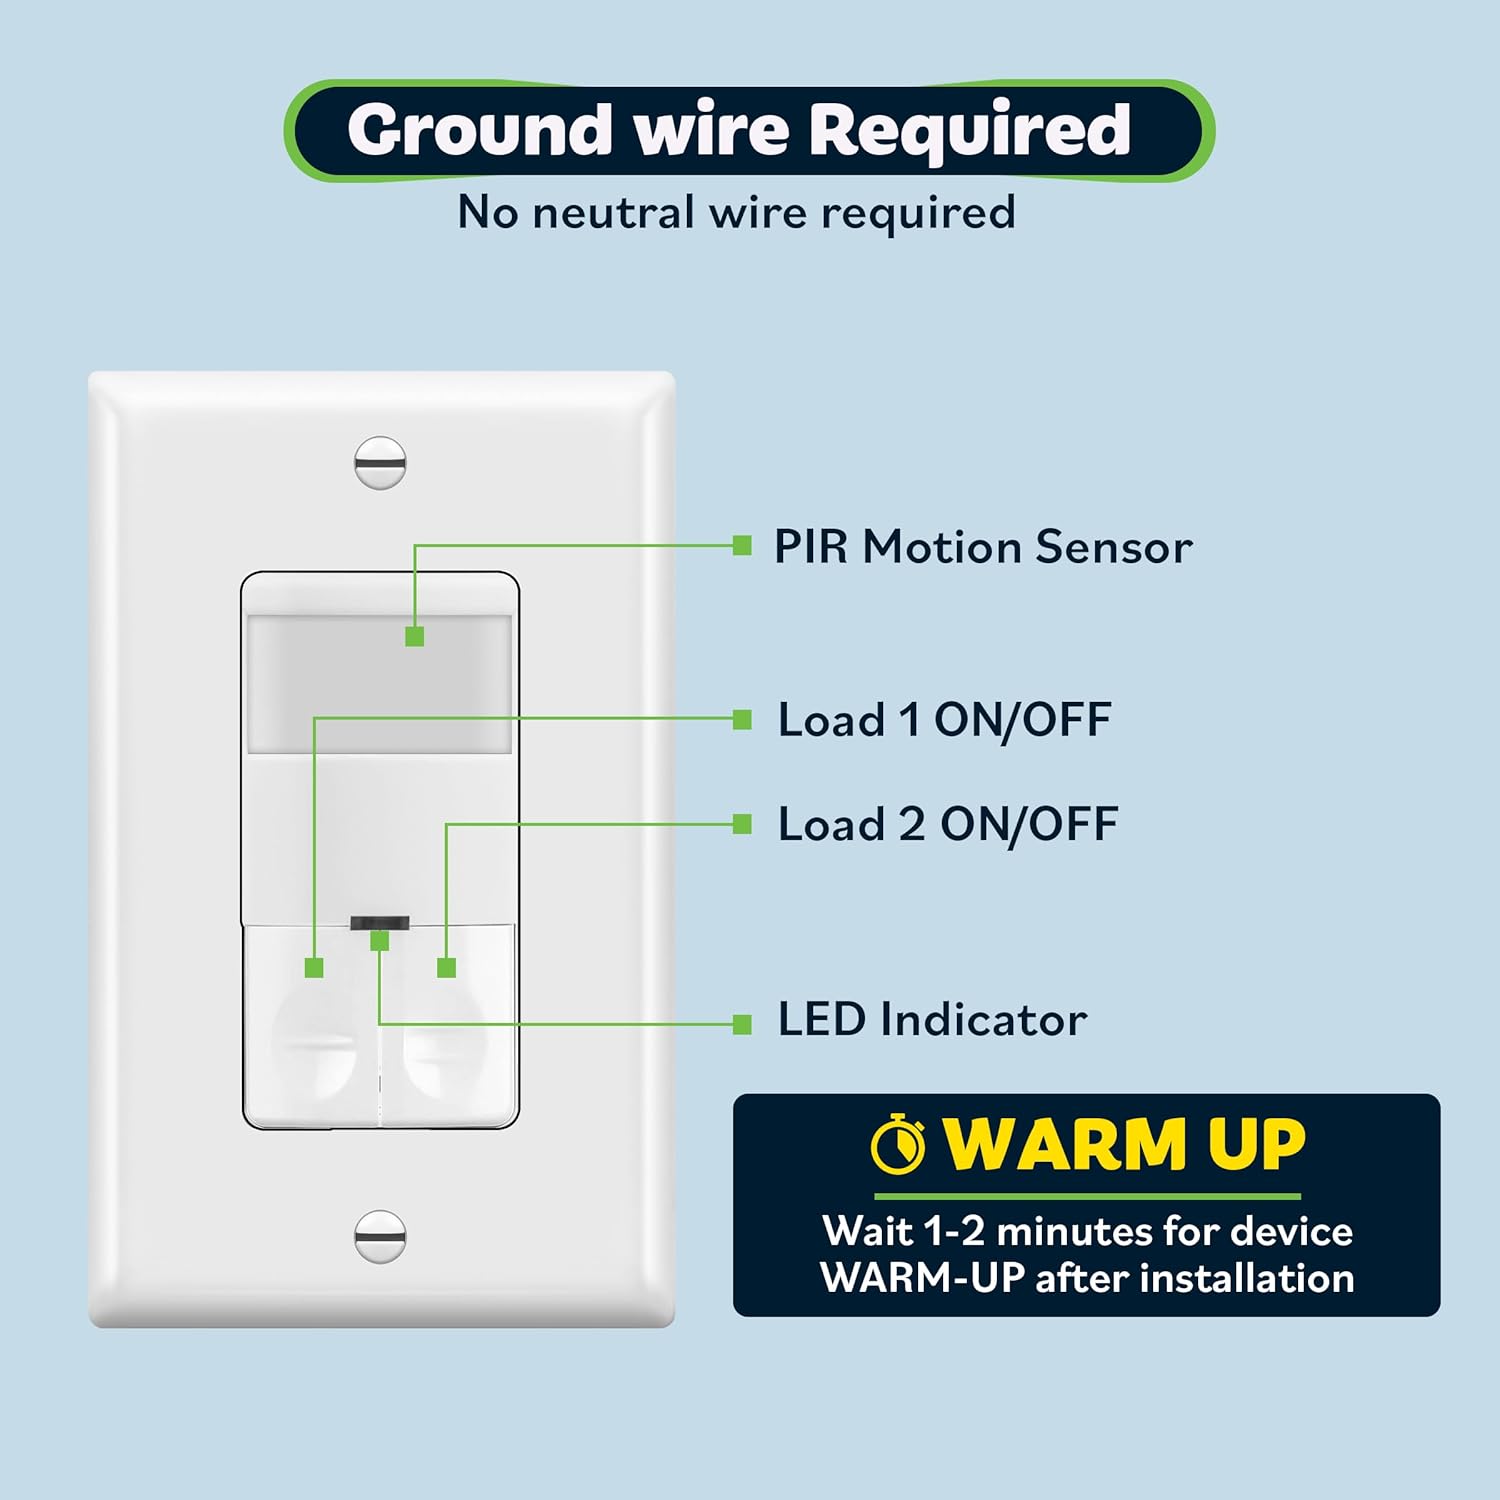
આકૃતિ 1: TDOS5-JD સેન્સર સ્વીચના ઘટકો, જે PIR સેન્સર દર્શાવે છે, લોડ 1/2 ચાલુ/બંધ બટનો, LED સૂચક, અને ઇન્સ્ટોલેશન પછી વોર્મ-અપ સમયગાળા વિશેની નોંધ. તે એ પણ દર્શાવે છે કે ગ્રાઉન્ડ વાયર જરૂરી છે અને કોઈ તટસ્થ વાયરની જરૂર નથી.
આકૃતિ 2: ઇન્સ્ટોલેશન પ્રક્રિયા દરમિયાન TOPGREENER TDOS5-JD મોશન સેન્સર સ્વીચને સ્ટાન્ડર્ડ ઇલેક્ટ્રિકલ વોલ બોક્સમાં કાળજીપૂર્વક દાખલ કરવામાં આવી રહી છે તે દર્શાવતી છબી.
6. ઓપરેશન
એકવાર ઇન્સ્ટોલ અને પાવર થઈ ગયા પછી, TDOS5-JD સ્વીચ પસંદ કરેલ મોડ (ઓક્યુપન્સી અથવા ખાલી જગ્યા) અને ગોઠવેલ સેટિંગ્સ અનુસાર કાર્ય કરશે.
- સ્વચાલિત નિયંત્રણ: ઓક્યુપન્સી મોડમાં, સેન્સર ગતિ શોધી કાઢે છે અને કનેક્ટેડ લોડ્સને આપમેળે ચાલુ કરે છે. નિર્ધારિત સમય વિલંબ માટે વિસ્તાર ખાલી થઈ જાય પછી, લોડ્સ બંધ થઈ જશે. વેકેન્સી મોડમાં, લોડ્સ મેન્યુઅલી ચાલુ થાય છે અને આપમેળે બંધ થાય છે.
- મેન્યુઅલ ચાલુ/બંધ: આ સ્વીચમાં બે ચાલુ/બંધ બટનો છે, દરેક લોડ માટે એક, જે મેન્યુઅલ નિયંત્રણ માટે પરવાનગી આપે છે. ચાલુ/બંધ બટન દબાવવાથી સંબંધિત લોડ ટૉગલ થશે.
- એલઇડી સૂચક: એક નાનું LED સૂચક સ્વીચની સ્થિતિ પર દ્રશ્ય પ્રતિસાદ પૂરો પાડે છે.

આકૃતિ 3: એક વ્યક્તિ કપડાની ટોપલી લઈને રૂમમાં જાય છે, અને લાઇટ આપમેળે ચાલુ થાય છે, જે મોશન સેન્સર સ્વીચની હેન્ડ્સ-ફ્રી લાઇટિંગ ક્ષમતા દર્શાવે છે.

આકૃતિ 4: એક આધુનિક બાથરૂમ સેટિંગ જ્યાં TOPGREENER ડ્યુઅલ લોડ સેન્સર સ્વીચ ઓવરહેડ લાઇટ અને એક્ઝોસ્ટ ફેન બંનેને આપમેળે નિયંત્રિત કરે છે, જે તેની ઊર્જા બચત ક્ષમતા દર્શાવે છે.
7. કસ્ટમાઇઝેશન અને સેટિંગ્સ
TDOS5-JD સ્વીચ સમય વિલંબ, સંવેદનશીલતા (રેન્જ) અને ઓપરેટિંગ મોડ માટે એડજસ્ટેબલ સેટિંગ્સ પ્રદાન કરે છે. આ સેટિંગ્સ ફેસપ્લેટની પાછળ સ્થિત છે.
- ઍક્સેસ સેટિંગ્સ: ગોઠવણ ડાયલ્સ અને મોડ સ્વીચ જોવા માટે સ્વીચના બાહ્ય કવરને ધીમેથી ખોલો.
- સમય વિલંબ સમાયોજિત કરો: ઇચ્છિત વિલંબ પસંદ કરવા માટે 'TIME' ડાયલ ફેરવવા માટે નાના સ્ક્રુડ્રાઈવરનો ઉપયોગ કરો: ટેસ્ટ (૧૫ સેકન્ડ), ૫ મિનિટ, ૧૦ મિનિટ, ૨૦ મિનિટ, અથવા ૩૦ મિનિટ.
- સેન્સર રેન્જ એડજસ્ટ કરો: ગતિ શોધ સંવેદનશીલતાને 1 (સૌથી ઓછી) થી 4 (સૌથી વધુ) સુધી સમાયોજિત કરવા માટે 'RANGE' ડાયલને ફેરવવા માટે નાના સ્ક્રુડ્રાઈવરનો ઉપયોગ કરો.
- ઓપરેટિંગ મોડ પસંદ કરો: તમારા ઇચ્છિત મોડને પસંદ કરવા માટે 'OCCD OCCS VACD' લેબલવાળા નાના સ્વીચનો ઉપયોગ કરો:
- ઓસીસીડી: ડ્યુઅલ ઓક્યુપન્સી મોડ
- ઓસીસીએસ: સિંગલ ઓક્યુપન્સી મોડ
- VACD: વેકેન્સી મોડ

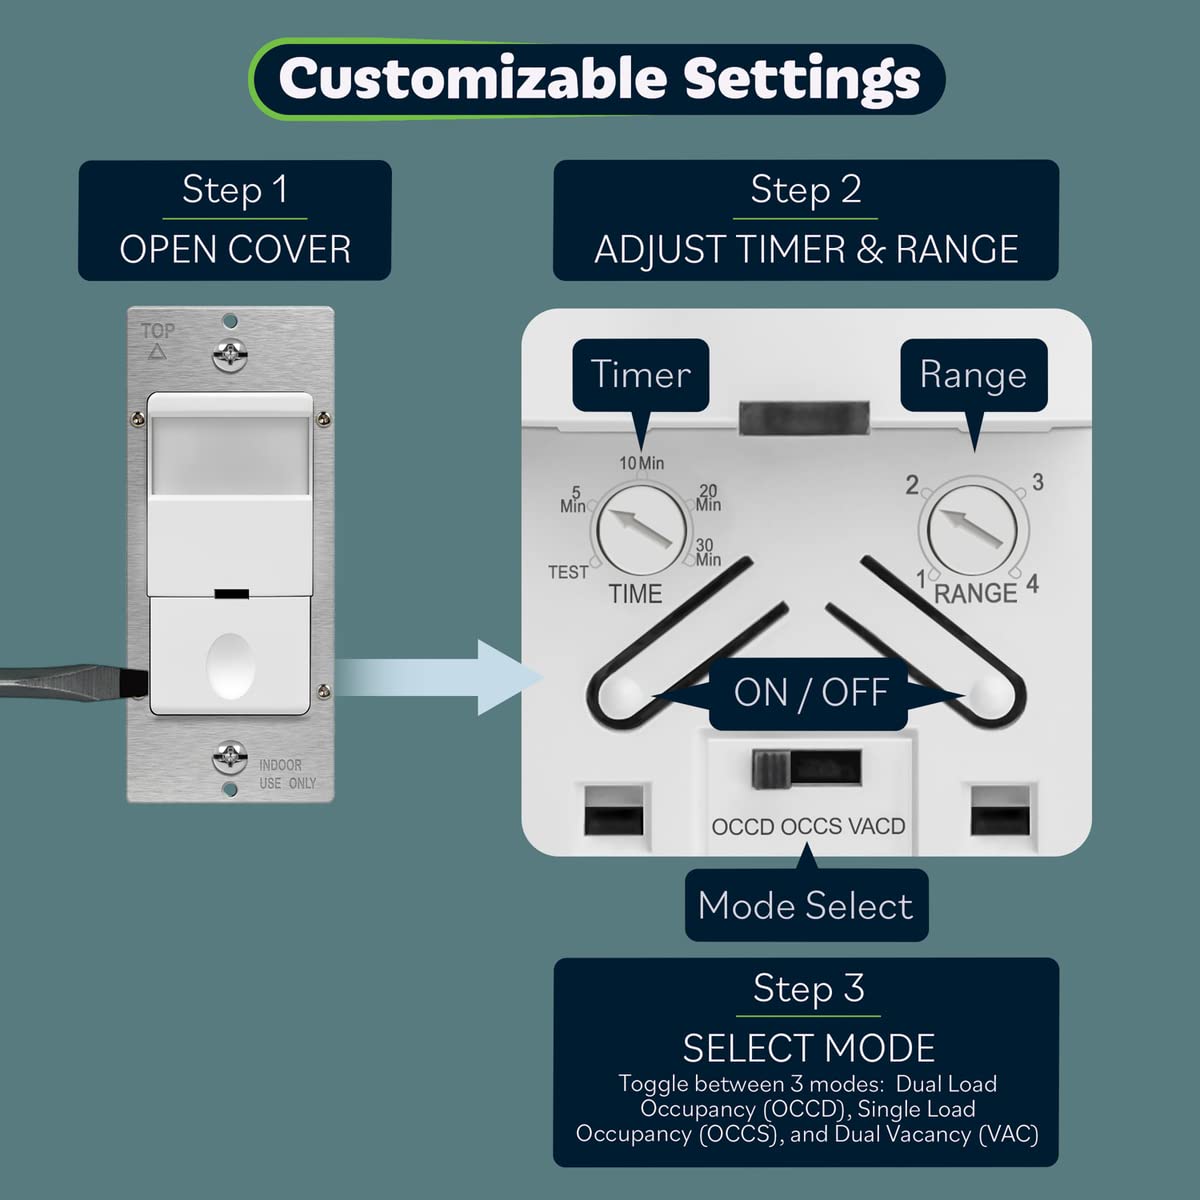
આકૃતિ 5: સેન્સર સ્વિચ સેટિંગ્સને કસ્ટમાઇઝ કરવા માટેના પગલાં દર્શાવતો વિગતવાર આકૃતિ. તે કવર કેવી રીતે ખોલવું તે બતાવે છે, અને પછી 'સમય' ડાયલ (ટેસ્ટ, 5, 10, 20, 30 મિનિટ), 'રેન્જ' ડાયલ (1-4), અને 'મોડ સિલેક્ટ' સ્વીચ (OCCD, OCCS, VACD) ને કેવી રીતે ગોઠવવું તે બતાવે છે.

આકૃતિ 6: દિવાલ પર સેન્સર સ્વીચ લગાવેલા આધુનિક બાથરૂમનું ચિત્ર. એક મોટું ઇનસેટ એડજસ્ટેબલ સમય વિલંબ અને રેન્જ ડાયલ્સ દર્શાવે છે, જે ઓટોમેટિક લાઇટ કંટ્રોલ માટે કસ્ટમાઇઝેશન વિકલ્પો પર ભાર મૂકે છે.
8. મુશ્કેલીનિવારણ
| સમસ્યા | સંભવિત કારણ | ઉકેલ |
|---|---|---|
| હલનચલન સાથે લાઇટ/પંખો ચાલુ થતા નથી. | પાવર નથી; ખોટો વાયરિંગ; સેન્સર બ્લોક થયેલ છે; ખોટો મોડ; રેન્જ ખૂબ ઓછી છે. | સર્કિટ બ્રેકર તપાસો. વાયરિંગ કનેક્શન ચકાસો. ખાતરી કરો કે સેન્સર લેન્સ સ્પષ્ટ છે. યોગ્ય ઓપરેટિંગ મોડ (OCCS/OCCD) ની પુષ્ટિ કરો. સેન્સર રેન્જ વધારો. |
| લાઇટ/પંખો ખૂબ લાંબા સમય સુધી ચાલુ રહે છે અથવા ખૂબ ઝડપથી બંધ થઈ જાય છે. | ખોટી સમય વિલંબ સેટિંગ; સતત ગતિ મળી; વોક-થ્રુ સુવિધા સક્રિય. | સમય વિલંબ સેટિંગ ગોઠવો. સેન્સરની અંદર કોઈ સતત ગતિ ન થાય તેની ખાતરી કરો. view. વોક-થ્રુ ફીચર વર્તણૂક સમજો. |
| દેખીતી ગતિ (ખોટા ટ્રિગર્સ) વગર લાઇટ/પંખો ચાલુ થાય છે. | સેન્સર ખૂબ સંવેદનશીલ; ગરમીના સ્ત્રોતો અથવા હવાના ડ્રાફ્ટ્સ; સેન્સર વધુ ટ્રાફિકવાળા વિસ્તાર તરફ. | સેન્સર રેન્જ ઘટાડો. સેન્સરને ગરમીના સ્ત્રોતો (HVAC વેન્ટ્સ, સીધો સૂર્યપ્રકાશ) અથવા ડ્રાફ્ટ્સથી દૂર ખસેડો. શક્ય હોય તો સેન્સરની દિશા ગોઠવો. |
| ટાઈમર અપેક્ષા મુજબ કામ કરતું નથી (દા.ત., ફક્ત આત્યંતિક સેટિંગ્સ જ કામ કરે છે). | ડાયલ મિકેનિઝમ સમસ્યા; ચોક્કસ યુનિટ કેલિબ્રેશન. | સમય ડાયલને કાળજીપૂર્વક ફરીથી ગોઠવો. જો સમસ્યા ચાલુ રહે, તો ગ્રાહક સપોર્ટનો સંપર્ક કરો. |
| એક ભાર કામ કરે છે, પણ બીજો નથી કરતો. | કામ ન કરતા ભાર માટે ખોટો વાયરિંગ; ખામીયુક્ત બલ્બ/પંખો. | લોડ 1 અને લોડ 2 માટે વાયરિંગ કનેક્શન ચકાસો. બલ્બ અથવા પંખો કાર્યરત છે તેની ખાતરી કરવા માટે તેનું સીધું પરીક્ષણ કરો. |
9. સ્પષ્ટીકરણો
- મોડલ નંબર: TDOS5-JD
- પરિમાણો: 2.5 x 2.5 x 4.5 ઇંચ
- વજન: 6 ઔંસ
- પાવર સ્ત્રોત: કોર્ડેડ ઇલેક્ટ્રિક
- ભાગtage: 120/277VAC, 60Hz
- અગ્નિથી પ્રકાશિત/હેલોજન લોડ: 800W મહત્તમ
- LED/CFL લોડ: 150W મહત્તમ
- મોટર રેટિંગ: ૧/૪HP મહત્તમ
- કવરેજ વિસ્તાર: 1200 ચોરસ ફૂટ સુધી
- નું ક્ષેત્ર View: 180 ડિગ્રી
- મહત્તમ શ્રેણી: ૪૦ ફૂટ (આગળ), ૨૦ ફૂટ (બાજુઓ)
- ઓપરેટિંગ તાપમાન: 32-131°F (0-55°C)
- વાયરિંગ: ગ્રાઉન્ડ વાયર જરૂરી છે, કોઈ ન્યુટ્રલ વાયર જરૂરી નથી
- પ્રમાણપત્રો: UL સૂચિબદ્ધ, શીર્ષક 20 અને શીર્ષક 24 સાથે સુસંગત
10. જાળવણી
TOPGREENER TDOS5-JD મોશન સેન્સર સ્વીચને ન્યૂનતમ જાળવણીની જરૂર છે.
- સફાઈ: સમયાંતરે સેન્સર લેન્સ અને ફેસપ્લેટને સોફ્ટ, ડી વડે સાફ કરોamp કાપડ. ઘર્ષક ક્લીનર્સ અથવા સોલવન્ટ્સનો ઉપયોગ કરશો નહીં, કારણ કે આ ફિનિશ અથવા સેન્સરને નુકસાન પહોંચાડી શકે છે.
- નિરીક્ષણ: ક્યારેક ક્યારેક સ્વીચને કોઈ દેખીતું નુકસાન અથવા છૂટા કનેક્શન માટે તપાસો. જો કોઈ સમસ્યા જણાય, તો સર્કિટ બ્રેકર પર પાવર બંધ કરો અને તેનું નિરાકરણ કરો અથવા લાયક ઇલેક્ટ્રિશિયનનો સંપર્ક કરો.
11. વોરંટી અને સપોર્ટ
TOPGREENER ઉત્પાદનો વિશ્વસનીયતા અને કામગીરી માટે રચાયેલ છે. નિયમો અને શરતો સહિત ચોક્કસ વોરંટી માહિતી માટે, કૃપા કરીને તમારી ખરીદી સાથે પૂરા પાડવામાં આવેલ વોરંટી દસ્તાવેજોનો સંદર્ભ લો અથવા સત્તાવાર TOPGREENER ની મુલાકાત લો. webસાઇટ. ટેકનિકલ સપોર્ટ અથવા મુશ્કેલીનિવારણમાં સહાય માટે, કૃપા કરીને TOPGREENER ગ્રાહક સેવાનો સંપર્ક કરો.
ઉત્પાદક: ટોપગ્રીનર
સંપર્ક માહિતી: કૃપા કરીને TOPGREENER અધિકારીની મુલાકાત લો webસૌથી અદ્યતન સંપર્ક વિગતો અને સહાયક સંસાધનો માટે સાઇટ.


