પરિચય
This manual provides comprehensive instructions for the setup, operation, and maintenance of your Segotep Phoenix ATX Mid Tower PC Gaming Computer Case. Please read through the entire manual before beginning assembly to ensure proper installation and optimal performance.
મુખ્ય લક્ષણો
- Sparkling LED Lighting: ATX PC case has an addressable RGB LED Strip in the front panel for vivid lighting effects. It can be easily controlled by a 5V 3-pin RGB header on the motherboard (5V 3 Pin addressable LED headers and VDG headers ONLY).
- Vertical GPU Mount Ready: This computer gaming case allows users to securely mount the graphics card, or any PCI Express card, vertically inside your case. Unlike horizontal installation, there is no need to worry about deformation.
- Powerful Directed Airflow: The computer case is designed for better cooling performance. Users can install 3 fans in the front to intake air from outside and exhaust hot air with 2 fans in the rear to cool internal components efficiently.
- Show Off Your Lights: Features a sleek and sturdy tempered glass side panel to showcase hardware and internal components.
- Builder Friendly: Offers room for front and rear radiators, and supports up to 167mm high CPU coolers and up to 323mm long graphic card installations.
- નોંધ: This item is the PC case ONLY; cooling fans are not included.
સેટઅપ અને ઇન્સ્ટોલેશન
1. Unboxing and Component Overview
Carefully remove the PC case from its packaging. Identify all included accessories, such as screws, cable ties, and the instruction manual. Note that cooling fans are sold separately.

Figure 1: Fully assembled Segotep Phoenix PC case showcasing internal components and RGB lighting.
2. Motherboard and Component Installation
The Segotep Phoenix case supports ATX, Micro-ATX, and ITX motherboards. The unique inverted design allows for vertical GPU mounting.

Figure 2: Internal layout diagram indicating motherboard compatibility (ATX, MATX, ITX) and various fan/water cooler mounting options. Note the power supply and storage drive locations.
For 360mm water cooler installation in the front, the internal cover and hard drive tray must be removed. The case supports CPU coolers up to 167mm high and graphics cards up to 323mm long (285mm for the first slot).
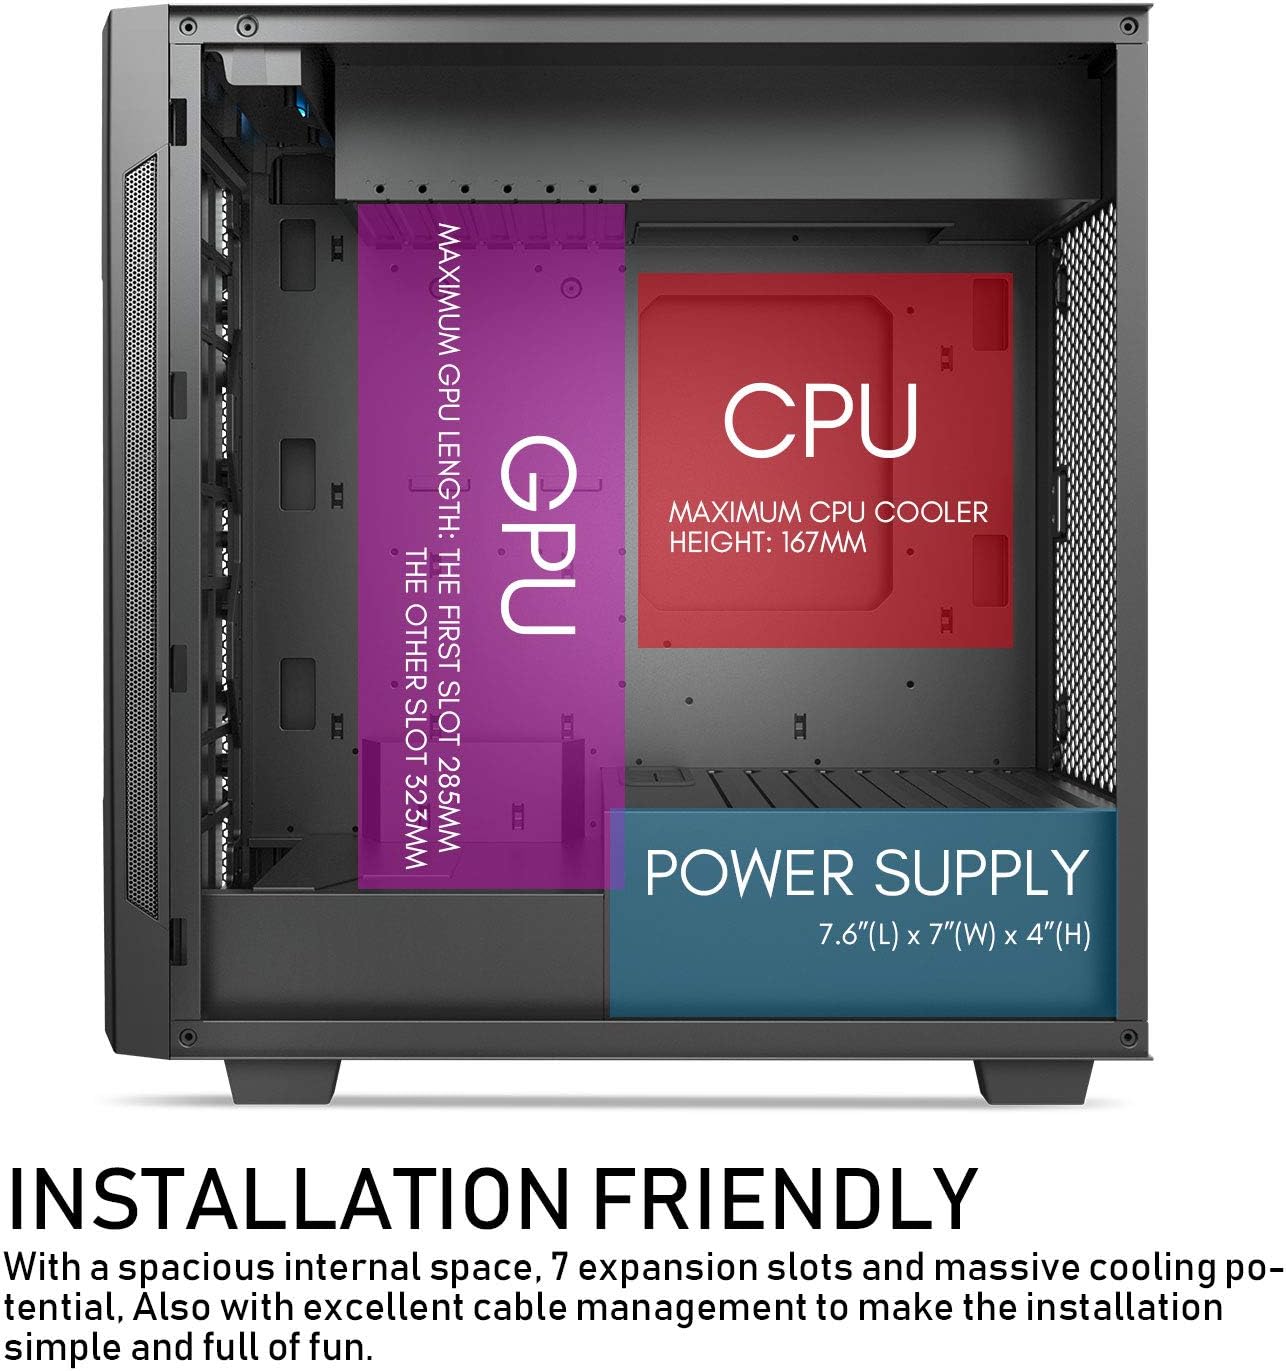
Figure 3: Installation friendly diagram detailing maximum CPU cooler height (167mm) and GPU length (285mm for first slot, 323mm for others).
3. Airflow and Cooling Setup
The case is designed for powerful directed airflow. Install up to three 120mm or two 140mm fans in the front for intake. For exhaust, install up to two 120mm or two 140mm fans in the rear.

Figure 4: Airflow diagram showing cool air intake from the front (blue arrows) and hot air exhaust from the rear (red arrows) for optimized cooling.
4. Cable Management and I/O Ports
Utilize the cable organizer on the top of the case to hide cables and maintain a clean build. The top I/O panel includes 1x Type-C port, 1x USB 3.0 port, and 2x USB 2.0 ports, along with HD audio ports for convenient access.

આકૃતિ 5: ટોચ view of the case highlighting the cable organizer compartment and the convenient I/O panel with USB and audio ports.
ઓપરેટિંગ સૂચનાઓ
1. RGB લાઇટિંગ કંટ્રોલ
The front panel RGB LED strip can be controlled via your motherboard's 5V 3-pin addressable RGB header (VDG headers ONLY). If your motherboard does not support synchronization, you can switch control to the LED button on the I/O ports. Press the LED button for 3 seconds to convert it to motherboard control.
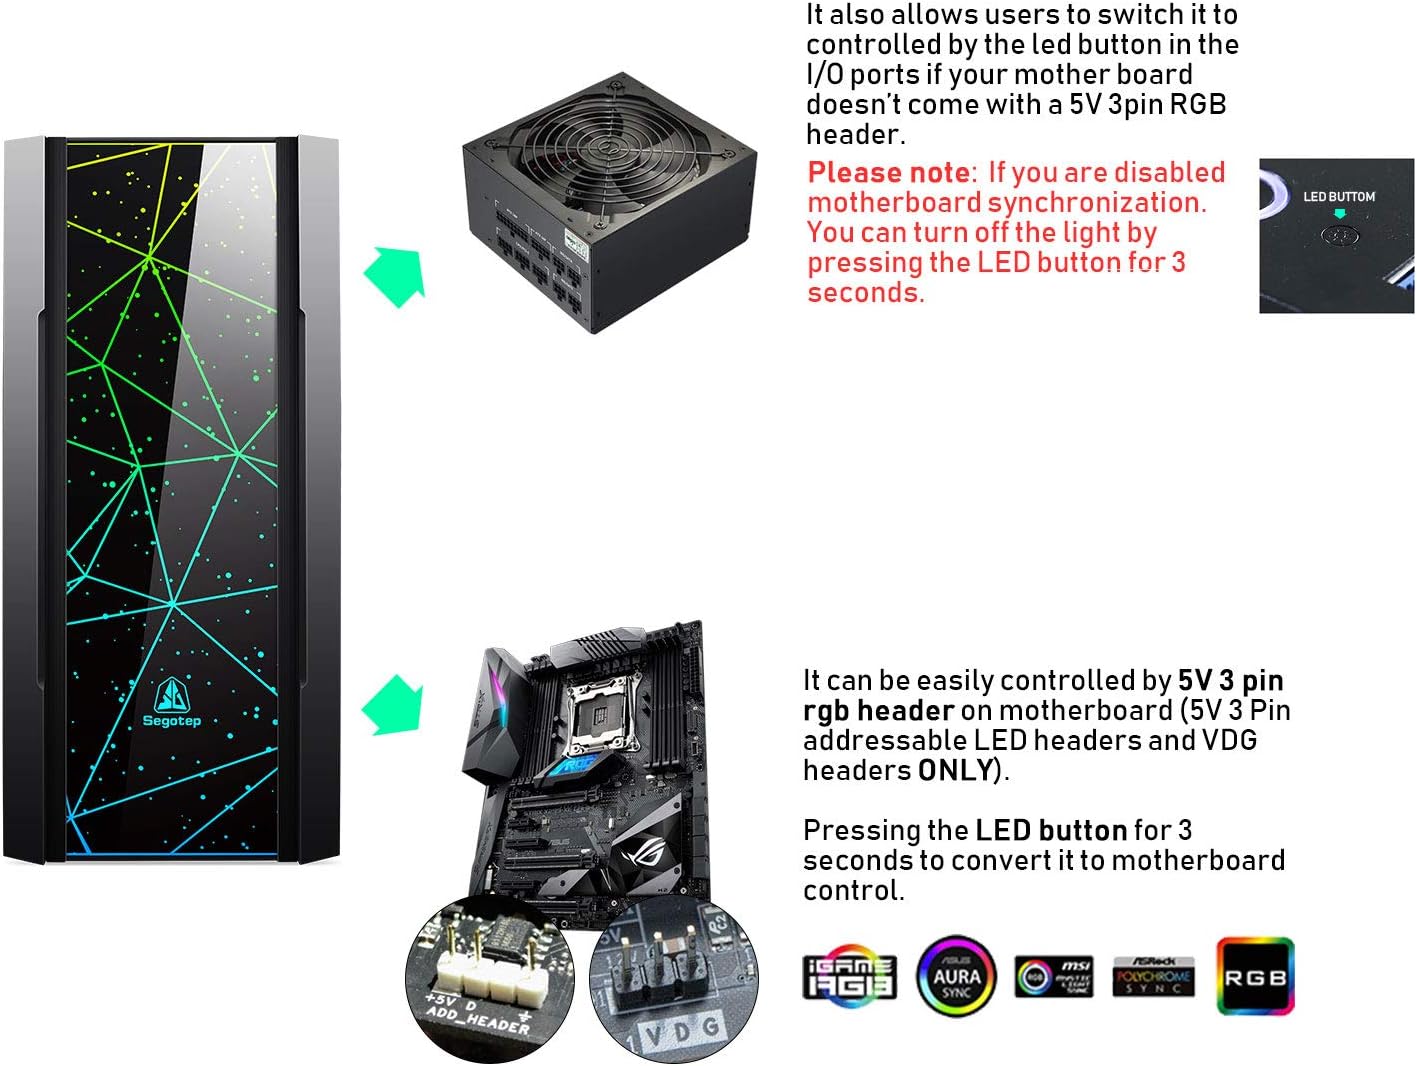
Figure 6: RGB control options, illustrating connection to a 5V 3-pin RGB header on a motherboard and the LED button on the I/O panel for manual control.
2. પાવરિંગ ચાલુ
Ensure all internal components are securely connected and the power supply is properly installed and plugged into a power source. Press the power button on the top I/O panel to start your system.
જાળવણી
૬.૧. ડસ્ટ ફિલ્ટર સફાઈ
The case features removable dust filters for easy cleaning. Regularly remove and clean these filters to maintain optimal airflow and prevent dust buildup inside your PC.
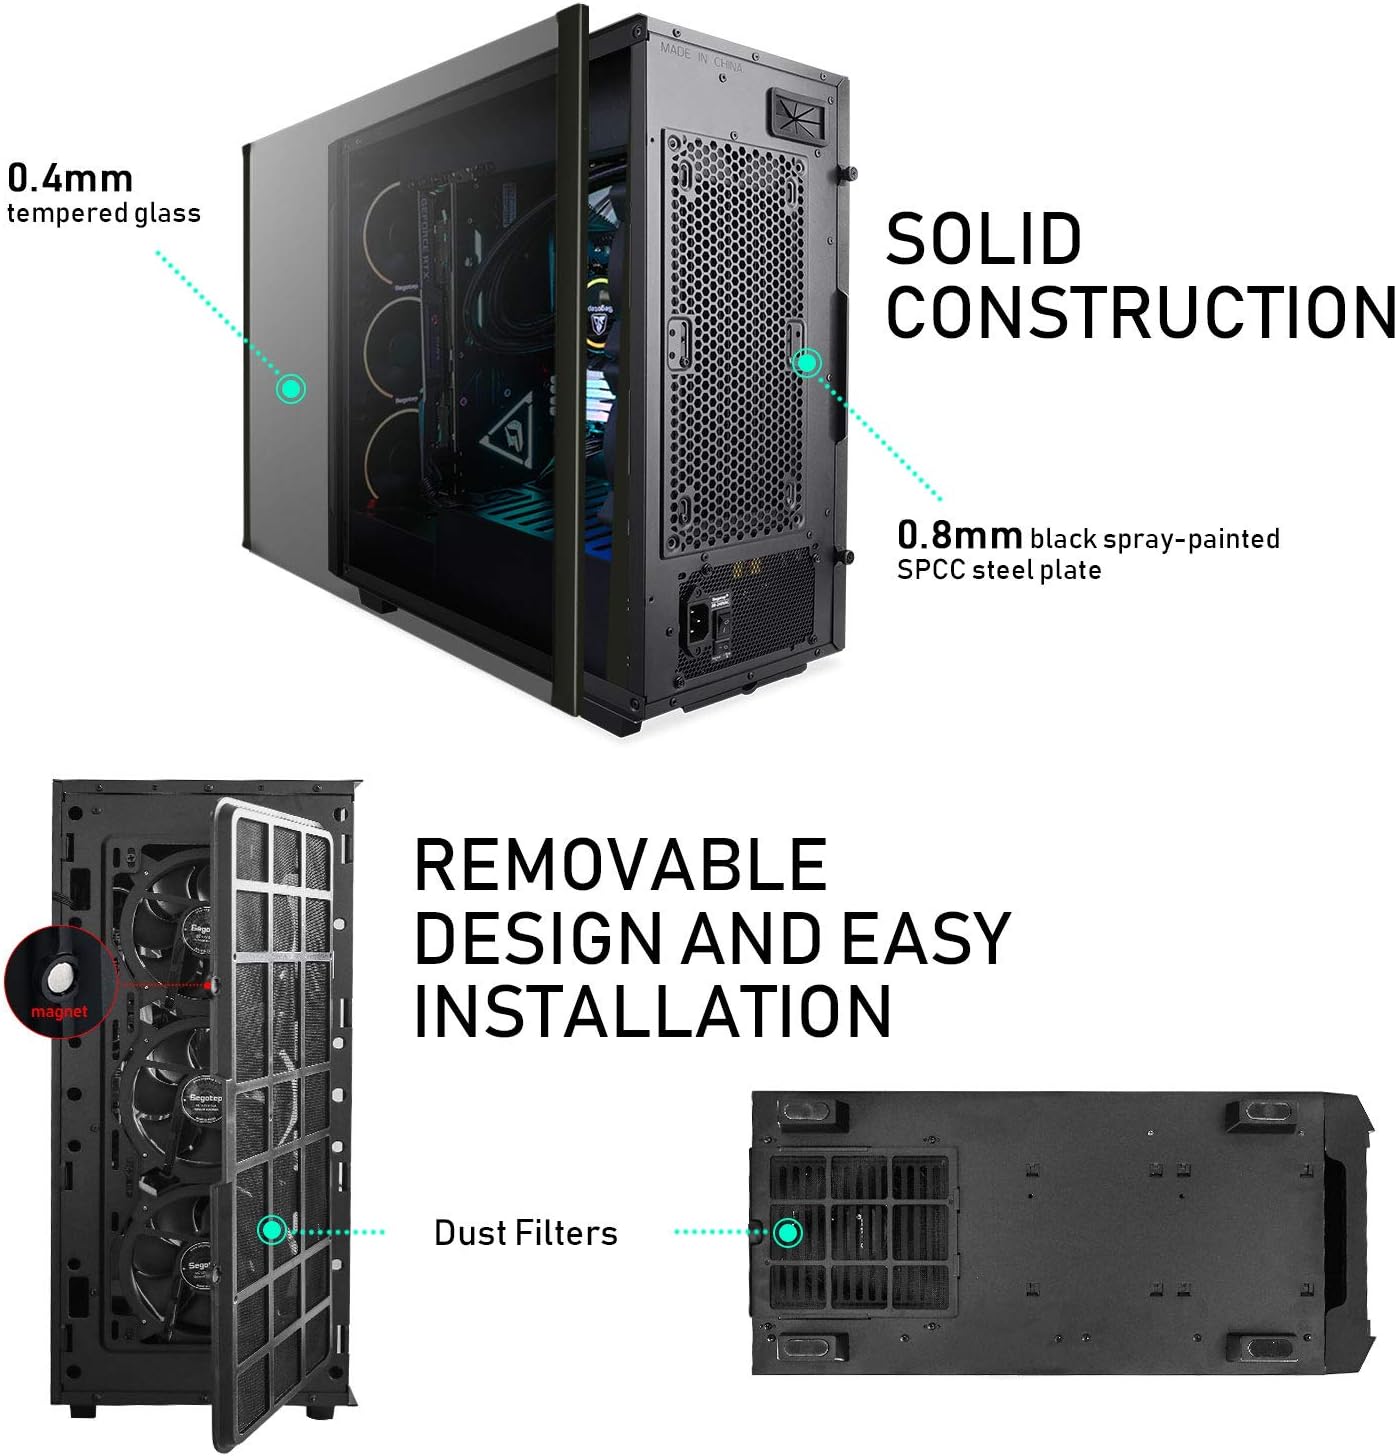
Figure 7: Removable design of dust filters for easy installation and cleaning, located on the front and bottom of the case.
2. Tempered Glass Care
The tempered glass side panel is 0.4mm thick and the steel plate is 0.8mm thick, ensuring solid construction. Clean the tempered glass with a soft, lint-free cloth and a non-abrasive glass cleaner. Avoid harsh chemicals or abrasive materials that could scratch the surface.
મુશ્કેલીનિવારણ
1. કોઈ પાવર નથી
- Ensure the power supply is switched on and properly connected to both the wall outlet and all internal components.
- Check all motherboard power connections (24-pin ATX, 8-pin CPU).
- Verify the power button cable is correctly connected to the motherboard's front panel headers.
2. RGB Lighting Not Working
- Confirm the RGB strip is connected to a 5V 3-pin addressable RGB header on the motherboard, not a 12V RGB header.
- If using motherboard software, ensure it is up-to-date and the correct lighting mode is selected.
- If using the I/O button, press and hold it for 3 seconds to switch control modes.
3. Poor Airflow/High Temperatures
- Ensure all installed fans are spinning correctly and are oriented for optimal airflow (front for intake, rear for exhaust).
- Clean all dust filters regularly.
- Verify that cables are managed efficiently to avoid obstructing airflow paths.
વિશિષ્ટતાઓ
| લક્ષણ | વિગત |
|---|---|
| બ્રાન્ડ | સેગોટેપ |
| મોડેલનું નામ | ફોનિક્સ |
| કેસનો પ્રકાર | મિડ ટાવર |
| મધરબોર્ડ સુસંગતતા | ATX, માઇક્રો-ATX, ITX |
| સામગ્રી | Tempered Glass, SPCC Steel |
| રંગ | Phoenix Black |
| વસ્તુનું વજન | 21.2 પાઉન્ડ |
| ઉત્પાદનના પરિમાણો (LxWxH) | 18.5 x 8.4 x 19 ઇંચ |
| યુએસબી 3.0 પોર્ટ્સ | 1 |
| યુએસબી 2.0 પોર્ટ્સ | 2 |
| ટાઇપ-સી પોર્ટ્સ | 1 |
| મહત્તમ CPU કુલર ઊંચાઈ | 167 મીમી |
| મહત્તમ GPU લંબાઈ | 323mm (First slot: 285mm) |
| ડ્રાઇવ બેઝ | 2x SSD, 2x HDD |
વોરંટી અને આધાર
For warranty information and technical support, please refer to the official Segotep webસાઇટ પર જાઓ અથવા તેમની ગ્રાહક સેવાનો સંપર્ક કરો. વોરંટી દાવાઓ માટે ખરીદીનો પુરાવો રાખો.
સત્તાવાર ઉત્પાદન વિડિઓઝ:
Video: Segotep RGB Front Panel PC Gaming Computer Case - This video provides an overview of the RGB lighting features and front panel design of the Segotep Phoenix case.
Video: Segotep Phoenix ATX Black Mid Tower PC Gaming Computer Case USB 3.0 Type-C Ports/Graphics Card Vertical Mounting - A detailed look at the case's features, including USB 3.0 and Type-C ports, and the vertical graphics card mounting option.


