1. પરિચય
This manual provides instructions for the safe and efficient operation, maintenance, and troubleshooting of your Solis Barista Perfetta Plus Espresso Machine. Please read all instructions carefully before using the appliance and retain this manual for future reference.
2. સલામતી સૂચનાઓ
- ઉપકરણને હંમેશા ગ્રાઉન્ડેડ પાવર આઉટલેટ સાથે જોડો.
- મશીન, પાવર કોર્ડ, અથવા પાણી કે અન્ય પ્રવાહીમાં પ્લગ ન નાખો.
- હાથ અને આંગળીઓને ગરમ સપાટી અને વરાળથી દૂર રાખો.
- Unplug the machine from the power outlet before cleaning or when not in use.
- ક્ષતિગ્રસ્ત કોર્ડ અથવા પ્લગ વડે ઉપકરણને ચલાવશો નહીં.
- આ ઉપકરણ શારીરિક, સંવેદનાત્મક અથવા માનસિક ક્ષમતાઓ અથવા અનુભવ અને જ્ઞાનની અછત ધરાવતી વ્યક્તિઓ (બાળકો સહિત) દ્વારા ઉપયોગ માટે બનાવાયેલ નથી, સિવાય કે તેઓને તેમની સુરક્ષા માટે જવાબદાર વ્યક્તિ દ્વારા ઉપકરણના ઉપયોગ અંગે દેખરેખ અથવા સૂચના આપવામાં આવી હોય. .
- Ensure the water tank is filled with fresh, cold water before operation.
3. પેકેજ સામગ્રી
ખાતરી કરો કે બધી વસ્તુઓ પેકેજિંગમાં હાજર છે:
- Solis Barista Perfetta Plus Espresso Machine
- પોર્ટફિલ્ટર
- સિંગલ શોટ ફિલ્ટર બાસ્કેટ
- ડબલ શોટ ફિલ્ટર બાસ્કેટ
- Tamper
- માપન સ્કૂપ
- સફાઈ બ્રશ
- Water Filter (if included)
- વપરાશકર્તા માર્ગદર્શિકા

Image: Solis Barista Perfetta Plus Espresso Machine with its various accessories, including portafilter, tamper, and filter baskets.
4. ઉત્પાદન ઓવરview
તમારા એસ્પ્રેસો મશીનના ઘટકોથી પરિચિત થાઓ:

છબી: આગળ view of the Solis Barista Perfetta Plus Espresso Machine, showing the control panel, pressure gauge, portafilter, and drip tray.
- નિયંત્રણ પેનલ: Buttons for Program (Prog.), Single Espresso, Double Espresso, and Steam.
- પ્રેશર ગેજ: ઉકાળવાનું દબાણ દર્શાવે છે.
- પોર્ટફિલ્ટર: Holds the ground coffee for brewing.
- સ્ટીમ વાન્ડ: Used for steaming milk.
- ડ્રિપ ટ્રે: વધારાનું પાણી અને કોફીના ટીપાં એકઠા કરે છે.
- પાણીની ટાંકી: Removable reservoir for water supply.
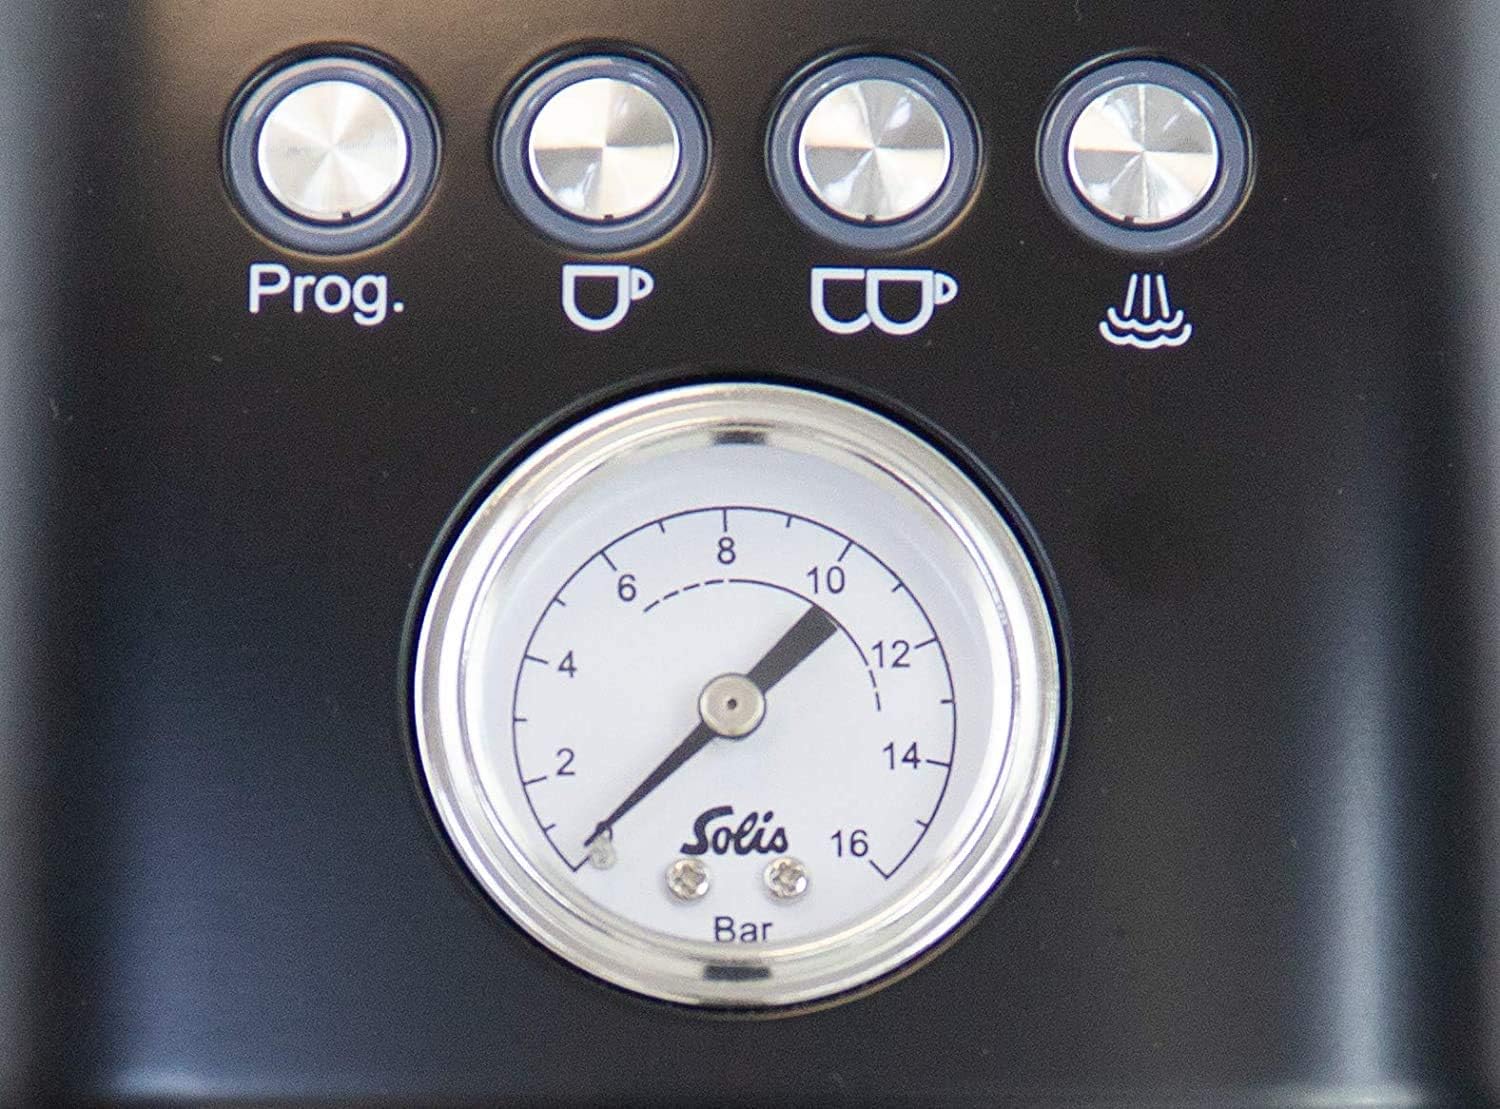
Image: Close-up of the control panel, highlighting the 'Prog', single and double espresso buttons, steam button, and the central pressure gauge.

છબી: બાજુ view of the Solis Barista Perfetta Plus Espresso Machine, clearly showing the removable water tank with 'Max' and 'Min' level indicators.
5. સેટઅપ
5.1 અનપેકિંગ અને પ્લેસમેન્ટ
- Remove all packaging materials and protective films from the machine.
- Place the machine on a stable, level, and heat-resistant surface, away from water sources and heat.
- ઉપકરણની આસપાસ પર્યાપ્ત વેન્ટિલેશનની ખાતરી કરો.
5.2 પાણીની ટાંકી ભરવી
- મશીનની પાછળથી પાણીની ટાંકી દૂર કરો.
- Fill the tank with fresh, cold drinking water up to the 'Max' level indicator.
- પાણીની ટાંકીને તેની જગ્યાએ સુરક્ષિત રીતે મૂકો.
5.3 First Use / Priming the Machine
- પાવર કોર્ડને ગ્રાઉન્ડેડ ઇલેક્ટ્રિકલ આઉટલેટમાં પ્લગ કરો.
- Press the 'ON/OFF' button to turn on the machine. The buttons will flash as the machine heats up.
- Once the buttons are steadily lit, the machine is ready.
- પોર્ટફિલ્ટર સ્પાઉટ (કોફી વગર) નીચે એક કપ મૂકો.
- Press the 'Double Espresso' button to run water through the group head. This primes the pump and flushes any manufacturing residue. Repeat this step for the steam wand by activating the steam function and letting water/steam flow for a few seconds.
6. ઓપરેટિંગ સૂચનાઓ
6.1 એસ્પ્રેસો બનાવવી
- પોર્ટફિલ્ટર તૈયાર કરો: Select the appropriate filter basket (single or double) and insert it into the portafilter.
- કોફીને ગ્રાઇન્ડ કરો: Grind fresh coffee beans to a fine consistency suitable for espresso. The grind size significantly impacts extraction.
- Fill and Tamp: Fill the filter basket with ground coffee. Use the tamper to press the coffee evenly and firmly.
- પોર્ટફિલ્ટર દાખલ કરો: Attach the portafilter to the group head by aligning it and rotating it to the right until it is secure.
- કપનું સ્થાન: તમારા એસ્પ્રેસો કપ(ઓ) ને પોર્ટફિલ્ટર સ્પાઉટ્સ નીચે મૂકો.
- એસ્પ્રેસો ઉકાળો: Press the 'Single Espresso' or 'Double Espresso' button. The machine will automatically brew the pre-programmed volume of espresso.
- મોનિટર દબાણ: Observe the pressure gauge during brewing. Optimal pressure is typically within the indicated range.
6.2 Programming Shot Volume
- With the machine ready, press and hold the 'Prog.' button until it flashes.
- Press either the 'Single Espresso' or 'Double Espresso' button to start brewing.
- Once the desired volume of espresso is dispensed, press the same espresso button again to stop. The machine will save this volume for future use.
૩.૨ બાફતું દૂધ
- Fill a milk pitcher with cold milk, typically to just below the spout.
- Press the 'Steam' button. The button will flash as the machine heats up to steaming temperature.
- Once the 'Steam' button is steadily lit, purge the steam wand by opening the steam knob briefly to release any condensed water. Close the knob.
- Insert the steam wand tip just below the surface of the milk. Open the steam knob fully.
- Steam the milk until it reaches the desired temperature and texture.
- સ્ટીમ નોબ બંધ કરો અને ઘડો બહાર કાઢો.
- જાહેરાતથી સ્ટીમ વાન્ડને તરત જ સાફ કરોamp cloth to prevent milk residue from drying. Purge the wand again briefly to clear any internal milk.
7. જાળવણી અને સફાઈ
7.1 દૈનિક સફાઈ
- ડ્રિપ ટ્રે: Empty and rinse the drip tray after each use or when the 'Full' indicator appears.
- પોર્ટફિલ્ટર અને ફિલ્ટર બાસ્કેટ: Remove spent coffee grounds, rinse the portafilter and filter baskets under hot water.
- સ્ટીમ વાન્ડ: Wipe the steam wand immediately after each use with a damp cloth. Purge the wand to clear any milk residue.
7.2 ગ્રુપ હેડ સફાઈ
Periodically clean the group head to remove coffee oils and residue:
- Insert a blind filter (if provided) into the portafilter.
- Add a small amount of espresso machine cleaning detergent to the blind filter.
- ગ્રુપ હેડ સાથે પોર્ટફિલ્ટર જોડો.
- Run a short brewing cycle (e.g., single espresso button) for 10 seconds, then stop. Wait 10 seconds. Repeat 5 times.
- Remove the portafilter, rinse it, and repeat the process with clean water to flush out detergent.
7.3 ડેસ્કલિંગ
Descaling is necessary to remove mineral buildup and maintain machine performance. The frequency depends on water hardness and usage. Refer to the descaling indicator (if present) or descale every 2-3 months.
- પાણીની ટાંકી ખાલી કરો અને ઉત્પાદકની સૂચનાઓ અનુસાર મિશ્રિત ડિસ્કેલિંગ સોલ્યુશનથી ભરો.
- ગ્રુપ હેડ અને સ્ટીમ વાન્ડ નીચે એક મોટું કન્ટેનર મૂકો.
- Follow the specific descaling procedure outlined in your machine's full manual or activate the descaling program if available. This typically involves running the solution through the group head and steam wand.
- After the descaling cycle, rinse the water tank thoroughly and fill it with fresh water. Run several cycles of fresh water through the machine to flush out any remaining descaling solution.
8. મુશ્કેલીનિવારણ
If you encounter issues, consult the following table before contacting customer support:
| સમસ્યા | સંભવિત કારણ | ઉકેલ |
|---|---|---|
| No water flow from group head | Water tank empty; machine not primed; pump airlock; clogged filter basket. | Fill water tank; prime the machine; clean filter basket. |
| એસ્પ્રેસો ખૂબ ધીમેથી બને છે અથવા બિલકુલ બનતું નથી | કોફી ગ્રાઉન્ડ ખૂબ બારીક; કોફી ટીampખૂબ સખત; ફિલ્ટર ભરાયેલું. | બરછટ ગ્રાઇન્ડનો ઉપયોગ કરો; ટીamp with less pressure; clean filter. |
| Espresso brews too quickly / weak coffee | કોફી ગ્રાઉન્ડ ખૂબ બરછટ; પૂરતી કોફી નથી; કોફી ટીampએડ ખૂબ હળવાશથી. | બારીક પીસીને વાપરો; કોફીની માત્રા વધારો; ટીamp વધુ દબાણ સાથે. |
| વરાળની લાકડીમાંથી વરાળ નહીં | Steam button not activated; steam wand clogged. | Ensure steam function is on and heated; clean steam wand tip. |
| મશીન ચાલુ નથી | પ્લગ ઇન નથી; પાવર આઉટલેટમાં સમસ્યા. | પાવર કનેક્શન તપાસો; કોઈ અલગ આઉટલેટ અજમાવી જુઓ. |
9. સ્પષ્ટીકરણો
- બ્રાન્ડ: સોલિસ
- મોડલ: પરફેટા પ્લસ
- ઉત્પાદન પરિમાણો: 17 x 7 x 12.5 ઇંચ
- વસ્તુનું વજન: 17.44 પાઉન્ડ
- કોફી ઇનપુટ પ્રકાર: ગ્રાઉન્ડ કોફી
- ઓપરેશન મોડ: સંપૂર્ણપણે સ્વચાલિત
- વિશેષ લક્ષણ: પ્રોગ્રામેબલ
- સમાવાયેલ ઘટકો: ફિલ્ટર કરો
10. વોરંટી અને સપોર્ટ
The Solis Barista Perfetta Plus Espresso Machine comes with a manufacturer's warranty. For specific warranty terms, duration, and conditions, please refer to the warranty card included with your product or visit the official Solis website. For technical support, spare parts, or service inquiries, please contact Solis customer service through their official channels.


