પરિચય
Thank you for choosing the Hanaix Projection Digital Alarm Clock. This manual provides comprehensive instructions to help you set up, operate, and maintain your new alarm clock. Please read this manual carefully before use to ensure optimal performance and longevity of the product.
ઉત્પાદન ઓવરview
The Hanaix Projection Digital Alarm Clock is designed to enhance your bedroom experience with its versatile features and sleek design. It offers clear time projection, dual alarms, FM radio, and convenient charging capabilities.
મુખ્ય લક્ષણો
- 180° Projection Alarm Clock: Projects clear time onto your wall or ceiling with focus control.
- Dual Alarms & Snooze Function: Set two separate wake-up times with 15 adjustable volume levels and a 5-minute snooze.
- FM Radio with Sleep Timer: Auto-off function allows 5 to 90 minutes sleep timer.
- USB Charging Port & Memory Function: Compatible with various digital devices for charging. Backup memory battery retains settings during power outages
- 7.3" Large LED Display & Mirror Screen: Large, clear display visible from a distance, also functions as a mirror.
ઘટકો

આકૃતિ 1: પાછળ view of the alarm clock with labeled components including buttons, speaker, USB charging port, and memory battery slot.
સેટઅપ
પાવરિંગ ચાલુ
To power on the alarm clock, remove the insulation tab from the button battery compartment on the back. Then, connect the power cable to the DC 5V port on the back of the clock and plug the adapter into a power outlet.

Figure 2: Alarm clock connected to power, ready for use.
નોંધ: The button battery is for memory backup only. The display will not light up without the power cord connected.
સમય અને તારીખ સેટિંગ
Follow these steps to set the time and date:
- Long press the "SET" button for 3 seconds to enter the time setting mode. The 12/24H format will flash. Use the "▲" or "▼" buttons to select your preferred format.
- Press "SET" again to set the hour. Use "▲" or "▼" to adjust the hour. Long press for faster adjustment.
- Press "SET" again to set the minute. Use "▲" or "▼" to adjust the minute. Long press for faster adjustment.
- Press "SET" one more time or wait 10 seconds without operation to exit the setting mode.
ઓપરેટિંગ સૂચનાઓ
તેજ દર્શાવો
The clock display has 4 levels of brightness. Short press the "Zz" button to cycle through brightness levels: Bright (Default) → Slightly Bright → Dim → Off.

Figure 3: Various brightness settings for the main display.
Long press the "Zz" button for 3 seconds to activate the automatic dimming function. The display will brighten in bright environments and dim in dark environments. Long press again to turn off this function (default is off).
પ્રોજેક્શન કાર્ય
The clock can project the time onto your wall or ceiling. The projection angle is 180° adjustable.
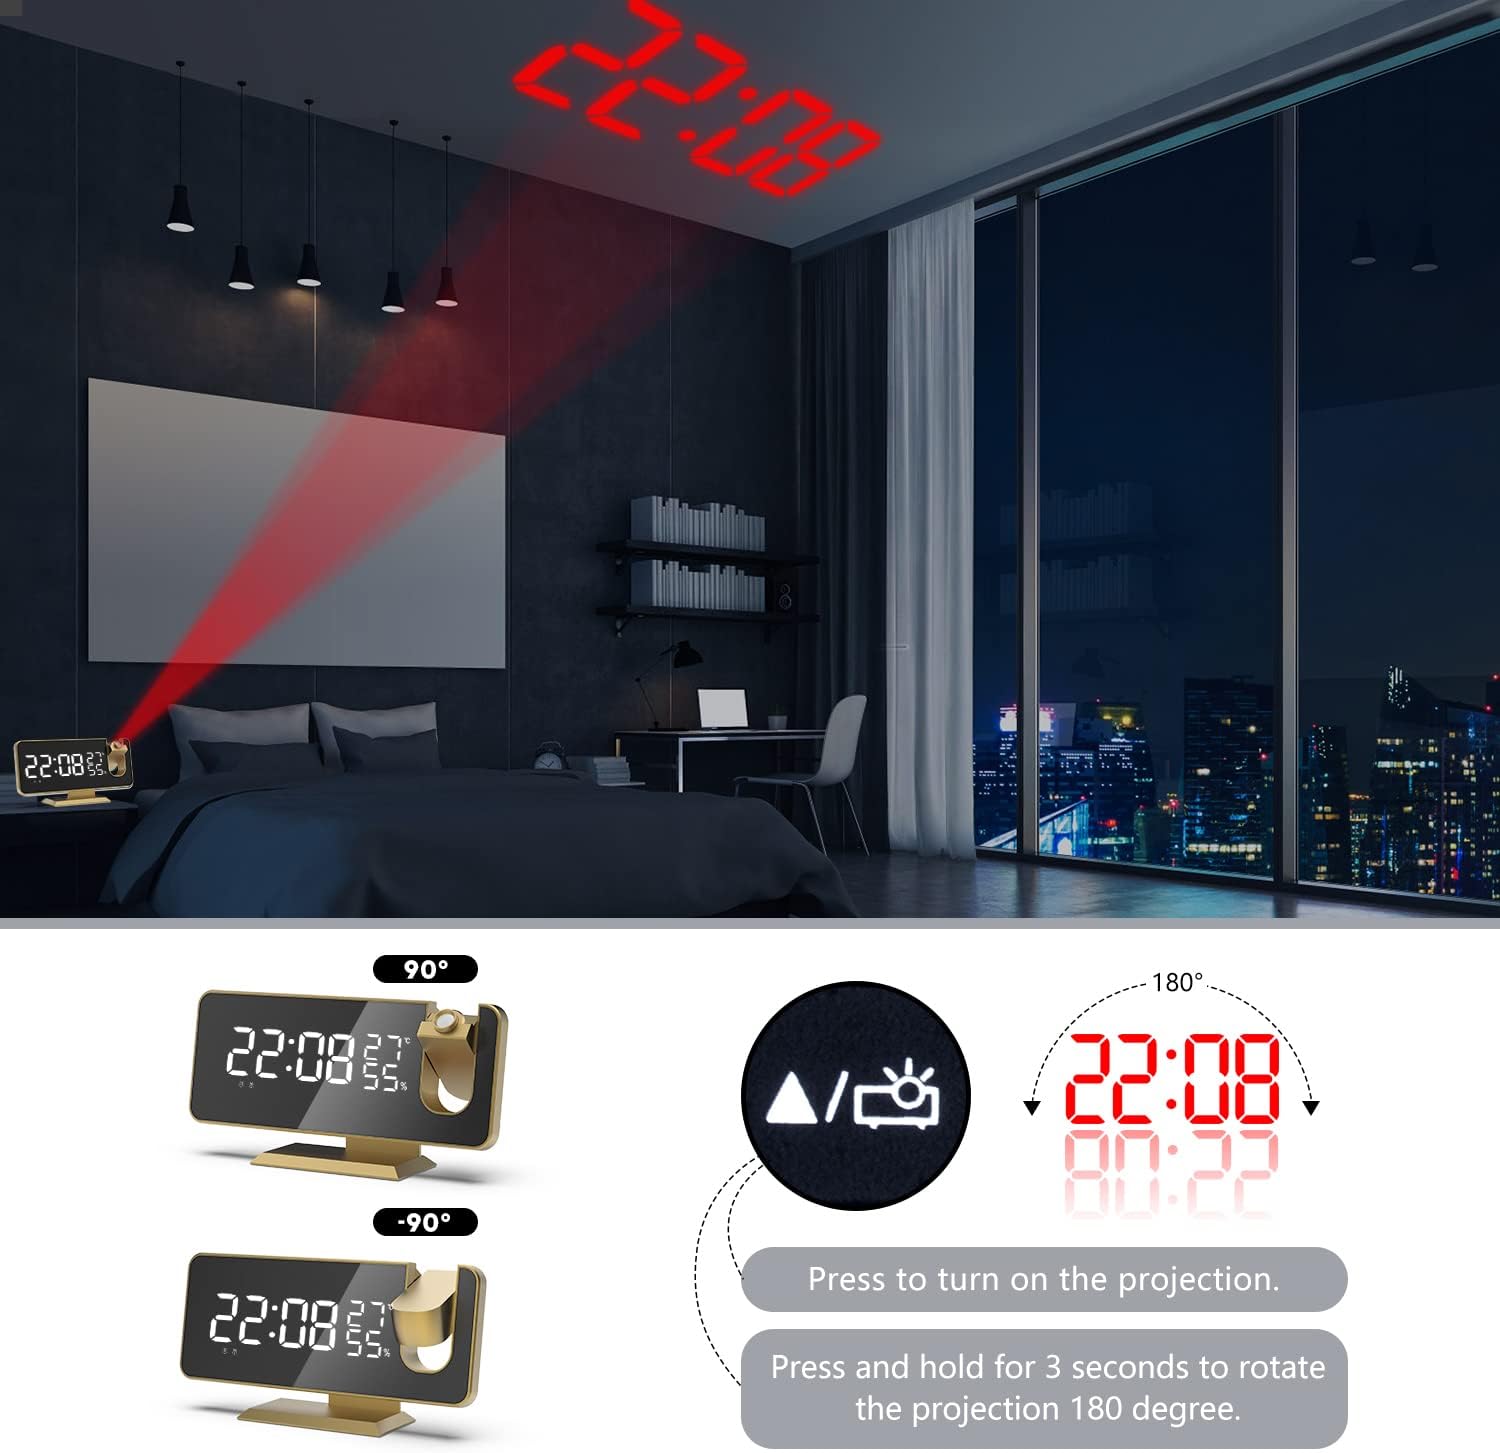
Figure 4: Time projection feature with adjustable angle.
- In normal time display mode, short press the "PROJECT" button to turn on the projection. Short press again to cycle through brightness levels: Bright → Dim → Off.
- While projecting, long press the "PROJECT" button for 3 seconds to invert the projected display.
નોંધ: The projection function is not available when the clock is running on battery backup mode.
એલાર્મ સેટિંગ
This clock features dual alarms. You can set two independent alarms.

Figure 5: Dual alarm setup for different wake-up times.
- Short press the "AL" button to select Alarm 1 or Alarm 2. Long press the selected alarm button for 3 seconds to enter alarm setting mode.
- Use "▲" or "▼" to set the hour, then short press the alarm button to confirm and move to minutes.
- Use "▲" or "▼" to set the minute, then short press the alarm button to confirm and move to snooze duration (5-60 minutes).
- To activate/deactivate an alarm, short press the "▼" button. The alarm icon (Bell 1 or Bell 2) will appear/disappear on the display.
- When the alarm sounds, short press the "Zz" button to activate snooze. The alarm will sound again after the set snooze duration. Press any other button to stop the alarm completely until the next day.
એફએમ રેડિયો
The clock includes an FM radio with automatic station search and a sleep timer.

Figure 6: FM Radio features and controls.
- Short press the "RADIO/SLEEP" button to turn on the FM radio.
- Long press the "SET" button to auto-search and save FM channels. The clock will scan and store available stations.
- Use "▲" or "▼" to switch between saved channels.
- Short press the "VOL" button to adjust the volume (15 levels).
- To set the sleep timer for the radio, long press the "RADIO/SLEEP" button. Use "▲" or "▼" to set the timer from 5 to 90 minutes. The radio will automatically turn off after the set time.
યુએસબી ચાર્જિંગ પોર્ટ
The alarm clock is equipped with a USB charging port on the back, allowing you to charge your smartphone or other digital devices while you sleep.
Figure 7: USB charging functionality.
Simply connect your device's USB charging cable to the port on the back of the alarm clock.
જાળવણી
Proper care and maintenance will ensure the longevity of your alarm clock.
- સફાઈ: સોફ્ટનો ઉપયોગ કરો, ડીamp cloth with a small amount of mild soapy water to clean the clock. Do not use gasoline, alcohol, or other strong solvents, as they may damage the surface. Always unplug the power cord before cleaning.
- સંગ્રહ: If you do not plan to use the clock for an extended period (more than 1 month), please remove the memory backup battery to prevent leakage and damage.
- પર્યાવરણ: Avoid using the clock in high-temperature, humid, or direct sunlight environments. Keep it away from water.
- પ્લેસમેન્ટ: When placing the clock on furniture, use a cloth or other protective material to prevent scratches or damage to the furniture surface.
મુશ્કેલીનિવારણ
અહીં કેટલીક સામાન્ય સમસ્યાઓ અને તેમના સંભવિત ઉકેલો છે:
| સમસ્યા | સંભવિત કારણ | ઉકેલ |
|---|---|---|
| Display is off or not lighting up. | પાવર કોર્ડ જોડાયેલ નથી અથવા પાવર OUtage. | Ensure the power cord is securely plugged into the clock and a working outlet. Check for power outages |
| Time display is incorrect or flickering. | Internal LED issue or memory battery problem. | Try replacing the CR2032 memory battery. If the issue persists, contact customer support. |
| Projection is blurry or unclear. | Focus ring needs adjustment or distance is too far/close. | Rotate the focus control ring on the projector to sharpen the image. Adjust the distance of the clock from the projection surface. |
| એલાર્મ વાગતો નથી. | Alarm not activated or volume too low. | Ensure the alarm icon is displayed. Check the alarm volume setting (15 levels available). |
| Difficulty setting up the clock. | Instructions unclear or user error. | Carefully re-read the "Setup" and "Operating Instructions" sections. Refer to the provided video tutorial for visual guidance. |
વિશિષ્ટતાઓ
| લક્ષણ | વિગત |
|---|---|
| બ્રાન્ડ | હનાઇક્સ |
| મોડલ નંબર | AC-A |
| રંગ | સોનું |
| ડિસ્પ્લે પ્રકાર | ડિજિટલ |
| ઉત્પાદન પરિમાણો | ૨.૩૬"પગ x ૪.૦૬"પગ |
| વસ્તુનું વજન | 10.2 ઔંસ |
| પાવર સ્ત્રોત | કોર્ડેડ ઇલેક્ટ્રિક |
| સામગ્રી | પ્લાસ્ટિક, એક્રેલિક |
| ખાસ લક્ષણો | Snooze, 4 Adjustable Brightness, 15 Adjustable Volume, Dual Alarm, USB Charging Port, Projection |
| બેટરીઓ | 1 CR2032 બેટરી જરૂરી છે (સમાવેલ) |
વોરંટી અને આધાર
Your Hanaix Projection Digital Alarm Clock comes with a 1-month money-back guarantee and a limited warranty. We are committed to providing high-quality products and smart technology.
If you encounter any problems or have questions, please do not hesitate to contact us. We provide 24/7 customer service to assist you.
For more information or to contact support, please visit the official Hanaix Store on Amazon.


