પરિચય
This manual provides detailed instructions for the installation, operation, and maintenance of your MSI MAG B550 Tomahawk MAX WiFi Gaming Motherboard. The MAG series is engineered for durability and user experience, offering a robust platform for AMD Ryzen processors.

Figure 1: MSI MAG B550 Tomahawk MAX WiFi Motherboard and Packaging
The MSI MAG B550 Tomahawk MAX WiFi motherboard is designed to support AMD Ryzen 5000 Series, 5000 G-Series, 4000G-Series, and 3000 Series processors. It features DDR4 memory support up to 4400(OC) MHz, PCIe 4.0, Lightning Gen 4 x4 M.2 with M.2 Shield Frozr, AMD Turbo USB 3.2 Gen 2, Wi-Fi 6E, Bluetooth 5.2, and 2.5Gbps LAN.
સેટઅપ
૫.૨. સીપીયુ ઇન્સ્ટોલેશન
Ensure the motherboard is placed on a non-conductive surface. Carefully open the CPU socket lever and align your AMD Ryzen processor with the socket, matching the golden triangle on the CPU to the corresponding mark on the socket. Gently lower the CPU into place without force, then close the lever to secure it.
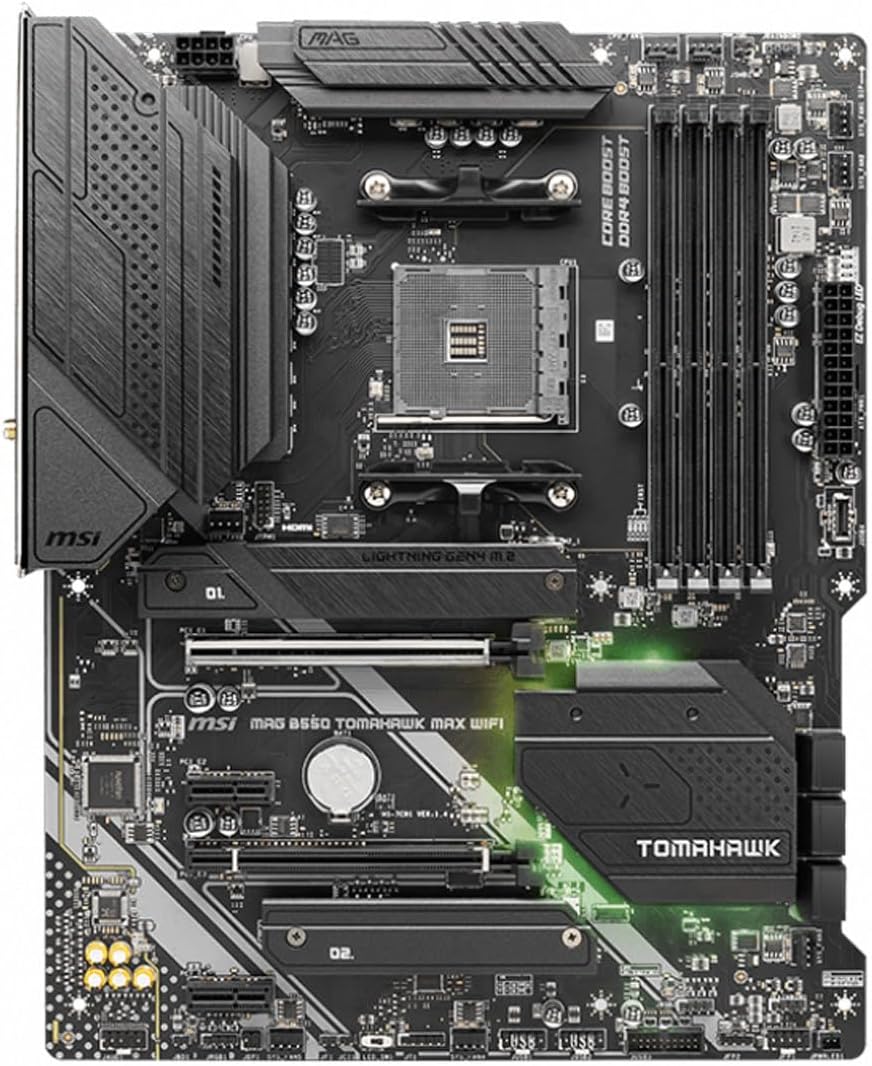
Figure 2: AM4 CPU Socket on the Motherboard
2. રેમ ઇન્સ્ટોલેશન
Locate the four DDR4 DIMM slots. For optimal performance with two RAM modules, refer to the motherboard manual for the recommended slot configuration (typically A2 and B2 for dual-channel operation). Open the clips on both ends of the DIMM slot, align the RAM module's notch with the slot's key, and press firmly until the clips snap into place.
૪. M.2 SSD ઇન્સ્ટોલેશન
The motherboard features Lightning Gen 4 x4 M.2 slots with M.2 Shield Frozr for optimal thermal management. Unscrew and remove the M.2 Shield Frozr cover. Insert your M.2 SSD into the slot at an angle, then gently push it down and secure it with the provided screw or latch. Reattach the M.2 Shield Frozr cover.
4. Motherboard Installation into Case
Align the motherboard with the standoffs in your PC case. Ensure the rear I/O shield (if not pre-installed) is correctly positioned in the case opening. Gently lower the motherboard onto the standoffs and secure it with screws. Connect the necessary power cables from your power supply to the motherboard (24-pin ATX power and 8-pin CPU power).

Figure 3: Motherboard with various slots and connectors
ઓપરેટિંગ
1. BIOS Update (Flash BIOS Button)
To update the BIOS without a CPU or RAM installed, save the BIOS file (renamed to MSI.ROM) to the root directory of a FAT32 formatted USB drive. Insert the USB drive into the designated 'Flash BIOS' USB port on the rear I/O panel. Press the 'Flash BIOS Button' and wait for the LED to stop flashing, indicating the update is complete. Ensure the power supply is connected and turned on during this process.
2. નેટવર્ક કનેક્ટિવિટી
The motherboard supports Wi-Fi 6E and Bluetooth 5.2. Attach the included Wi-Fi antennas to the connectors on the rear I/O panel for wireless network access. The integrated 2.5Gbps LAN port provides a high-speed wired network connection.
3. યુએસબી કનેક્ટિવિટી
The rear I/O panel includes multiple USB ports, including USB 3.2 Gen 2 (Type-A and Type-C) for high-speed data transfer, and standard USB 2.0 ports. Ensure you connect devices to the appropriate ports for optimal performance.

Figure 4: Rear I/O Panel with various ports
4. Video Outputs
The motherboard features HDMI and DisplayPort outputs on the rear I/O panel. These outputs are functional only when using an AMD Ryzen processor with integrated graphics (G-series CPUs). If using a processor without integrated graphics, a discrete graphics card installed in a PCIe slot is required for video output.
જાળવણી
1. Thermal Solution
The motherboard incorporates a Premium Thermal Solution with an Extended Heatsink Design, additional choke thermal pads rated for 7W/mk, and a PCB with 2oz thickened copper. These features are designed to maintain stable temperatures for high-performance systems and extended operation. Regularly ensure proper airflow within your PC case to maximize cooling efficiency.
2. BIOS Management
Keep your BIOS updated to ensure compatibility with new hardware and to benefit from performance optimizations and bug fixes. Always download the correct BIOS version for your specific motherboard model from the official MSI webસાઇટ
મુશ્કેલીનિવારણ
1. BIOS Update Issues
If you encounter issues updating the BIOS using the Flash BIOS Button, ensure your USB drive is formatted to FAT32 and the BIOS file is correctly renamed to MSI.ROM in the root directory. Some USB drives may not be compatible; try using a different USB drive if the issue persists.
2. No Video Output
Verify that your AMD Ryzen processor has integrated graphics if you are not using a discrete graphics card. If your CPU lacks integrated graphics, a dedicated graphics card must be installed in the primary PCIe slot for display output.
3. PCIe/M.2 Lane Sharing
The motherboard may share PCI lanes between PCIe connectors and M.2 slots. Refer to the detailed motherboard manual for specific configurations and potential limitations when populating multiple M.2 drives or PCIe expansion cards to ensure optimal performance for all installed components.
વિશિષ્ટતાઓ
| લક્ષણ | વિગત |
|---|---|
| બ્રાન્ડ | MSI |
| મોડેલનું નામ | MAG B550 TOMAHAWK MAX WIFI |
| CPU સોકેટ | સોકેટ AM4 |
| સુસંગત પ્રોસેસર્સ | AMD Ryzen 5000 Series, 5000-G Series, 4000-G Series and 3000 Series |
| ચિપસેટ પ્રકાર | AMD B550 |
| રેમ મેમરી ટેકનોલોજી | DDR4 |
| મેમરી સ્પીડ | Up to 4400(OC) MHz |
| PCIe સપોર્ટ | PCIe 4.0 |
| M.2 સ્લોટ્સ | Lightning Gen 4 x4 M.2 with M.2 Shield Frozr |
| યુએસબી પોર્ટ્સ | AMD Turbo USB 3.2 Gen 2, USB-C |
| વાયરલેસ પ્રકાર | વાઇ-ફાઇ 6E, બ્લૂટૂથ 5.2 |
| LAN | 2.5Gbps LAN with LAN Manager |
| વિડિઓ આઉટપુટ | HDMI, ડિસ્પ્લેપોર્ટ |
| ફોર્મ ફેક્ટર | એટીએક્સ |
| વસ્તુનું વજન | 3.75 પાઉન્ડ |
| ઉત્પાદન પરિમાણો | 12 x 9.6 x 2.5 ઇંચ |
વોરંટી અને આધાર
For warranty information and technical support, please refer to the official MSI website or contact MSI customer service directly. Product registration may be required to activate your warranty.


