પરિચય
The PENTAX O-GPS2 is a versatile GPS unit designed for use with compatible PENTAX digital SLR cameras. This unit provides location data, including latitude, longitude, altitude, Universal Time Coordinated (UTC), and shooting direction, which is recorded onto captured images. It supports GPS (US), QZSS (Japan), GLONASS, and Galileo satellite systems. The O-GPS2 also offers advanced features such as ASTROTRACER, Simple Navigation, and an Electronic Compass, enhancing photographic capabilities and outdoor navigation.
This manual provides detailed instructions for the proper setup, operation, and maintenance of your PENTAX O-GPS2 unit.

Image: The PENTAX O-GPS2 Handy GPS Unit, a compact black device with an ON/OFF button and status indicators.
પેકેજ સામગ્રી
ખાતરી કરો કે બધી વસ્તુઓ પેકેજમાં હાજર છે:
- PENTAX O-GPS2 Unit
- સૂચના માર્ગદર્શિકા (આ દસ્તાવેજ)
- વોરંટી કાર્ડ
Note: An AAA-size battery is not included and must be purchased separately.
સેટઅપ
1. બેટરી ઇન્સ્ટોલેશન
The O-GPS2 unit operates on a single AAA-size battery. It supports Alkaline AAA, Lithium AAA (L92), or NiMH AAA rechargeable batteries.
- Locate the battery compartment cover on the side of the O-GPS2 unit.
- Slide the lock mechanism to unlock the cover.
- બેટરી કમ્પાર્ટમેન્ટ કવર ખોલો.
- Insert one AAA-size battery, ensuring correct polarity (+/-) as indicated inside the compartment.
- Close the battery compartment cover and slide the lock mechanism to secure it.

Image: The PENTAX O-GPS2 with its battery compartment open, showing the correct orientation for inserting an AAA battery.
2. Mounting the O-GPS2 Unit
Mount the O-GPS2 unit onto the hot shoe of your compatible PENTAX digital SLR camera.
- Ensure both the camera and the O-GPS2 unit are powered off.
- Remove the hot shoe cover from your camera.
- Slide the O-GPS2 unit into the camera's hot shoe until it clicks into place.
- Tighten the locking screw or lever on the O-GPS2 unit (if present) to secure it firmly.

Image: The PENTAX O-GPS2 unit securely mounted on the hot shoe of a PENTAX K-3 Mark III digital SLR camera.
Compatible Camera Models: The O-GPS2 is compatible with PENTAX K-3 Mark III, KP, K-3, K-5II, K-5IIs, K-5, K-S2, K-S1, K-70, K-50, K-30, K-r, K-01, 645Z, and 645D (as of May 2022). Note that not all applications may be supported on all models.
ઓપરેટિંગ સૂચનાઓ
1. Powering On and GPS Signal Acquisition
After mounting the O-GPS2, power on your camera. The O-GPS2 will automatically power on and begin searching for GPS signals. The status indicator on the unit will show its acquisition progress.
- જીપીએસ કાર્ય: Once a signal is acquired, the unit records latitude, longitude, altitude, UTC, and shooting direction onto the EXIF data of captured images. This data is useful for tracking shooting locations and organizing images.
- In an open environment, a 3D coordinate fix typically takes 2-3 minutes.
- If the camera is turned off for an extended period, the O-GPS2 may enter a power-saving mode and require manual re-activation or a brief wait for re-acquisition upon camera power-on.

Image: A camera's LCD screen showing the current GPS location, including latitude, longitude, and altitude.
2. ASTROTRACER Function
The ASTROTRACER function, when used with a compatible PENTAX digital SLR camera, combines the O-GPS2's location data with the camera's SR (Shake Reduction) system. This allows for the tracking of celestial bodies, enabling longer exposures without star trails, ideal for astrophotography.
- To activate ASTROTRACER, refer to your camera's instruction manual for specific settings.
- Ensure the O-GPS2 has a stable GPS fix and is properly calibrated for optimal performance.

Image: A long-exposure photograph of the night sky, demonstrating the effectiveness of the ASTROTRACER function in capturing stars as points of light rather than trails.
3. Simple Navigation
The Simple Navigation function allows the O-GPS2 to calculate and display the direction and distance to a pre-set destination from your current position. This feature is useful for returning to specific shooting locations or navigating in unfamiliar terrain.
- Destination coordinates must be entered into the camera or O-GPS2 via a memory card and computer.
- Consult your camera's manual for detailed instructions on setting destinations.
4. Electronic Compass
The O-GPS2 includes an Electronic Compass function that displays the camera's precise direction on its LCD monitor. This is valuable for orienting yourself and planning shots based on cardinal directions.
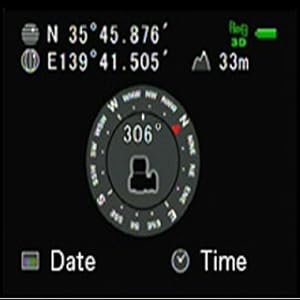
Image: A camera's LCD screen showing the electronic compass display, indicating the camera's current orientation.
5. માપાંકન
For accurate GPS and compass readings, especially for ASTROTRACER, calibration of the O-GPS2 is essential. This process compensates for magnetic interference and ensures precise orientation data.
- Access the calibration menu on your camera (refer to your camera's manual).
- Follow the on-screen instructions to rotate the camera in three directions, ensuring each rotation exceeds 180 degrees. This helps the unit learn its orientation in space.
- A "Calibration complete" message will appear upon successful calibration.

Image: A diagram illustrating the required camera rotations (pitch, roll, yaw) for calibrating the O-GPS2 unit.

Image: Calibration screen prompt.

Image: Calibration complete message.
It is recommended to perform calibration each time the unit is used, especially if the camera's orientation has changed significantly or if you are in a new location.
જાળવણી
1. સફાઈ
Wipe the unit with a soft, dry cloth. For stubborn dirt, lightly dampen the cloth with water and then wipe dry. Avoid using organic solvents like thinner or benzine, as they may damage the finish.
૭.૬. હવામાન પ્રતિકાર
The O-GPS2 features simplified weather-resistant construction, allowing for use in light rain. However, it is not fully waterproof. Avoid exposing the unit to heavy rain, direct water spray, or submersion. Ensure the battery compartment cover is securely closed to maintain weather resistance.
3. બેટરી રિપ્લેસમેન્ટ
Replace the AAA battery when the low battery indicator appears on the unit or camera display. Always use fresh batteries for optimal performance, especially during critical operations like ASTROTRACER.
મુશ્કેલીનિવારણ
- GPS સિગ્નલ નથી:
- Ensure the unit is outdoors with a clear view of the sky, away from tall buildings or dense foliage.
- Verify the battery is correctly installed and has sufficient charge.
- Allow several minutes for initial signal acquisition.
- Inaccurate Compass/ASTROTRACER:
- Perform a full calibration as described in the "Calibration" section.
- Avoid strong magnetic fields (e.g., large metal objects, magnets, electronic devices) that can interfere with the compass.
- એકમ ચાલુ નથી:
- Check battery installation and replace with a fresh battery.
- Ensure the unit is properly mounted on the camera's hot shoe.
- Verify your camera is powered on and compatible with the O-GPS2.
વિશિષ્ટતાઓ
| મોડેલનું નામ | O-GPS2 |
| આઇટમ મોડલ નંબર | 30364 |
| પરિમાણો (L x W x H) | ૭ x ૬ x ૩ ઇંચ (આશરે ૧૭૮ x ૧૫૨ x ૭૬ મીમી) |
| વસ્તુનું વજન | ૧૧.૩ ઔંસ (આશરે ૩૨૦ ગ્રામ) |
| પાવર સ્ત્રોત | 1x AAA-size battery (Alkaline, Lithium L92, or NiMH) |
| GPS Systems Supported | GPS (US), QZSS (Japan), GLONASS, Galileo |
| ખાસ લક્ષણો | ASTROTRACER, Simple Navigation, Electronic Compass, Weather-Resistant Construction |
| કનેક્ટિવિટી ટેકનોલોજી | USB (for data transfer via camera, not direct unit connection) |
| ઉત્પાદક | RICOH |
સ્પષ્ટીકરણો સૂચના વિના ફેરફારને પાત્ર છે.
વોરંટી અને આધાર
For warranty information and customer support, please refer to the warranty card included with your product or visit the official Pentax webસાઇટ. વોરંટી દાવાઓ માટે ખરીદીના પુરાવા તરીકે તમારી ખરીદી રસીદ રાખો.
Official Pentax Webસાઇટ: www.ricoh-imaging.co.jp/english/products/o-gps2/


