1. મહત્વપૂર્ણ સલામતી માહિતી
ડિહ્યુમિડિફાયર ચલાવતા પહેલા કૃપા કરીને બધી સૂચનાઓ કાળજીપૂર્વક વાંચો. ભવિષ્યના સંદર્ભ માટે આ માર્ગદર્શિકા જાળવી રાખો.
- પાણીના ઢોળાવને રોકવા માટે ખાતરી કરો કે યુનિટ એક સમતલ, સ્થિર સપાટી પર મૂકવામાં આવ્યું છે.
- Maintain adequate clearance (at least 20 cm) around the unit for proper airflow.
- Do not operate the unit with a damaged power cord. Contact customer support for replacement.
- સફાઈ કરતા પહેલા અથવા કોઈપણ જાળવણી કરતા પહેલા ડિહ્યુમિડિફાયરને અનપ્લગ કરો.
- એર ઇનલેટ અથવા આઉટલેટમાં વસ્તુઓ દાખલ કરશો નહીં.
- એકમને ગરમીના સ્રોતો અને સીધા સૂર્યપ્રકાશથી દૂર રાખો.
- આ ઉપકરણ ઓછી શારીરિક, સંવેદનાત્મક અથવા માનસિક ક્ષમતાઓ અથવા અનુભવ અને જ્ઞાનનો અભાવ ધરાવતી વ્યક્તિઓ (બાળકો સહિત) દ્વારા ઉપયોગ માટે બનાવાયેલ નથી, સિવાય કે તેમની સુરક્ષા માટે જવાબદાર વ્યક્તિ દ્વારા ઉપકરણના ઉપયોગ અંગેની દેખરેખ અથવા સૂચના આપવામાં આવી હોય.
2. ઉત્પાદન ઓવરview
The Waykar 80 Pints Dehumidifier is designed to efficiently remove excess moisture from your environment, improving air quality and comfort. It is suitable for spaces up to 5,000 square feet.

આકૃતિ 2.1: ફ્રન્ટ view of the Waykar 80 Pints Dehumidifier.

Figure 2.2: Dehumidifier operating in a room, illustrating its coverage capability and adjustable humidity range (30-80% RH).
મુખ્ય લાક્ષણિકતાઓમાં શામેલ છે:
- ૩૫ પિન્ટ ક્ષમતા: દરરોજ 80 પિન્ટ સુધી ભેજ દૂર કરે છે.
- એનર્જી સ્ટાર પ્રમાણિત: Designed for high energy efficiency.
- Wide-Angle Swing: Automatic 30°-90° swing function for improved air circulation.
- શાંત કામગીરી: Operates as low as 42 dB.
- સ્માર્ટ ટચ નિયંત્રણ: Intuitive panel for easy settings adjustment.
- 24-કલાક ટાઈમર: Schedule operations for convenience.
- Auto Defrost & Memory Restart: Ensures stable performance and resumes settings after power interruption.
- Flexible Drainage: Options for manual tank emptying or continuous drainage.
- ધોવા યોગ્ય એર ફિલ્ટર: સાફ અને જાળવણી માટે સરળ.
- 360° Swivel Wheels & Integrated Handle: સરળ ગતિશીલતા માટે.
3. સેટઅપ અને ઇન્સ્ટોલેશન
3.1 અનપેકિંગ
Carefully remove the dehumidifier from its packaging. Inspect the unit for any signs of damage. If any damage is found, do not operate the unit and contact customer support.
3.2 પ્લેસમેન્ટ
Place the dehumidifier on a firm, level surface in a location where the ambient temperature will not fall below 5°C (41°F). Ensure there is at least 20 cm (8 inches) of space around the unit for proper air circulation. Avoid placing the unit near heat-generating appliances or in direct sunlight.

Figure 3.1: The dehumidifier features 360° swivel wheels and an integrated handle for easy movement, along with tidy cable storage.
3.3 પાવર કનેક્શન
પાવર કોર્ડને ગ્રાઉન્ડેડ ઇલેક્ટ્રિકલ આઉટલેટમાં પ્લગ કરો. ખાતરી કરો કે વોલ્યુમtage and frequency of the power supply match the specifications on the unit's rating label.
4. ઓપરેટિંગ સૂચનાઓ
કંટ્રોલ પેનલ તમને ડિહ્યુમિડિફાયરના તમામ કાર્યોનું સંચાલન કરવાની મંજૂરી આપે છે.
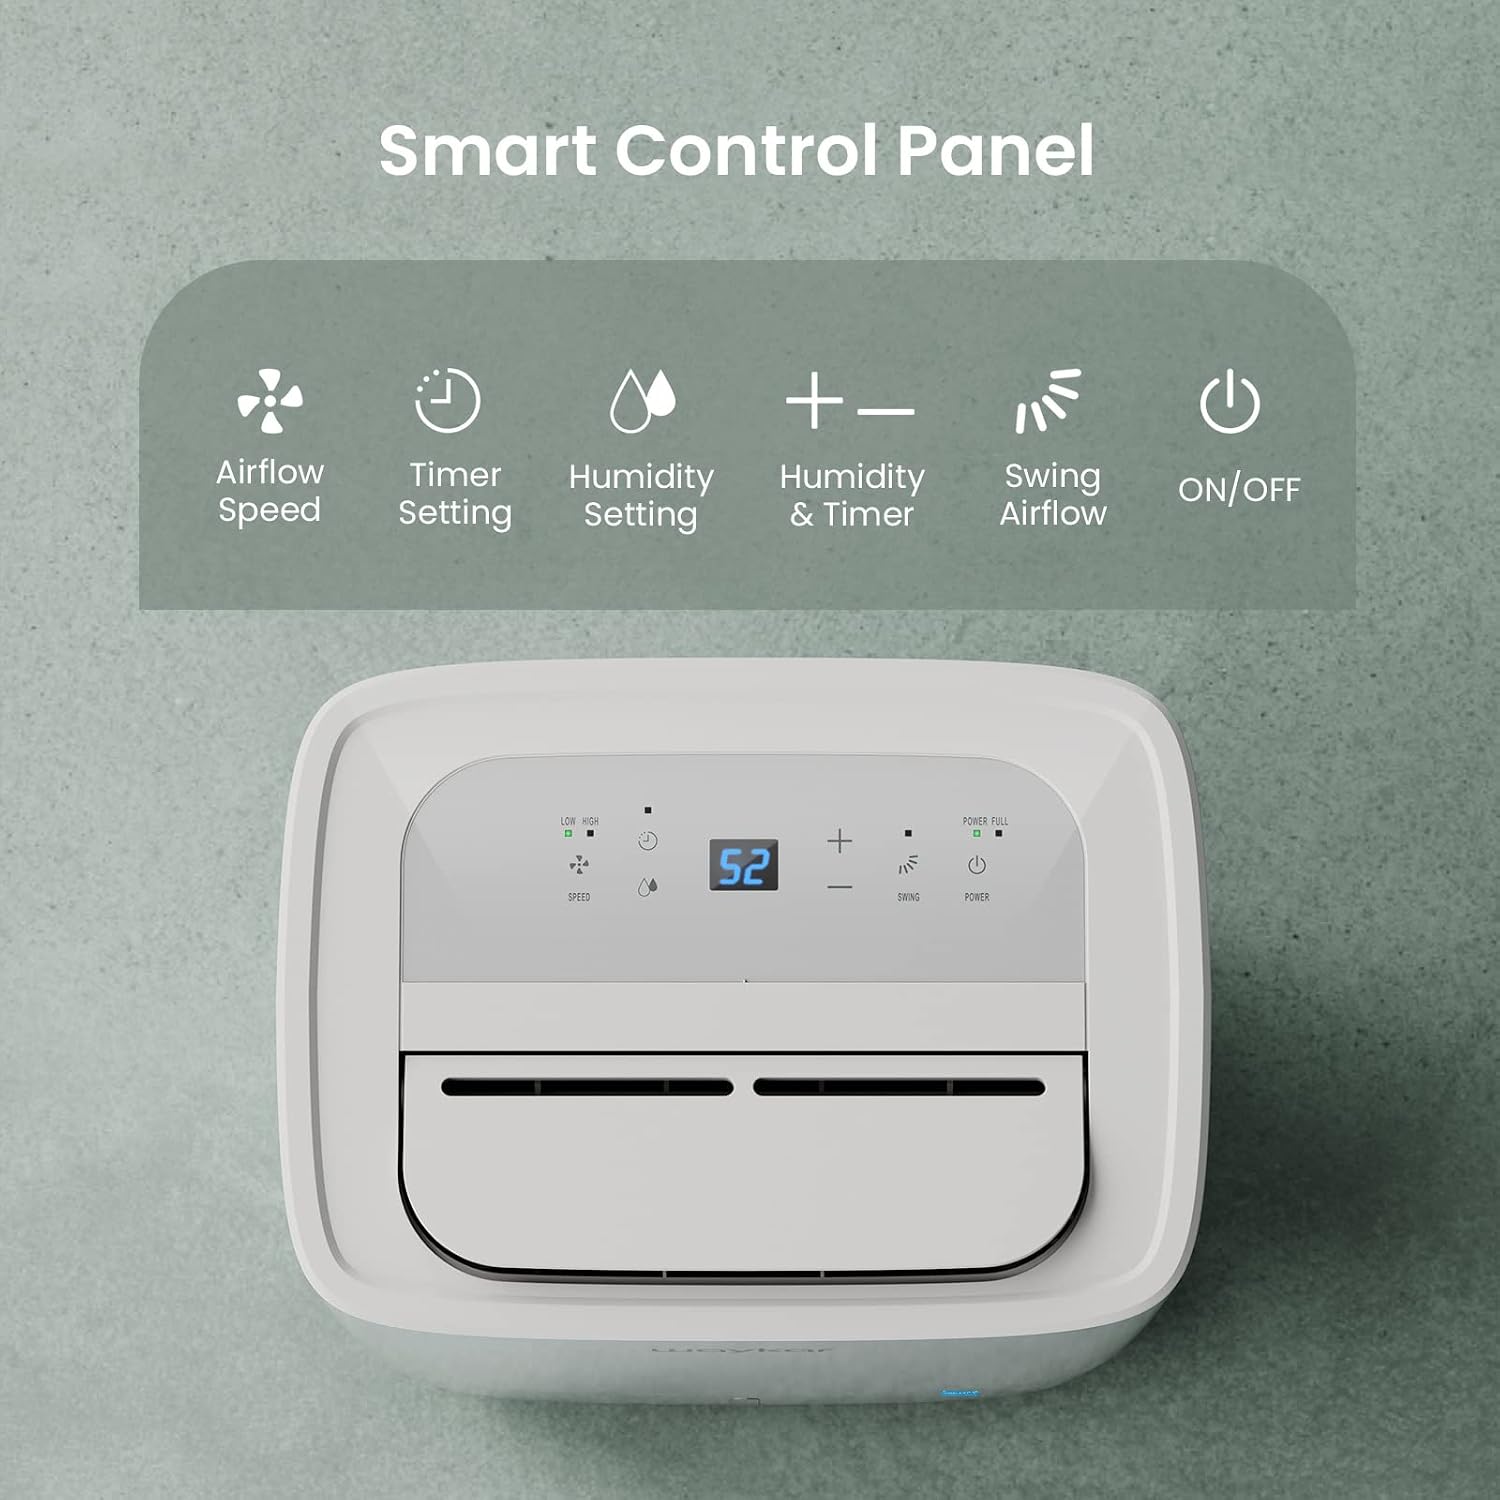
Figure 4.1: Smart Control Panel with buttons for Airflow Speed, Timer Setting, Humidity Setting, Swing Airflow, and ON/OFF.
4.1 પાવર ચાલુ/બંધ
- દબાવો શક્તિ યુનિટને ચાલુ અથવા બંધ કરવા માટેનું બટન.
૫.૨ ભેજનું સ્તર નક્કી કરવું
- દબાવો + or - buttons to adjust the desired humidity level between 30% and 80% Relative Humidity (RH). The unit will operate until the set humidity level is reached, then cycle ON/OFF to maintain it.
4.3 પંખાની ઝડપ
- દબાવો ઝડપ button to toggle between Low and High fan speeds.
4.4 ટાઈમર કાર્ય
- દબાવો ટાઈમર button to set a delay for the unit to turn ON or OFF. The timer can be set from 0.5 to 24 hours.
4.5 Swing Airflow
- દબાવો સ્વિંગ button to activate the automatic 30°-90° airflow oscillation. This helps distribute dehumidified air more evenly.
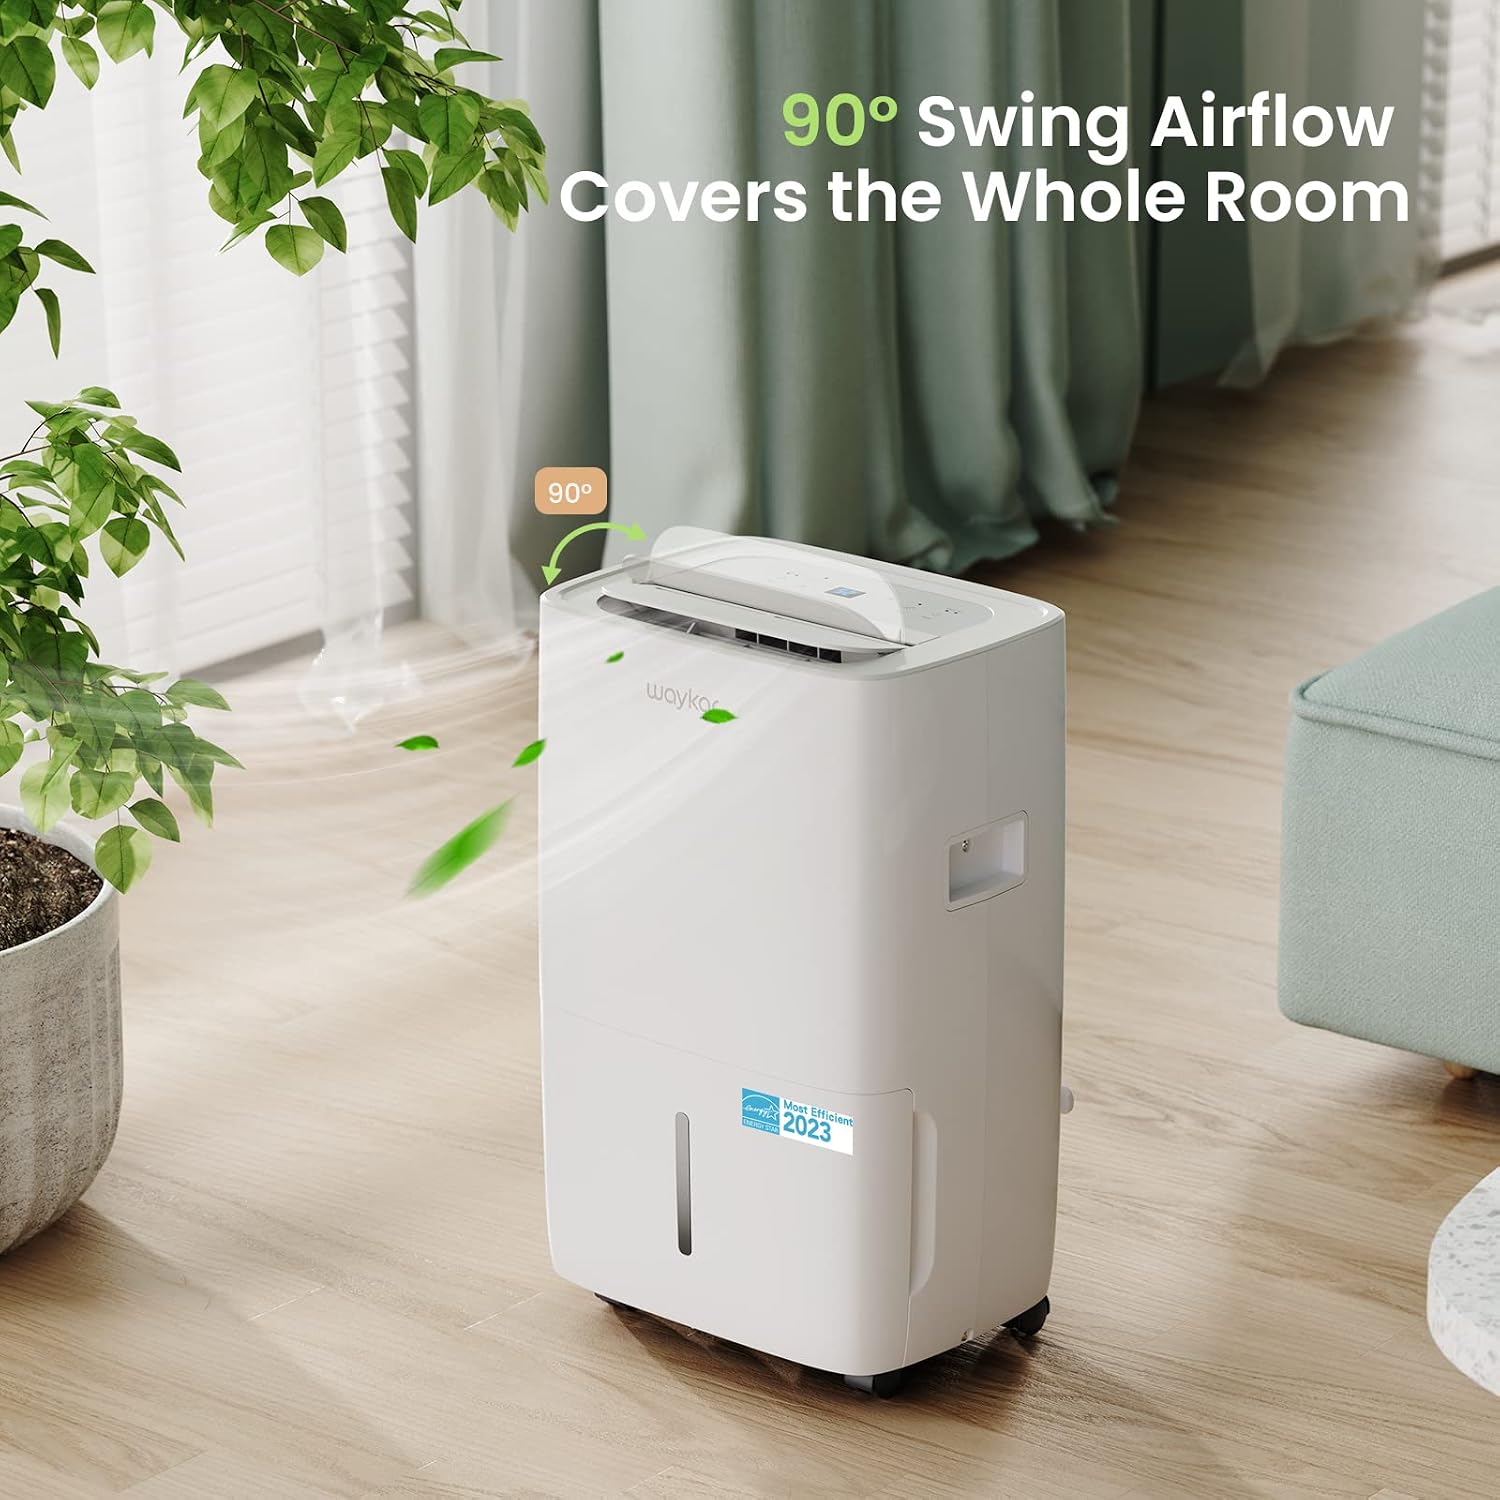
Figure 4.2: The 90° swing airflow feature helps cover the entire room for efficient dehumidification.
4.6 બાળ લોક
- ચાઇલ્ડ લોક સક્રિય કરવા માટે, દબાવો અને પકડી રાખો ટાઈમર button for 3 seconds. The control panel will be locked to prevent accidental changes. Repeat to unlock.
4.7 Auto Defrost and Memory Restart
- આ યુનિટમાં ઓટોમેટિક ડિફ્રોસ્ટ ફંક્શન છે જે બાષ્પીભવન કરનાર કોઇલ પર હિમ જમા થાય ત્યારે સક્રિય થાય છે, જે ઠંડા વાતાવરણમાં કાર્યક્ષમ કામગીરી સુનિશ્ચિત કરે છે.
- પાવર ou કિસ્સામાંtage, the Memory Restart function will automatically resume the previous settings once power is restored.
5. ડ્રેનેજ વિકલ્પો
The Waykar dehumidifier offers two convenient drainage methods:
૬.૧ મેન્યુઅલ ડ્રેનેજ (પાણીની ટાંકી)
- When the 1.14-gallon (4.3L) water tank is full, the unit will automatically shut off and an indicator light will illuminate on the control panel.
- યુનિટના આગળના ભાગમાંથી પાણીની ટાંકી કાળજીપૂર્વક બહાર કાઢો.
- એકત્રિત પાણી ખાલી કરો.
- ખાલી ટાંકીને યુનિટમાં પાછી સ્લાઇડ કરો જ્યાં સુધી તે જગ્યાએ ક્લિક ન થાય. ત્યારબાદ યુનિટ ફરી કાર્યરત થશે.
૬.૨ સતત ડ્રેનેજ (ડ્રેઇન નળી)
- For continuous operation without needing to empty the tank, attach the included 3.3 ft (1 m) drain hose to the drainage outlet at the back of the unit.
- Ensure the hose is securely tightened to prevent leaks.
- Direct the other end of the hose to a suitable drain (e.g., floor drain, sink). Ensure the hose is sloped downwards to allow gravity drainage.

Figure 5.1: Illustration of both manual drainage (left) and continuous drainage (right) options.
6. જાળવણી
નિયમિત જાળવણી તમારા ડિહ્યુમિડિફાયરની શ્રેષ્ઠ કામગીરી અને આયુષ્ય સુનિશ્ચિત કરે છે.
6.1 એર ફિલ્ટરની સફાઈ
The washable air filter should be cleaned regularly (approximately every 250 hours of operation or when the filter indicator light illuminates) to maintain efficiency.
- યુનિટ બંધ કરો અને તેને પાવર આઉટલેટમાંથી અનપ્લગ કરો.
- યુનિટના પાછળના ભાગમાંથી એર ફિલ્ટર દૂર કરો.
- ફિલ્ટરને ગરમ, સાબુવાળા પાણીથી ધોઈ લો. સારી રીતે ધોઈ લો.
- ફિલ્ટરને યુનિટમાં ફરીથી દાખલ કરતા પહેલા તેને હવામાં સંપૂર્ણપણે સૂકવવા દો.
- Once the filter is reinstalled, press and hold the ફિલ્ટર કરો button for 3 seconds to reset the filter indicator.

Figure 6.1: The detachable and washable water tank, featuring a visible water level indicator.
6.2 પાણીની ટાંકીની સફાઈ
Clean the water tank periodically to prevent mold and bacteria growth.
- એકમમાંથી પાણીની ટાંકી દૂર કરો.
- Wash the tank with warm water and a mild detergent.
- તેને ફરીથી ડિહ્યુમિડિફાયરમાં મૂકતા પહેલા સારી રીતે ધોઈ લો અને સૂકવી દો.
6.3 બાહ્ય સફાઈ
- સોફ્ટ સાથે એકમના બાહ્ય ભાગને સાફ કરો, ડીamp કાપડ કઠોર રસાયણો અથવા ઘર્ષક ક્લીનર્સનો ઉપયોગ કરશો નહીં.
7. મુશ્કેલીનિવારણ માર્ગદર્શિકા
ગ્રાહક સપોર્ટનો સંપર્ક કરતા પહેલા, કૃપા કરીને નીચેની સામાન્ય સમસ્યાઓ અને ઉકેલોનો સંદર્ભ લો:
| સમસ્યા | સંભવિત કારણ | ઉકેલ | ||||||||||
|---|---|---|---|---|---|---|---|---|---|---|---|---|
| Dehumidifier does not turn ON | No power supply; Power cord not plugged in; Water tank full or incorrectly installed. | Check power outlet; Plug in power cord securely; Empty and correctly reinstall water tank. | ||||||||||
| Unit is running but not dehumidifying | એર ફિલ્ટર ભરાયેલું; રૂમનું તાપમાન ખૂબ ઓછું; ભેજ ખૂબ વધારે. | Clean air filter; Ensure room temperature is above 5°C (41°F); Lower desired humidity setting. | ||||||||||
| એકમ ઘોંઘાટીયા છે | યુનિટ સમતલ સપાટી પર નથી; એર ફિલ્ટર ભરાયેલું છે. | સપાટ, સ્થિર સપાટી પર યુનિટ મૂકો; સ્વચ્છ એર ફિલ્ટર. | ||||||||||
| એકમમાંથી પાણી લીક થાય છે | Water tank incorrectly installed; Drain hose not securely attached (continuous drainage). | Reinstall water tank correctly; Securely tighten drain hose connection. | ||||||||||
ભૂલ કોડ
સંબંધિત દસ્તાવેજો - JD025CE-80-CA
|


