1. પરિચય
Thank you for choosing the Hayve DM7 Digital Microscope. This device is designed for detailed observation and analysis of various objects, offering up to 1000X magnification and a clear 4.3-inch IPS display. It is suitable for applications such as coin inspection, PCB board examination, insect and plant observation, and jewelry appraisal. This manual provides essential information for the safe and effective use of your microscope.

Figure 1: Hayve DM7 Digital Microscope with 32GB TF Card
2. સલામતી માહિતી
Please read all safety instructions carefully before using the Hayve DM7 Digital Microscope to prevent injury or damage to the device.
- ઉપકરણને પાણી અને ભેજથી દૂર રાખો.
- Do not attempt to disassemble or modify the microscope. Repairs should only be performed by authorized personnel.
- ઉપકરણને અતિશય તાપમાન અથવા સીધા સૂર્યપ્રકાશમાં લાવવાનું ટાળો.
- ફક્ત આપેલા ચાર્જિંગ કેબલ અને એડેપ્ટરનો જ ઉપયોગ કરો.
- Ensure the microscope is placed on a stable, level surface during operation.
- નાના ભાગો આકસ્મિક રીતે ગળી ન જાય તે માટે નાના બાળકોની પહોંચથી દૂર રાખો.
3. પેકેજ સામગ્રી
ખાતરી કરો કે બધી વસ્તુઓ તમારા પેકેજમાં હાજર છે:
- Hayve DM7 Digital Microscope (with 4.3-inch IPS screen)
- એડજસ્ટેબલ સ્ટેન્ડ
- 32GB TF Card (pre-installed or included separately)
- ટાઇપ-સી યુએસબી કેબલ
- વપરાશકર્તા માર્ગદર્શિકા (આ દસ્તાવેજ)
4. ઉત્પાદન ઓવરview
Familiarize yourself with the main components of your Hayve DM7 Digital Microscope.

Figure 2: Flexible Stand and Screen Adjustments
- 4.3-ઇંચ આઇપીએસ ડિસ્પ્લે: High-resolution screen for live viewing અને પ્લેબેક.
- ફોકસ વ્હીલ: Adjusts magnification and focus.
- એલઇડી રોશની: 8 adjustable LEDs for optimal lighting of the specimen.
- Microscope Lens: Captures magnified images.
- એડજસ્ટેબલ સ્ટેન્ડ: Provides stability and allows for height and angle adjustments.
- Base with Scale: Features measurement markings for precise positioning.
- નિયંત્રણ બટનો: Power, Menu, Capture/Record, Up/Down navigation.
- ટીએફ કાર્ડ સ્લોટ: For storage of captured images and videos.
- ટાઇપ-સી યુએસબી પોર્ટ: ચાર્જિંગ અને પીસી કનેક્શન માટે.
5. સેટઅપ
Follow these steps to assemble and prepare your microscope for first use:
- સ્ટેન્ડ એસેમ્બલ કરો:
- Insert the vertical pole into the base.
- કૌંસને ધ્રુવ સાથે જોડો.
- Secure the microscope unit onto the bracket.
- Tighten all knobs to ensure stability.
- Insert TF Card: If not pre-installed, gently insert the provided 32GB TF card into the TF card slot on the side of the display unit until it clicks into place.
- ઉપકરણ ચાર્જ કરો: Connect the Type-C USB cable to the microscope and a suitable USB power adapter (not included) or computer USB port. The charging indicator will illuminate. A full charge provides approximately 5 hours of working time.
- પાવર ચાલુ: Press and hold the Power button (usually located on the display unit) for a few seconds until the screen illuminates.

આકૃતિ 3: એસેમ્બલી સ્ટેપ્સ

Figure 4: TF Card Insertion

Figure 5: Charging the Microscope
6. ઓપરેટિંગ સૂચનાઓ
6.1 Basic Observation
- Place the object you wish to observe on the microscope's base.
- Adjust the distance between the microscope lens and the object using the stand's adjustment knobs.
- Rotate the focus wheel to achieve a clear image on the IPS screen.
- Adjust the LED illumination as needed (see Section 6.4).

Figure 6: Basic Operation Steps
૩.૨ મેગ્નિફિકેશન અને ફોકસને સમાયોજિત કરવું
The Hayve DM7 offers 50X to 1000X magnification. Magnification is adjusted by changing the distance between the lens and the object, and then fine-tuning with the focus wheel.
- To increase magnification, lower the microscope lens closer to the object.
- To decrease magnification, raise the microscope lens further from the object.
- After adjusting the height, rotate the ફોકસ વ્હીલ (typically on the side of the lens barrel) until the image on the screen is sharp and clear.
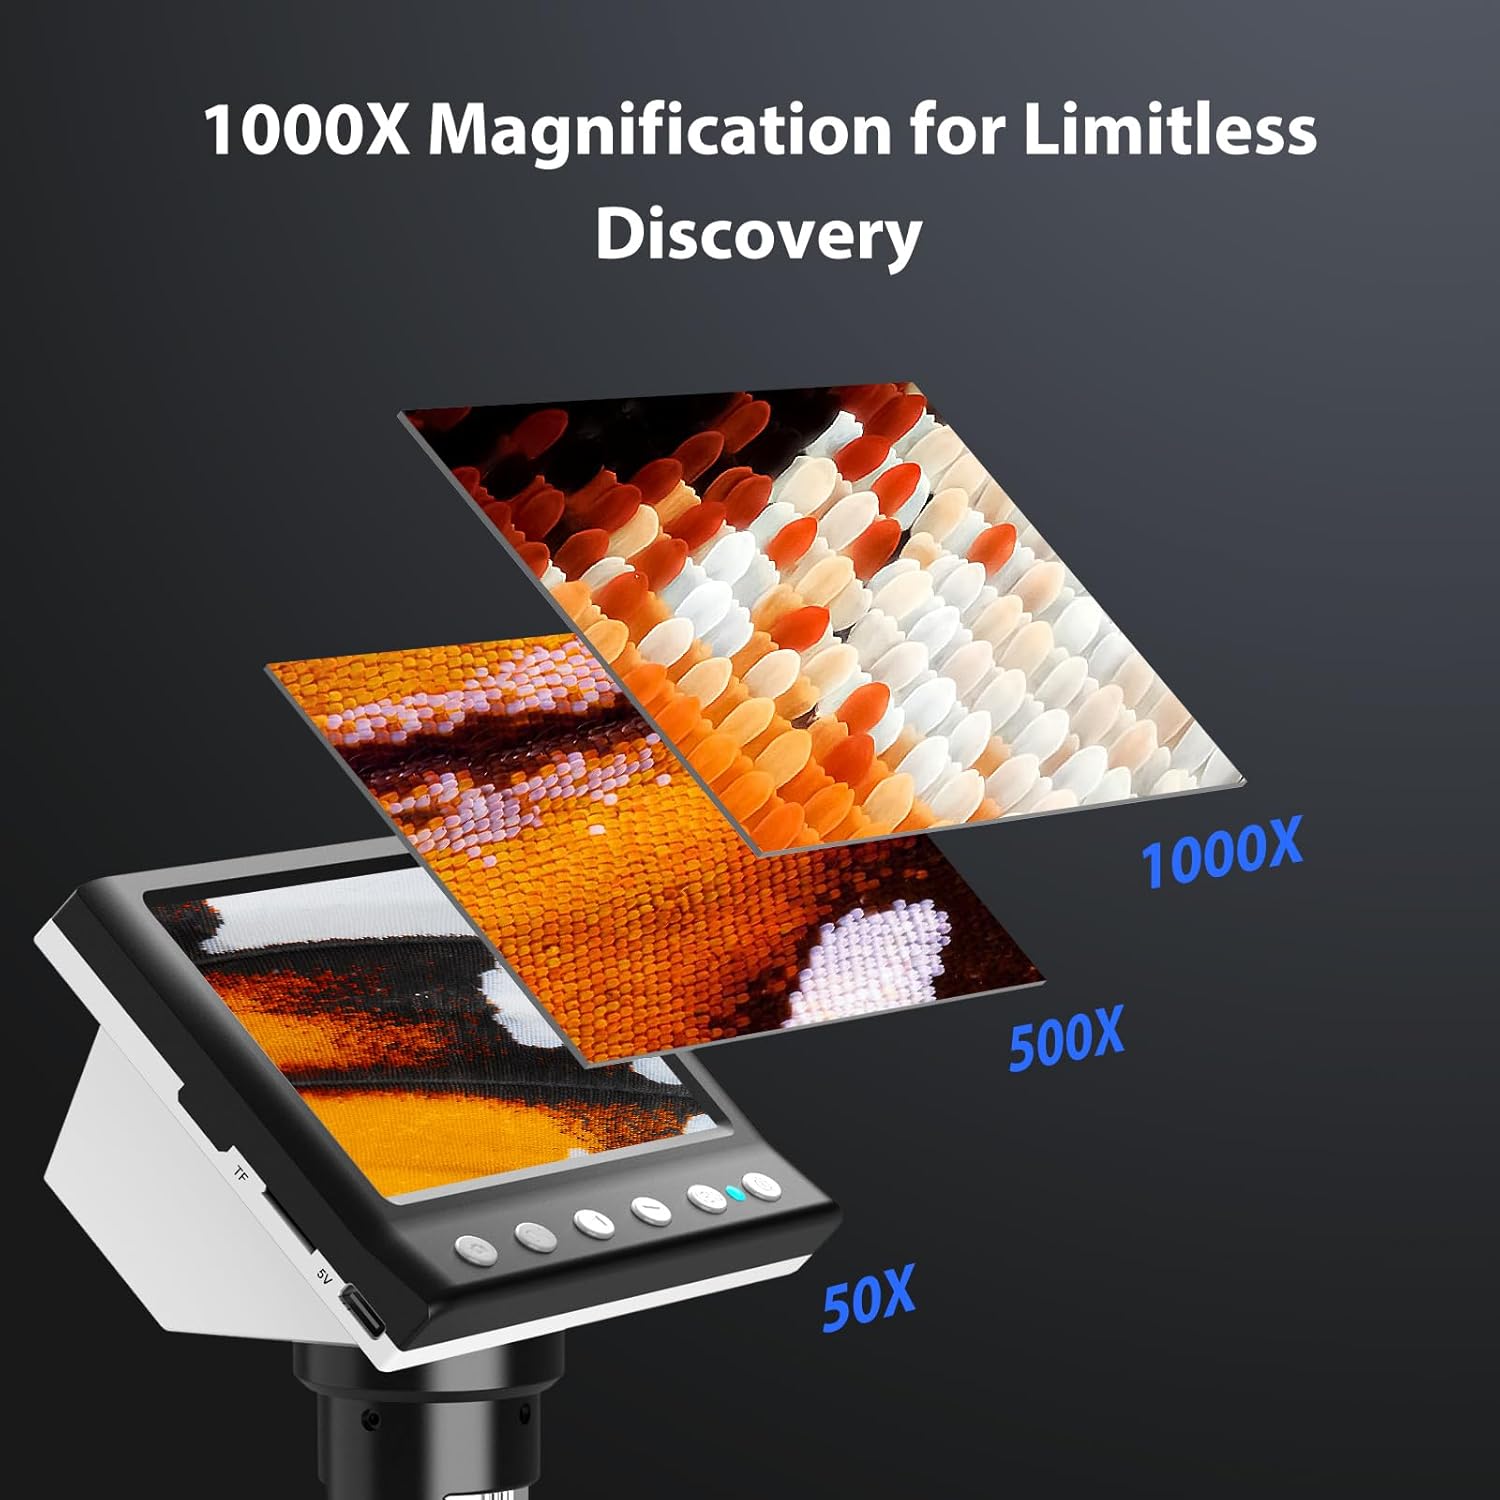
Figure 7: Magnification Levels
૪.૩ છબીઓ અને વિડિઓઝ કેપ્ચર કરવા
The microscope allows you to capture high-quality photos and record videos directly to the installed TF card.
- ફોટો લેવા માટે: While observing, press the 'Capture' button (often marked with a camera icon). The image will be saved to the TF card.
- વિડિઓ રેકોર્ડ કરવા માટે: Press the 'Record' button (often marked with a video camera icon) once to start recording. Press it again to stop. The video will be saved to the TF card.
- Access saved files through the 'Playback' or 'Gallery' option in the microscope's menu.
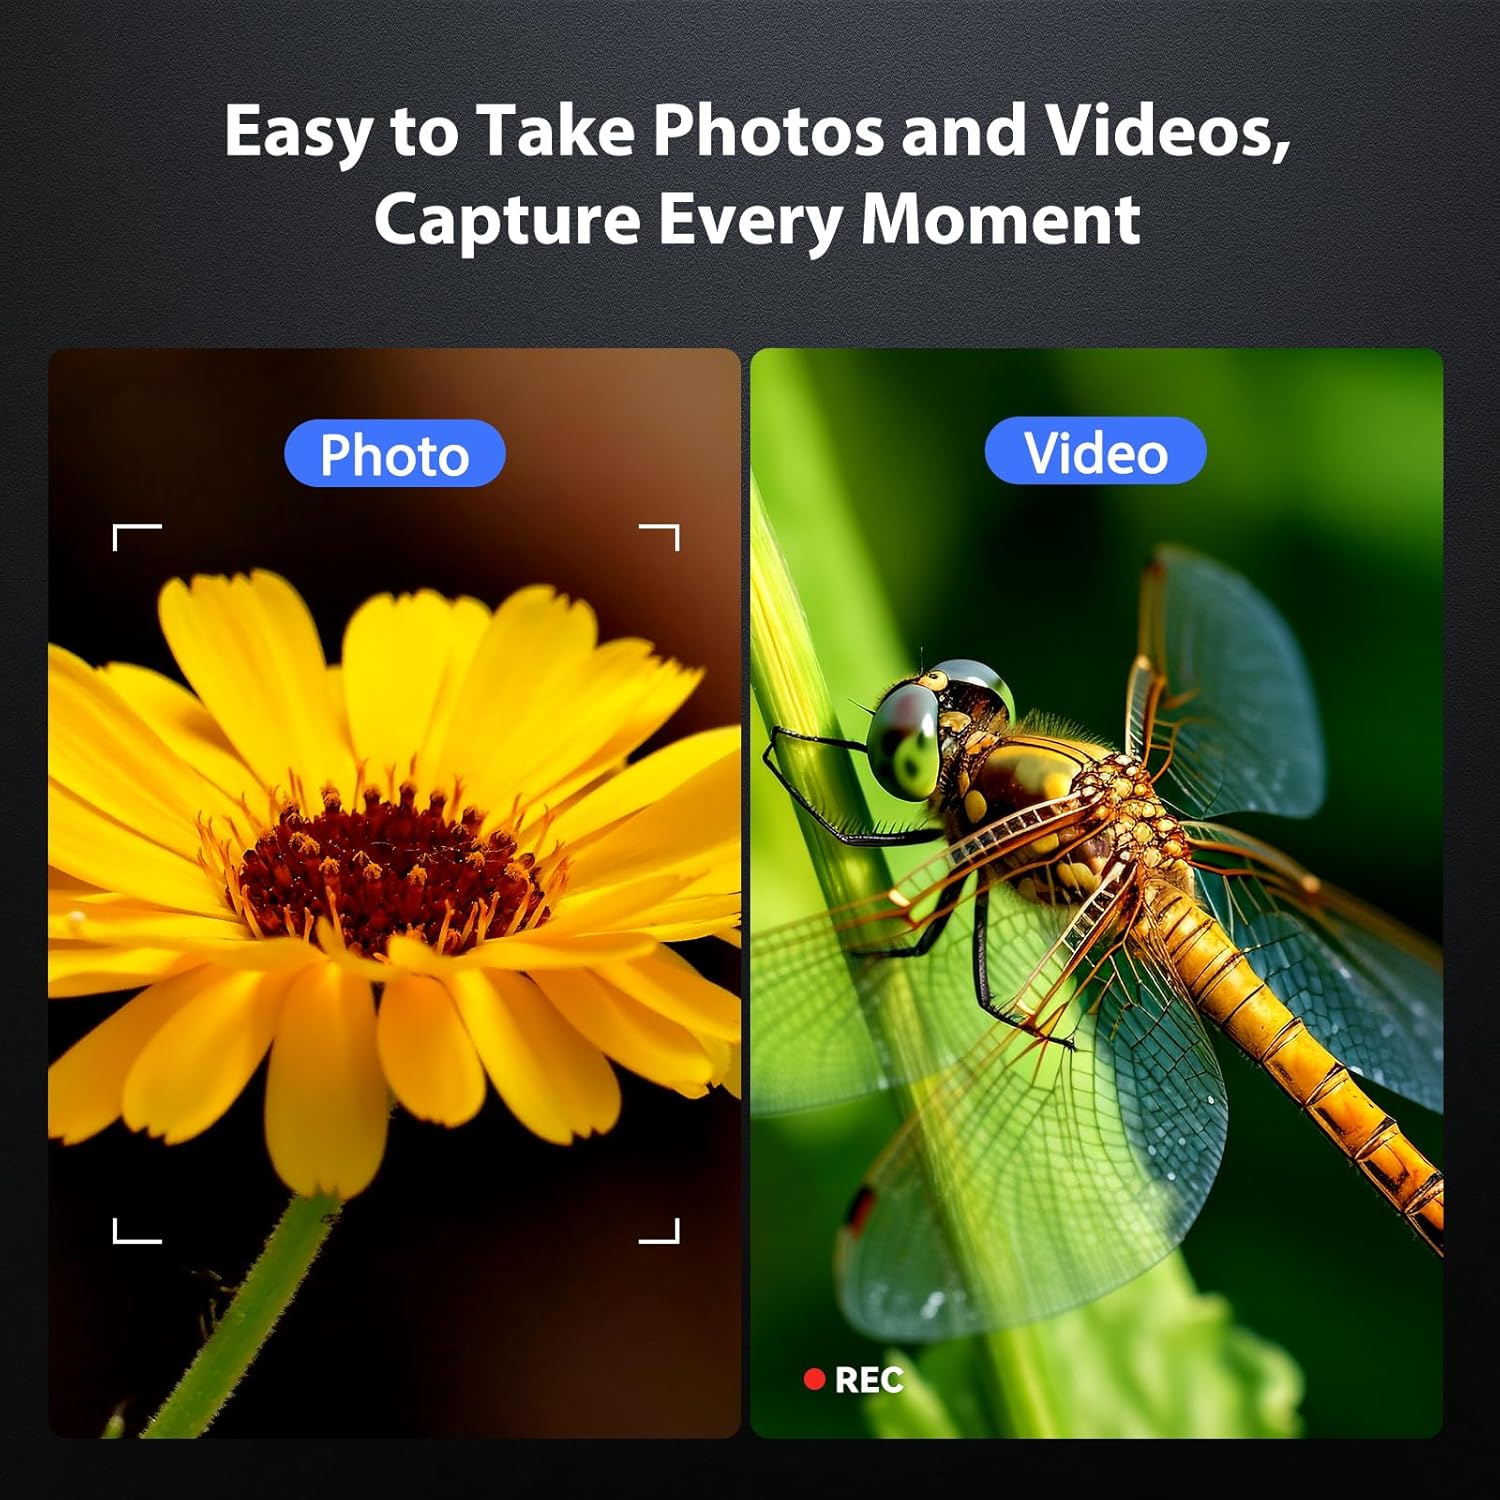
Figure 8: Photo and Video Capture
6.4 Adjusting LED Illumination
The 8 adjustable LED lights provide optimal illumination for various specimens. You can control their brightness from 0% to 100%.
- Locate the LED control button or dial on the microscope unit.
- Rotate the dial or press the button to increase or decrease the brightness.
- Adjust until the object is evenly lit without glare or shadows.

Figure 9: LED Brightness Adjustment
6.5 Connecting to a Computer (PC Mode)
મોટા માટે viewing, precise measurements, or sharing, you can connect the microscope to a Windows-compatible computer.
- Ensure the microscope is powered on.
- Connect the microscope to your computer using the provided Type-C USB cable.
- The microscope screen may display "PC Cam" or prompt you to select a mode. Choose "PC Camera" or "UVC" mode.
- On your computer, open a camera application (e.g., Windows Camera app) or a dedicated microscope software (if provided or downloaded) to view જીવંત ફીડ.
- Some software may allow for measurement functions.

Figure 10: PC Connection for Measurement
7. જાળવણી
Proper maintenance ensures the longevity and optimal performance of your microscope.
- લેન્સની સફાઈ: Use a soft, lint-free cloth specifically designed for optical lenses. For stubborn smudges, a small amount of lens cleaning solution can be applied to the cloth (not directly to the lens).
- Cleaning the Screen and Body: Wipe the screen and body with a soft, dry cloth. Avoid abrasive cleaners or solvents.
- સંગ્રહ: When not in use, store the microscope in a clean, dry, dust-free environment. Consider using a protective cover.
- બેટરી સંભાળ: For long-term storage, charge the battery to about 50% every few months to maintain battery health.
8. મુશ્કેલીનિવારણ
સામાન્ય સમસ્યાઓના ઉકેલો માટે આ વિભાગનો સંદર્ભ લો.
| સમસ્યા | સંભવિત કારણ | ઉકેલ |
|---|---|---|
| માઈક્રોસ્કોપ ચાલુ થતો નથી. | બેટરી ઓછી છે; પાવર બટન યોગ્ય રીતે દબાવવામાં આવ્યું નથી. | Charge the microscope fully. Press and hold the power button for 3-5 seconds. |
| છબી ઝાંખી છે. | Incorrect focus; Object too far/close to lens. | Adjust the focus wheel. Adjust the height of the microscope unit on the stand. |
| Screen is too dark/bright. | LED illumination not adjusted. | Adjust the LED brightness using the control dial/button. |
| ફોટા/વિડિઓ સાચવી શકાતા નથી. | TF card full or not inserted correctly; TF card error. | Check TF card insertion. Delete old files or replace TF card. Format TF card (backup data first). |
| PC connection not working. | Incorrect mode selected; Driver issue; Cable fault. | Ensure "PC Camera" mode is selected on the microscope. Try a different USB port or cable. Check computer's device manager for driver issues. |
9. સ્પષ્ટીકરણો
Technical specifications for the Hayve DM7 Digital Microscope:
| લક્ષણ | વિગત |
|---|---|
| મોડલ | DM7 |
| ડિસ્પ્લે સ્ક્રીન | 4.3-ઇંચ આઇપીએસ |
| વિસ્તૃતીકરણ | 50X થી 1000X |
| પ્રકાશ સ્ત્રોત | 8 એડજસ્ટેબલ એલઈડી |
| સંગ્રહ | 32GB TF Card (included) |
| બેટરી | 1 લિથિયમ આયન બેટરી (સમાવેલ) |
| કામ કરવાનો સમય | આશરે. 5 કલાક |
| કનેક્ટિવિટી | Type-C USB (for charging and PC connection) |
| સુસંગત OS | Windows (PC connection) |
| સામગ્રી | પ્લાસ્ટિક |
| રંગ | કાળો |
| વસ્તુનું વજન | 1.3 પાઉન્ડ (0.59 કિગ્રા) |
| પેકેજ પરિમાણો | 7.91 x 7.44 x 3.78 ઇંચ |
10. વોરંટી અને સપોર્ટ
Hayve provides customer support for its products. If you encounter any issues or have questions regarding your DM7 Digital Microscope, please contact our customer service team.
- ગ્રાહક સેવા: Hayve offers 24-hour professional and kind after-sales service.
- સંપર્ક માહિતી: Refer to the product packaging or the official Hayve webસૌથી અદ્યતન સંપર્ક વિગતો માટે સાઇટ.
- વોરંટી: Specific warranty terms and conditions may apply. Please retain your proof of purchase for warranty claims.
૫.૩. પ્રોડક્ટ વિડિઓઝ
No official product videos were provided in the input data for embedding in this manual.


