1. પરિચય
This manual provides detailed instructions for the operation and maintenance of your LIJIANI RD239 Multi-Band Shortwave Radio. The RD239 is a compact, versatile radio designed for receiving various frequency bands, including AM, FM, Shortwave (SW), Aviation (AIR), Very High Frequency (VHF), and Weather Band (WB). It also features Bluetooth connectivity, TF card playback, digital recording, an integrated flashlight, alarm clock, and sleep timer functions.
2. ઉત્પાદન ઓવરview
2.1 મુખ્ય લક્ષણો
- Multi-Band Reception: Supports AIR/VHF/AM/FM/Shortwave/Weather bands for comprehensive listening.
- Digital Recording: Record radio broadcasts or external audio directly to a TF card.
- Bluetooth & TF Card Playback: Stream audio wirelessly via Bluetooth or play MP3/WAV/WMA files from a TF card. Includes 6 EQ modes.
- સંકલિત લાઇટિંગ: Features a high-power flashlight and a reading lamp for various situations.
- સમય વ્યવસ્થાપન: Includes an alarm clock and a programmable sleep timer.
- પાવર વિકલ્પો: Operates on 3 AA batteries or a BL-5C rechargeable battery, with Type-C input for charging and external power.
- વપરાશકર્તા ઈન્ટરફેસ: Backlit display and keys for visibility in low-light conditions.
2.2 પેકેજ સામગ્રી
- LIJIANI RD239 Shortwave Radio
- માલિકની માર્ગદર્શિકા
2.3 ઘટક ઓળખ

આકૃતિ 1: ફ્રન્ટ view of the LIJIANI RD239 Shortwave Radio, showing the display, keypad, speaker, and extended antenna.

આકૃતિ 2: બાજુ view illustrating the radio's dimensions (3"L x 5.3"W x 1"H) and port locations including the 3.5mm audio input (AUX IN), Type-C charging port, and headphone jack.
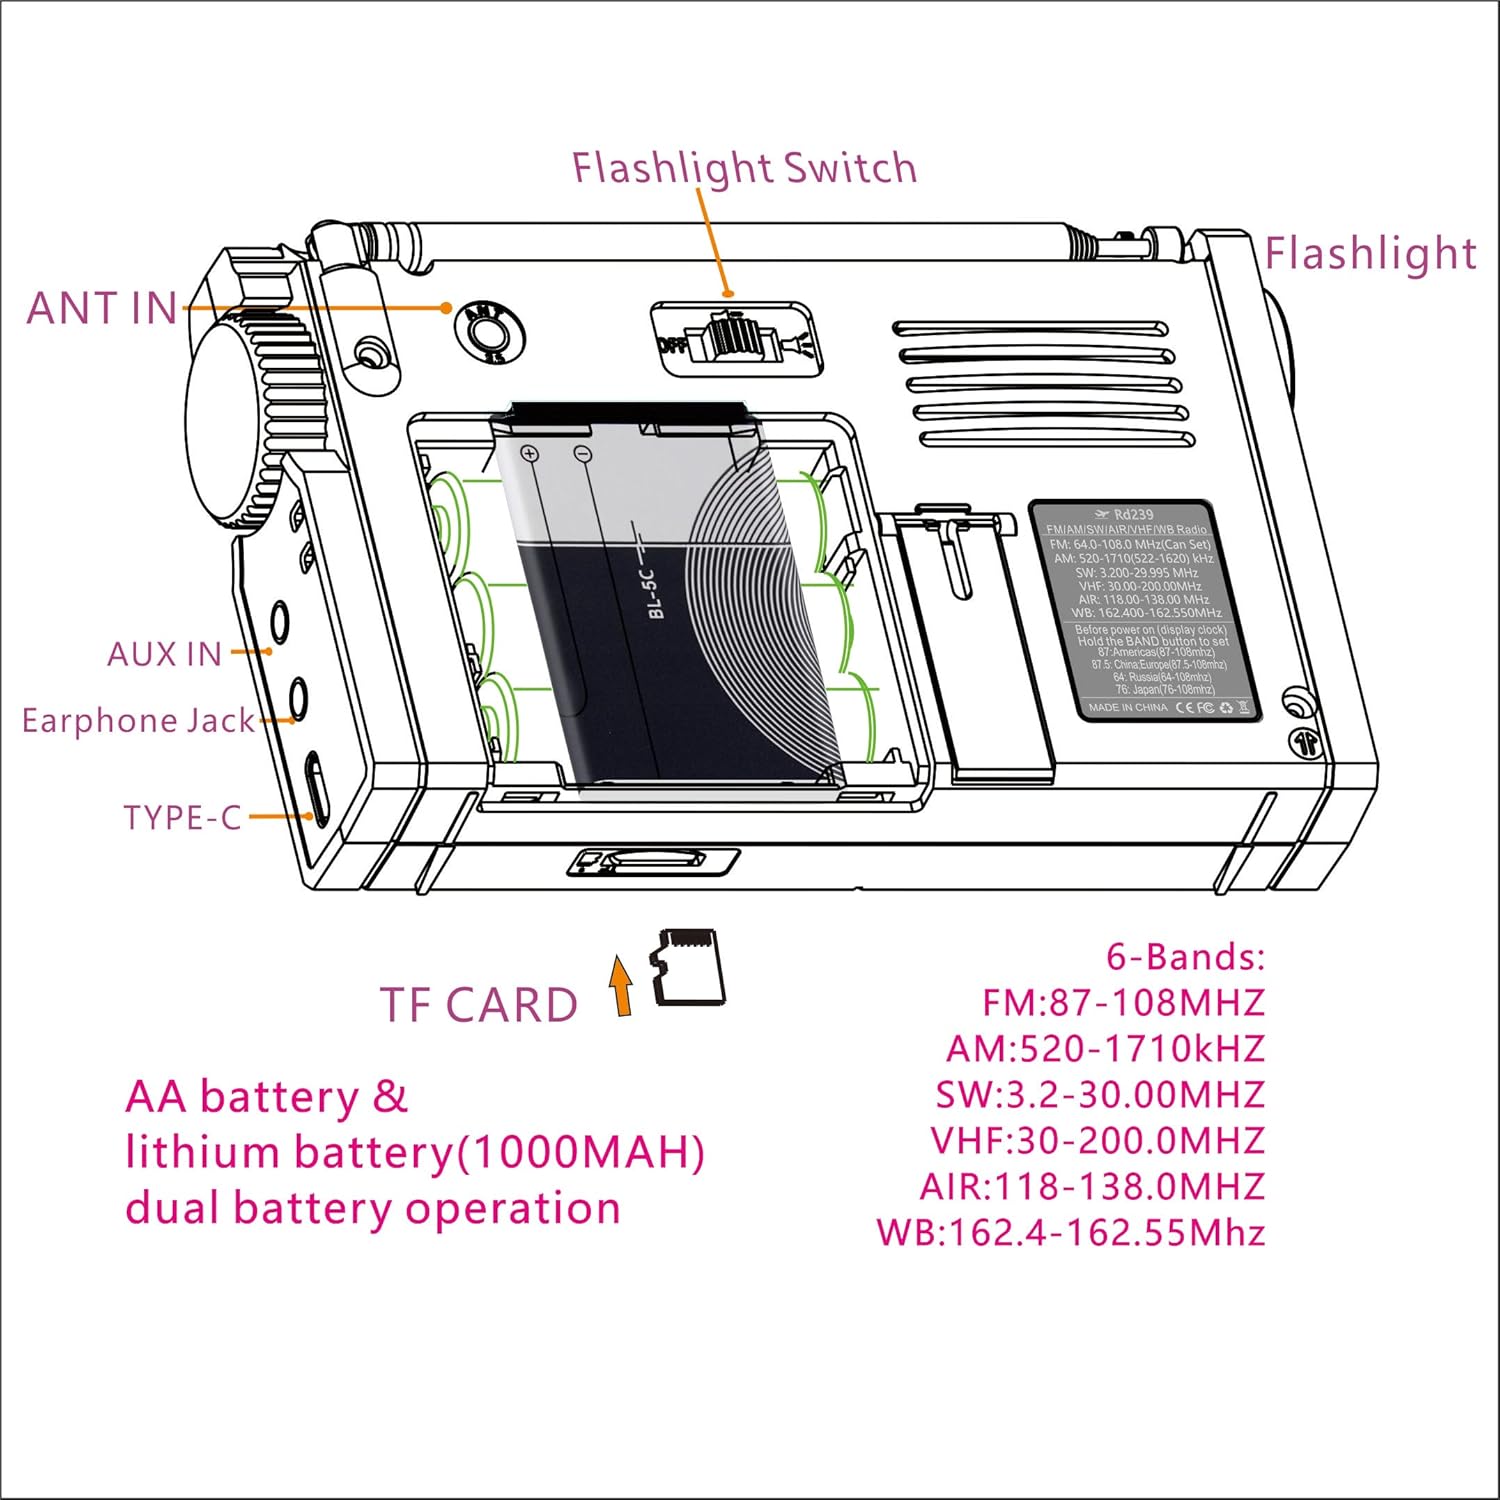
આકૃતિ 3: પાછળ view of the radio, highlighting the battery compartment, ANT IN jack, AUX IN jack, Earphone Jack, Type-C port, Flashlight Switch, and TF Card slot.
3. સેટઅપ
3.1 બેટરી ઇન્સ્ટોલેશન

Figure 4: Schematic for installing BL-5C lithium-ion battery and AA batteries.
- રેડિયોની પાછળના ભાગમાં બેટરી કમ્પાર્ટમેન્ટ કવર ખોલો.
- For BL-5C Lithium-Ion Battery: Insert the BL-5C battery (1000mAh) into the compartment, ensuring the correct polarity (+/-) as indicated. Insert the electrode end first.
- AA બેટરી માટે: Insert three (3) 1.5V AA batteries, observing the correct polarity.
- બેટરી કમ્પાર્ટમેન્ટ કવર સુરક્ષિત રીતે બંધ કરો.
Important Note on AA Batteries: When using AA batteries, especially with high volume, the radio may experience early shutdown, screen flickering, or sound lag due to insufficient current supply. To mitigate this, reduce the volume or use headphones. It is recommended to use the BL-5C lithium-ion battery for optimal performance, reserving AA batteries for emergency backup.
3.2 પ્રારંભિક પાવર ચાલુ
Press the power button once to activate the display, then press it a second time to turn on the radio. This two-step process helps prevent accidental power-on.
4. ઓપરેટિંગ સૂચનાઓ
4.1 પાવર ચાલુ/બંધ
- ચાલુ કરવા માટે: દબાવો શક્તિ button once to wake the display, then press it again to power on the radio.
- બંધ કરવા માટે: દબાવો અને પકડી રાખો શક્તિ બટન
4.2 Band Selection and Tuning

Figure 5: Radio displaying various frequency bands and their ranges.
- દબાવો બેન્ડ button to cycle through available frequency bands: FM, AM, SW, AIR, VHF, WB.
- Use the tuning knob on the side of the radio for manual frequency adjustment.
- For direct frequency input, use the numeric keypad and press દાખલ કરો.
- To save a station, tune to the desired frequency, then press મેમરી followed by a numeric key to assign a preset.
- To recall a saved station, press the corresponding numeric key.
4.3 બ્લૂટૂથ મોડ
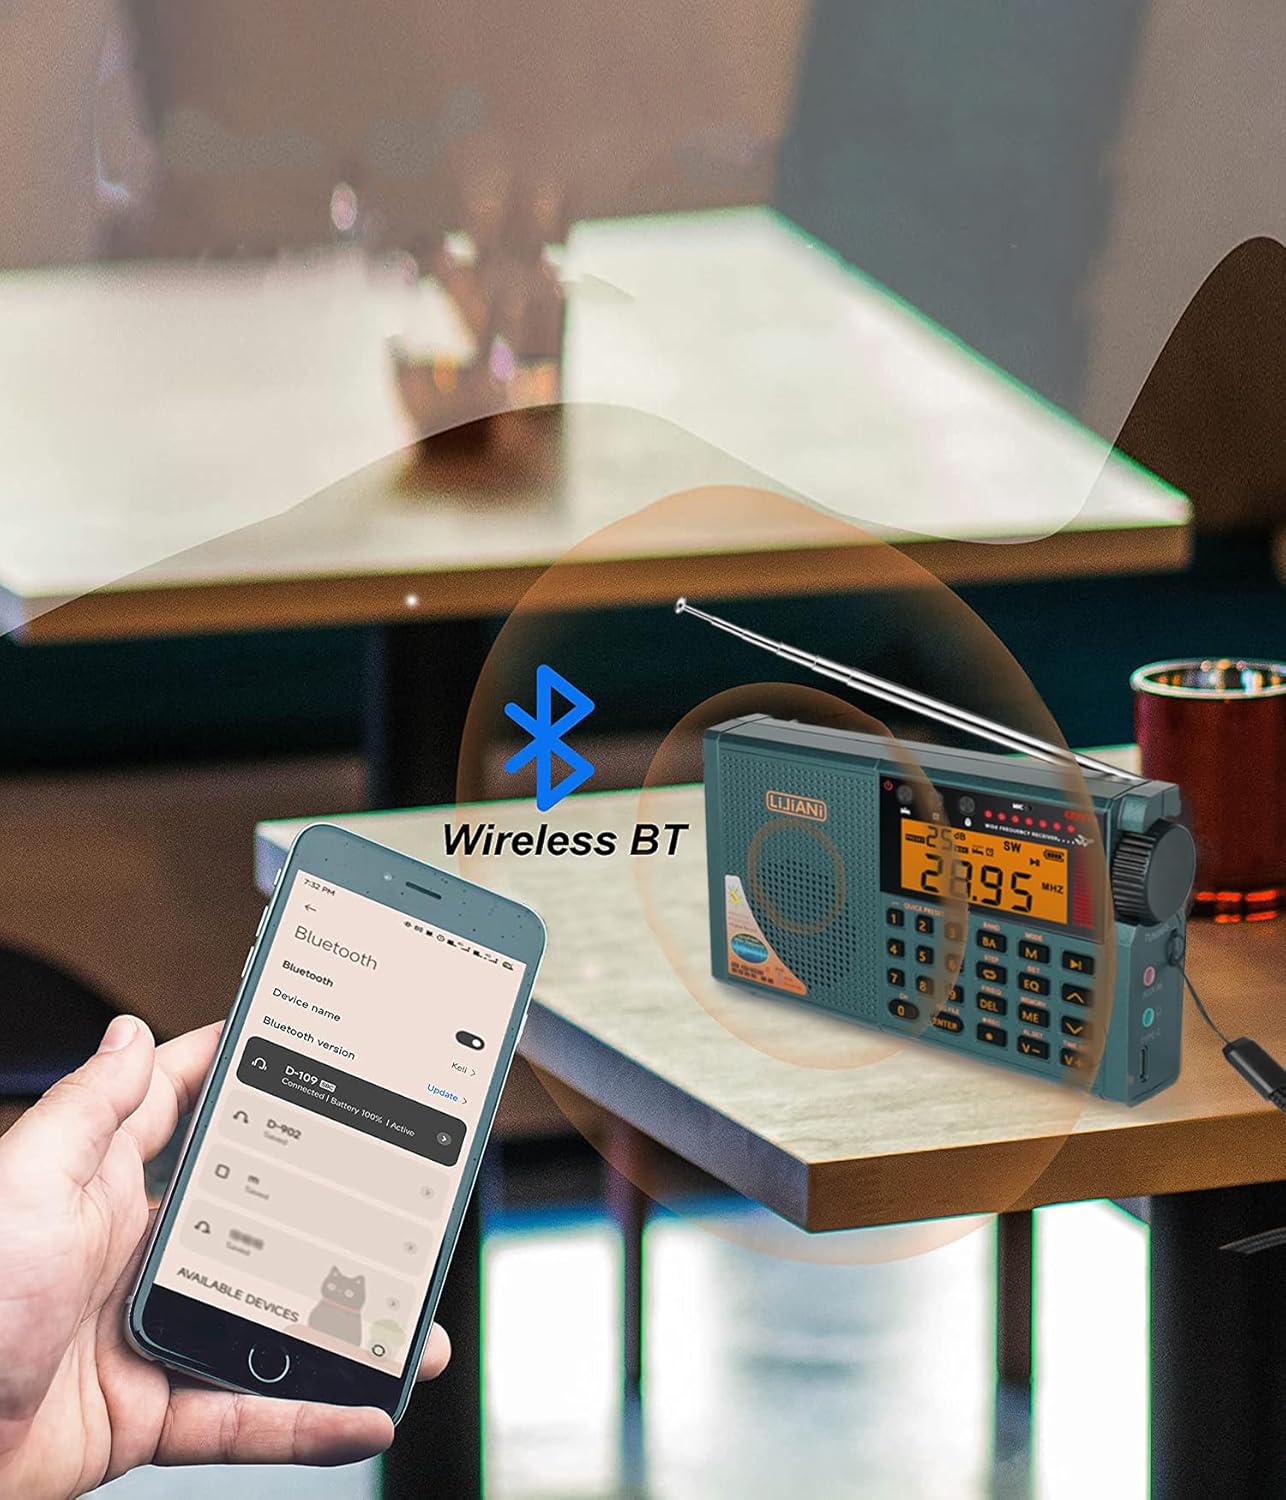
Figure 6: The radio wirelessly connected to a smartphone via Bluetooth.
- દબાવો મોડ button until "BT" or the Bluetooth icon appears on the display.
- On your smartphone or other Bluetooth device, search for available devices and select "RD239" to pair.
- એકવાર જોડી થઈ ગયા પછી, તમે તમારા ઉપકરણથી રેડિયો પર ઓડિયો સ્ટ્રીમ કરી શકો છો.
૫.૨ TF કાર્ડ પ્લેબેક
- Insert a TF (Micro SD) card into the designated slot on the side of the radio.
- દબાવો મોડ button until "TF" or the TF card icon appears.
- નેવિગેશન બટનોનો ઉપયોગ કરો (પહેલા/આગળ) to select tracks and રમો/થોભો પ્લેબેક નિયંત્રિત કરવા માટે.
- દબાવો EQ button to cycle through 6 available equalizer modes.
4.5 ડિજિટલ રેકોર્ડિંગ
- Ensure a TF card is inserted.
- To record radio broadcasts: Tune to the desired station, then press the આરઈસી રેકોર્ડિંગ શરૂ કરવા માટે બટન. દબાવો આરઈસી ફરી રોકવા માટે.
- To record external audio: Connect an external audio source to the AUX IN jack (if applicable for external recording, otherwise use built-in microphone). Press આરઈસી to start and stop.
- To play recordings: Press આરઈસી FILE to access recorded files on the TF card. Use navigation buttons to select and play.
- To delete recordings: While playing a recording, press the DEL બટન
4.6 Flashlight and Reading Lamp

Figure 7: The radio's integrated flashlight providing illumination.
- The radio features a high-power flashlight on one end and a reading lamp બાજુ પર.
- શોધો ફ્લેશલાઇટ સ્વિચ on the top/back of the radio (refer to Figure 3).
- Slide the switch to activate the flashlight or reading lamp.
૪.૭ એલાર્મ ઘડિયાળ અને સ્લીપ ટાઈમર
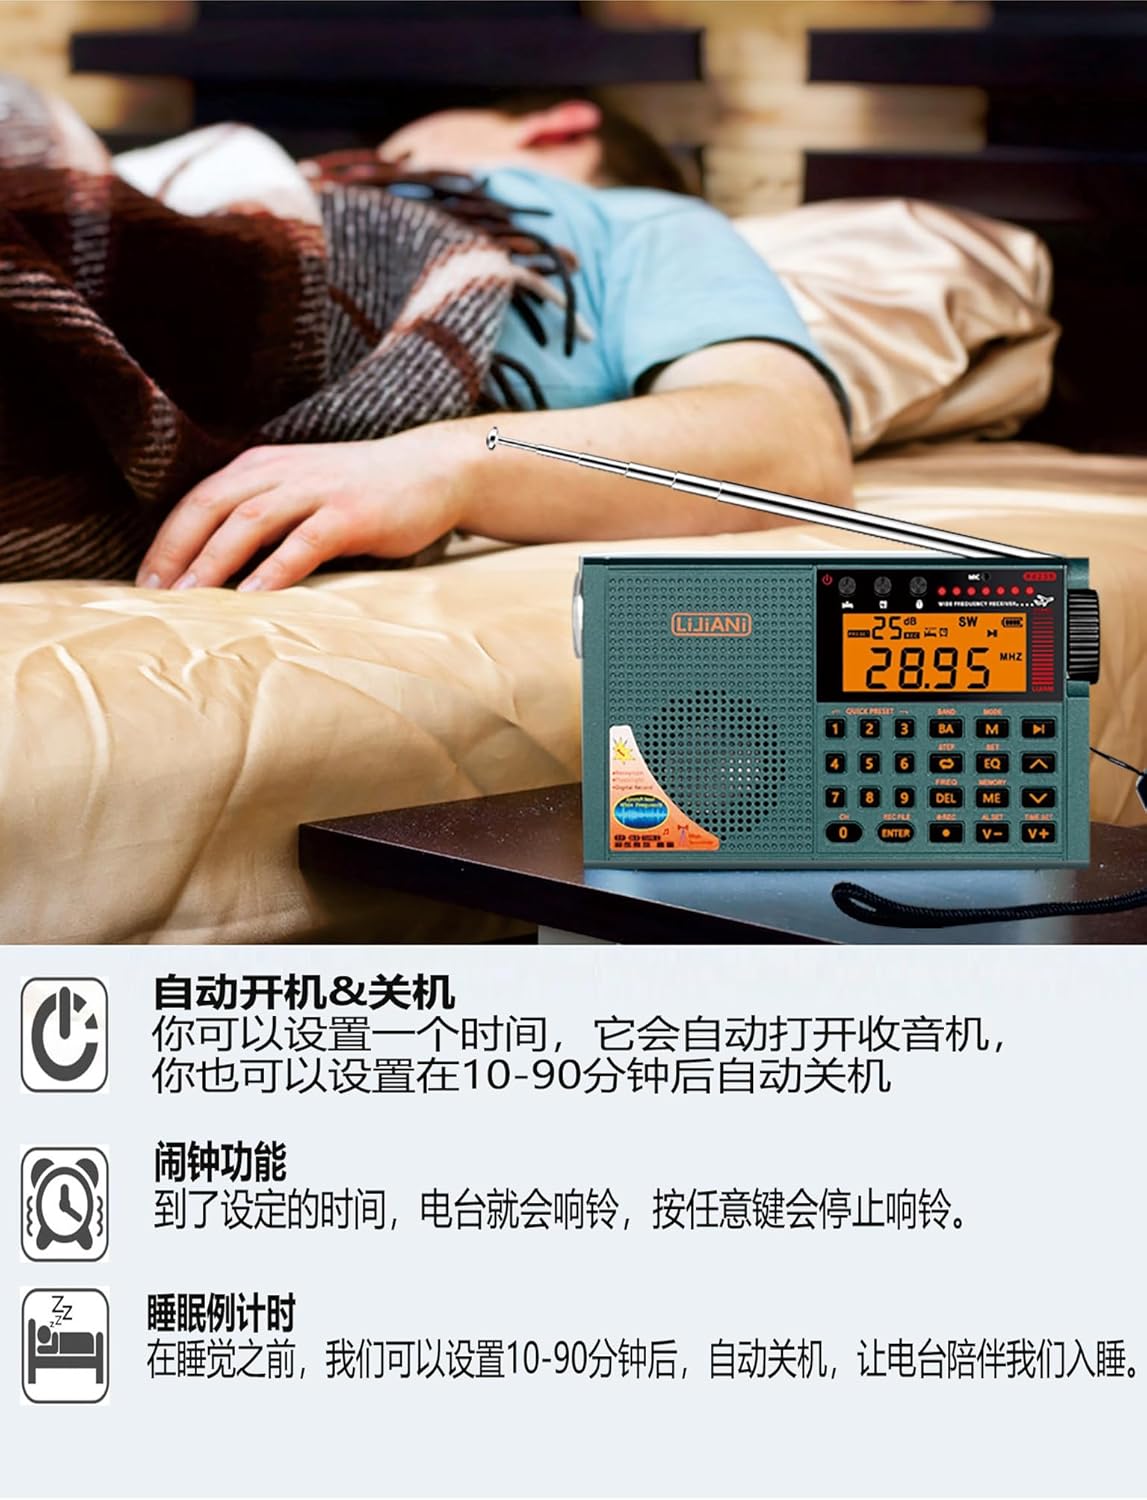
Figure 8: The radio functioning as an alarm clock and sleep timer.
- ઘડિયાળ સેટ કરવી: While the radio is off and displaying the clock, press and hold the ટાઇમ સેટ button. Use the numeric keys or tuning knob to adjust the time, then press ટાઇમ સેટ પુષ્ટિ કરવા માટે ફરીથી.
- એલાર્મ સેટ કરી રહ્યું છે: દબાવો AL સેટ button. Use the numeric keys or tuning knob to set the alarm time. Press AL સેટ again to confirm. When the alarm sounds, press any button to stop it.
- સ્લીપ ટાઈમર સેટ કરવું: દબાવો ઊંઘ button repeatedly to cycle through sleep timer durations (e.g., 10-90 minutes). The radio will automatically turn off after the selected time.
4.8 Backlit Keys and Display
- The keypad and display feature backlighting for improved visibility.
- To adjust the backlight duration: Before turning on the radio (when the clock is displayed), press and hold the સેટ button until the duration options appear (e.g., 5, 10, 15, 20 seconds). Press સેટ again to select the desired duration. The setting will automatically apply after 3 seconds.
5. અદ્યતન સુવિધાઓ
5.1 Squelch (SQ) Function (AIR Band)
- The SQ function is effective only for the AIR band.
- When listening to an AIR band station, press and hold the સેટ button for 2 seconds. "ON" or "OFF" will appear.
- દબાવો સેટ button to select "ON" to enable squelch. The setting will automatically exit and take effect after 3 seconds.
- Squelch automatically mutes the output signal when the radio does not receive a signal or the signal is weak, preventing noise.
5.2 FM/VHF Bandwidth Setting
- When listening to FM, long press the સેટ button for 2 seconds. Characters like "50K-100K-150K-200K" will appear.
- દબાવો સેટ button again to select the desired bandwidth (e.g., 100K).
- The setting will automatically exit after 3 seconds and the FM frequency bandwidth will operate at the selected value.
6. પાવર મેનેજમેન્ટ
6.1 Battery Usage Guidelines
- The radio is designed to use either a BL-5C lithium-ion battery or 3 AA batteries.
- For optimal performance and to avoid issues like early shutdown or sound distortion at high volumes, prioritize using the BL-5C lithium-ion battery.
- If using AA batteries, especially with high volume, it is recommended to reduce the volume or use headphones to prevent power-related issues. Avoid using inferior quality AA batteries.
6.2 ચાર્જિંગ
- Connect the radio to a power source using a standard Type-C cable.
- Charging is only effective for the BL-5C lithium-ion battery. The Type-C input does not charge AA batteries.
- The Type-C port can also function as an external computer speaker connector or allow the device to act as a card reader when a TF card is inserted and connected to a computer.
7. મુશ્કેલીનિવારણ
- No Power/Early Shutdown: Ensure batteries are correctly installed and charged. If using AA batteries, consider replacing them with fresh, high-quality ones or switching to the BL-5C battery. High volume with AA batteries can cause premature shutdown.
- નબળું સ્વાગત: Extend the telescopic antenna fully. Try repositioning the radio to a location with better signal. For AM, rotate the radio for optimal reception.
- Screen Flickering/Sound Lag: This can occur with low battery power, especially when using AA batteries at high volume. Reduce volume or replace/recharge batteries.
- No Sound from TF Card/Bluetooth: Ensure the correct mode is selected. Check if the TF card is properly inserted and contains compatible audio files. For Bluetooth, ensure the radio is paired correctly with your device.
- રેકોર્ડિંગ સમસ્યાઓ: Verify that a TF card is inserted and has sufficient free space.
8. સ્પષ્ટીકરણો
| લક્ષણ | સ્પષ્ટીકરણ |
|---|---|
| મોડલ નંબર | આરડી239 |
| ઉત્પાદન પરિમાણો | 3 x 5.3 x 1 ઇંચ (7.62 x 13.46 x 2.54 સેમી) |
| વસ્તુનું વજન | 8.8 ઔંસ (249.5 ગ્રામ) |
| રેડિયો બેન્ડ્સ સપોર્ટેડ છે | FM, AM, SW, AIR, VHF, WB |
| કનેક્ટિવિટી ટેકનોલોજી | બ્લૂટૂથ |
| પાવર સ્ત્રોત | 3 AA batteries or BL-5C LI-ION battery |
| ખાસ લક્ષણો | Built-In AM Antenna, Built-In Clock, Built-In Flashlight, Digital Recording, TF Card Playback |
| ઉત્પાદક | LIJIANI |
9. વોરંટી અને સપોર્ટ
9.1 વોરંટી માહિતી
Specific warranty details for the LIJIANI RD239 radio are typically provided at the point of purchase or within separate warranty documentation. Please refer to your purchase receipt or contact the retailer for information regarding warranty coverage and terms.
9.2 ગ્રાહક સપોર્ટ
For technical assistance, troubleshooting, or further inquiries regarding your LIJIANI RD239 Shortwave Radio, please contact the manufacturer or your authorized dealer. Contact information can usually be found on the product packaging or the seller's webસાઇટ


