1. ઉત્પાદન ઓવરview
The SCULPFUN S30 Pro is a high-performance 10W diode laser engraver designed for precision engraving and cutting of various materials. It features an automatic air assist system for enhanced cutting performance and comes bundled with the SCULPFUN TS1 Touch Screen for offline control and Wi-Fi connectivity. This machine is suitable for engraving and cutting wood, MDF, bamboo, cardboard, plastic, leather, PCB board, aluminum oxide, 304 stainless steel, ceramic, and dark stone.
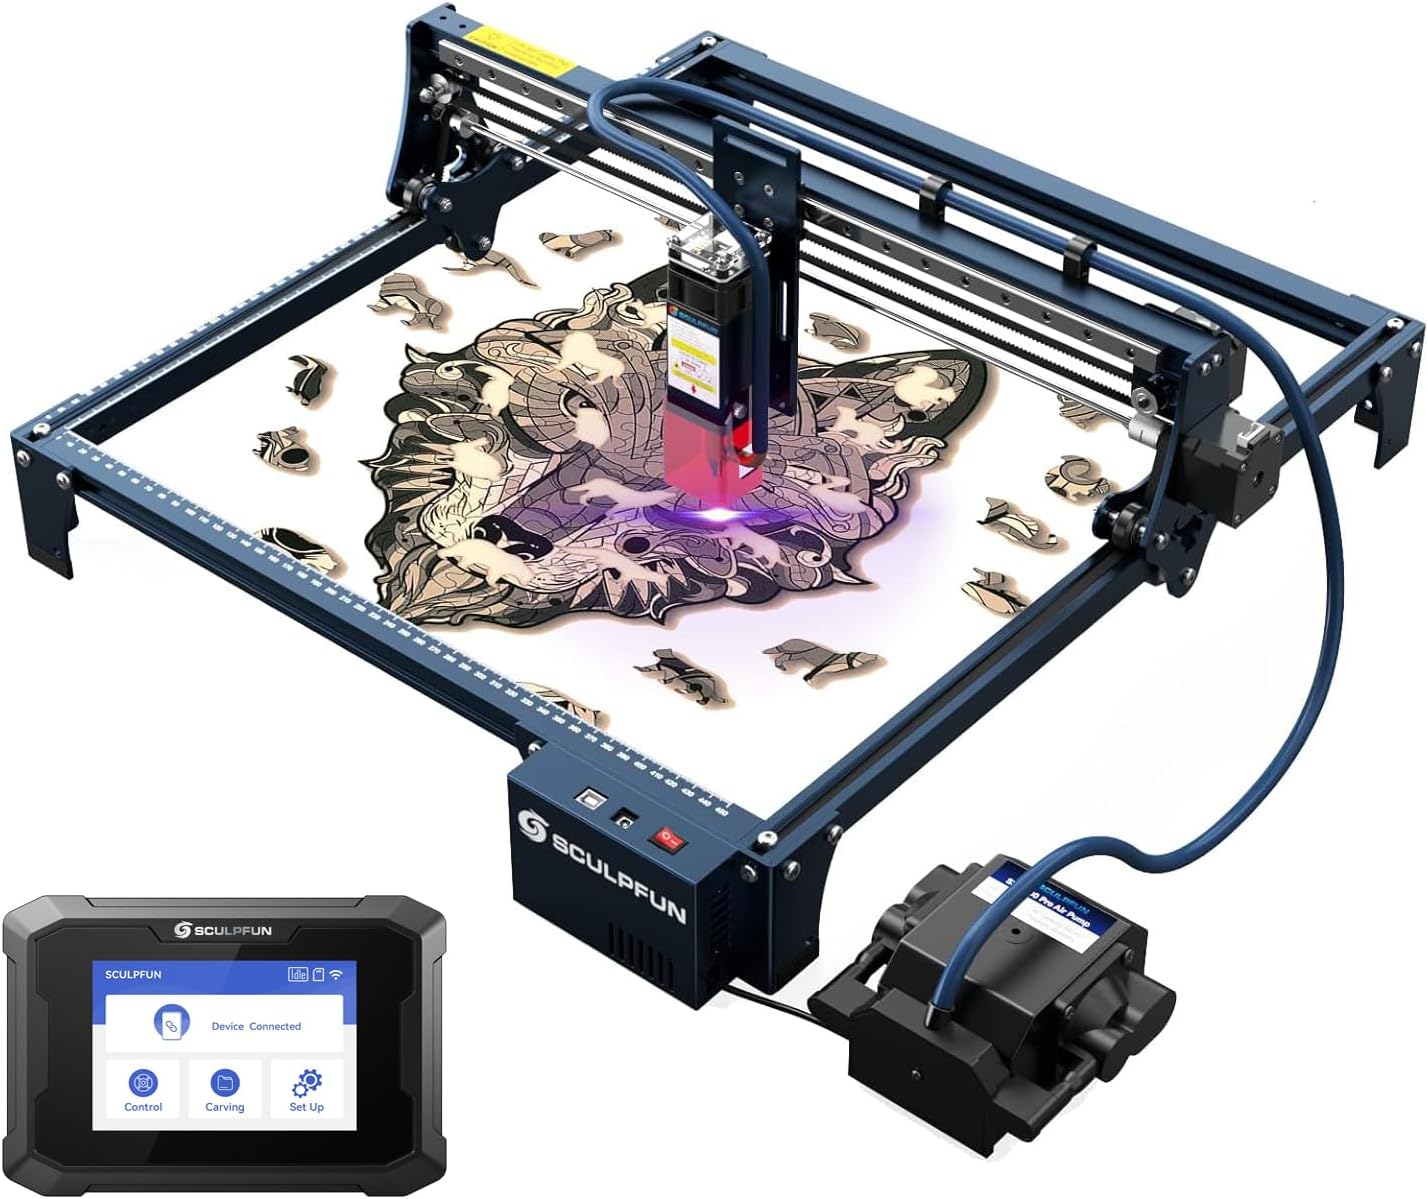
Figure 1: SCULPFUN S30 Pro Laser Engraver with TS1 Touch Screen. This image shows the complete laser engraving system, including the main engraver unit, the external air pump, and the TS1 touch screen.
મુખ્ય લક્ષણો:
- 10W Diode Laser Output: Capable of cutting 10mm wood or 5mm acrylic in a single pass with a 0.06x0.08mm ultra-fine compression spot for detailed engraving.
- ઓટોમેટિક એર આસિસ્ટ: Mainboard-controlled air pump (12V, 30L/min) with an advanced high-pressure metal nozzle, intelligently controlled via LightBurn software (M8 command) to significantly improve cutting speed and performance.
- SCULPFUN TS1 Touch Screen: 3.5-inch capacitive touch screen (480x320 resolution) for offline engraving, Wi-Fi connectivity, and real-time slicing via the SCULPFUN mobile app.
- Expandable Working Area: Standard 410x400mm engraving area, expandable up to 935x905mm with optional extension kits.
- મજબૂત બાંધકામ: Features an industrial-grade linear rail for high precision and durability.
- આંખનું રક્ષણ: Equipped with a detachable laser protection cover.
2. સલામતી માહિતી
Operating a laser engraver involves potential hazards. Always adhere to the following safety guidelines to prevent injury or damage.
- આંખનું રક્ષણ: Always wear the provided laser safety goggles when the laser is operating. Never look directly at the laser beam.
- વેન્ટિલેશન: Operate the machine in a well-ventilated area to dissipate fumes and smoke produced during engraving/cutting. Consider an exhaust system.
- આગનું જોખમ: Laser engraving/cutting can ignite flammable materials. Do not leave the machine unattended during operation. Keep a fire extinguisher nearby.
- સામગ્રી સુસંગતતા: Only engrave or cut materials specified in the product description. Avoid materials that produce toxic fumes or can easily catch fire (e.g., PVC, vinyl).
- બાળકો અને પાળતુ પ્રાણી: બાળકો અને પાલતુ પ્રાણીઓને ઓપરેટિંગ વિસ્તારથી દૂર રાખો.
- ઇલેક્ટ્રિકલ સલામતી: ખાતરી કરો કે પાવર સપ્લાય યોગ્ય રીતે જોડાયેલ અને ગ્રાઉન્ડેડ છે. ભીના હાથે અથવા અંદર કામ કરશો નહીંamp શરતો
- તત્કાલીન બંધ: Familiarize yourself with the location of the power switch for immediate shutdown in an emergency.
3. સેટઅપ અને એસેમ્બલી
Before operating the SCULPFUN S30 Pro, careful assembly is required. Refer to the included "Step 1-6 Installation package" and the physical manual for detailed visual instructions. The following outlines the general steps.
3.1 અનપેકિંગ અને નિરીક્ષણ
Carefully unpack all components and verify against the packing list:
- 1 x S30 Pro laser
- 1 x Laser repair kit
- 1 x 12V Automatic air pump
- 3 x A4 size 3mm wood board
- 2 x Limit switches
- 1 x 12V 5A Power adapter
- 1 x પાવર કોર્ડ
- 1 x USB કેબલ
- 1 x Air pipe
- 1 x Installation toolkit
- 1 x Laser goggles
- 1 x A4 Metal backing plate
- Step 1-6 Installation package
- 1 એક્સ મેન્યુઅલ
- 1 x X-axis assembly
- 2 x X Profiles
- 2 x Y Profiles
- 1 x Control box assembly
- 3 x સપોર્ટ ફીટ
- 1 x Touch screen (SCULPFUN TS1)
- 1 x Power cord (for TS1)
- 1 x SD card (for TS1)
- 1 x Card reader (for TS1)
- 1 x Manual (for TS1)
3.2 મિકેનિકલ એસેમ્બલી
Follow the step-by-step instructions in the provided installation package to assemble the frame, X-axis, Y-axis, and control box. Ensure all screws are tightened securely.

આકૃતિ 2: ઓવરview of SCULPFUN S30 Series components and innovative technologies. This diagram highlights the industrial-grade linear rail, S30 Pro 10W dual-laser, air assist, automatic air assist pump, X&Y axis expansion kit compatibility, replaceable lens, and 32-bit air assist mainboard.
3.3 લેસર મોડ્યુલ ઇન્સ્ટોલેશન
Install the S30 Pro laser module onto the X-axis assembly. Ensure it is securely fastened and the laser protection cover is in place.
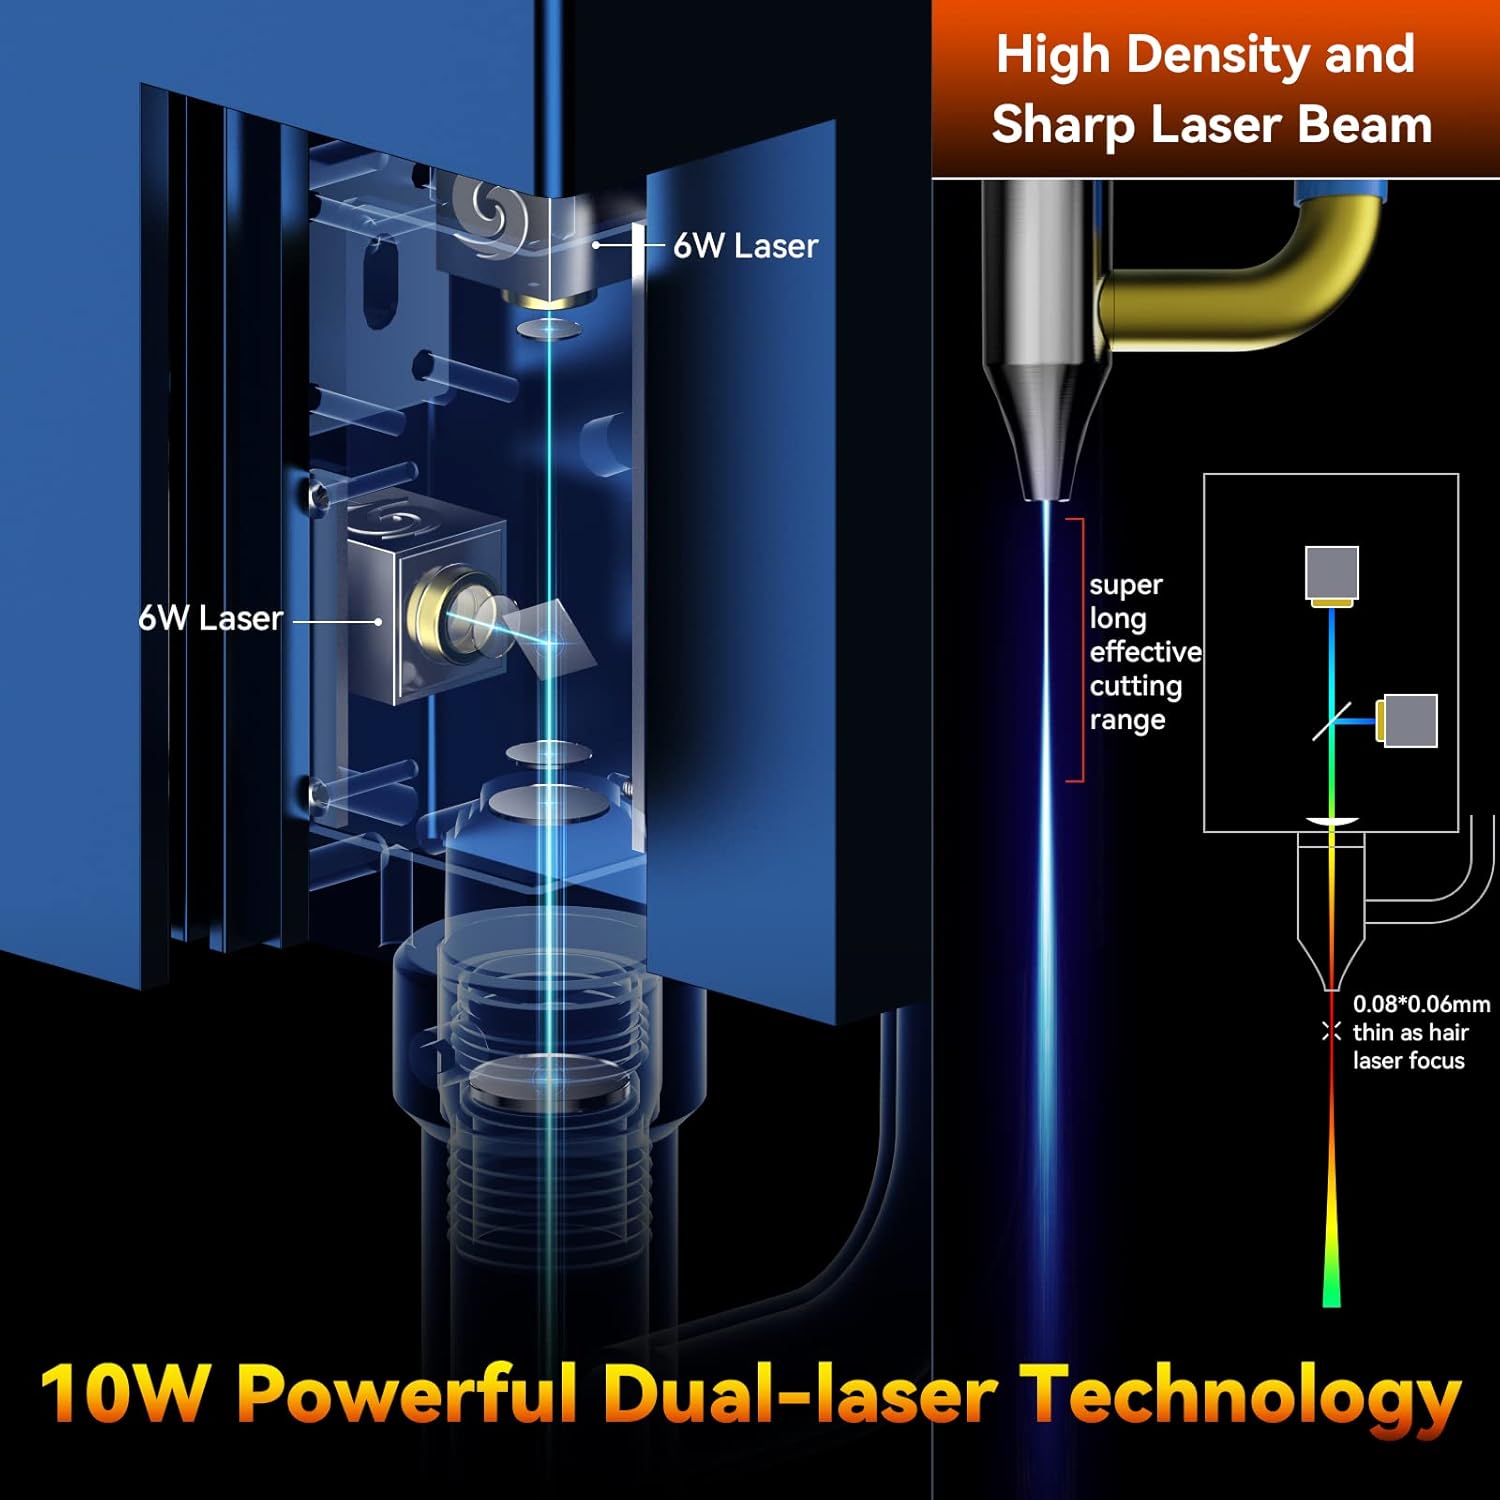
Figure 3: Illustration of the 10W Powerful Dual-laser Technology. This image demonstrates how two 6W lasers are combined to achieve a 10W output with a super long effective cutting range and a fine 0.06x0.08mm laser focus.
3.4 Air Assist System Connection
Connect the air pipe from the 12V automatic air pump to the air assist nozzle on the laser module. Ensure the air pump is connected to the mainboard's designated port.

Figure 4: Close-up of the Built-in High Pressure Air Assist Nozzle. This image illustrates the advanced fluid mechanics design of the S30 Pro nozzle, which enhances airflow for improved cutting performance.
3.5 SCULPFUN TS1 Touch Screen Connection
Connect the SCULPFUN TS1 touch screen to the laser engraver using the provided USB cable. Power on the TS1 using its dedicated power cord.

Figure 5: SCULPFUN TS1 Touch Screen for Laser Engravers. This image highlights the TS1's WiFi function, 3.5-inch capacitive screen, and wide compatibility with S30 series machines.

Figure 6: SCULPFUN TS1 WiFi Functionality. This image shows the TS1 connected to the engraver and interacting with the SCULPFUN mobile phone app for wireless control and file બનાવટ
3.6 સૉફ્ટવેર ઇન્સ્ટોલેશન
The S30 Pro supports various operating software:
- LightBurn (recommended, with air assist function M8)
- લેસરજીઆરબીએલ
- Benbox
- GrblController
- LiteFire
These software packages support Windows and MAC systems. Supported file formats include NC, BMP, JPG, PNG, DXF, and other image formats. Install your preferred software and configure it for the S30 Pro.
4. ઓપરેટિંગ સૂચનાઓ
4.1 Preparing for Engraving/Cutting
- સામગ્રી પ્લેસમેન્ટ: Place the material to be engraved or cut on the metal backing plate. Ensure it is flat and securely positioned within the working area.
- ફોકસ એડજસ્ટમેન્ટ: Adjust the laser focus using the fixed focus column and sliding device to achieve the optimal focal point for your material.
- સૉફ્ટવેર સેટઅપ: Open your chosen engraving software (e.g., LightBurn). Import or create your design.
- પરિમાણ સેટિંગ્સ: Set the appropriate laser power, speed, and passes based on the material type and desired outcome. Refer to material test guides for optimal settings.
- Air Assist Control: For cutting operations, ensure the automatic air assist is enabled in your software (e.g., M8 command in LightBurn). For engraving, air assist may be turned off for finer details or specific material requirements.

Figure 7: Automatic Controlled Air Assist in LightBurn. This image demonstrates how the air assist can be intelligently controlled (ON/OFF) via the LightBurn software's M8 button, showing its effect on cutting and engraving.
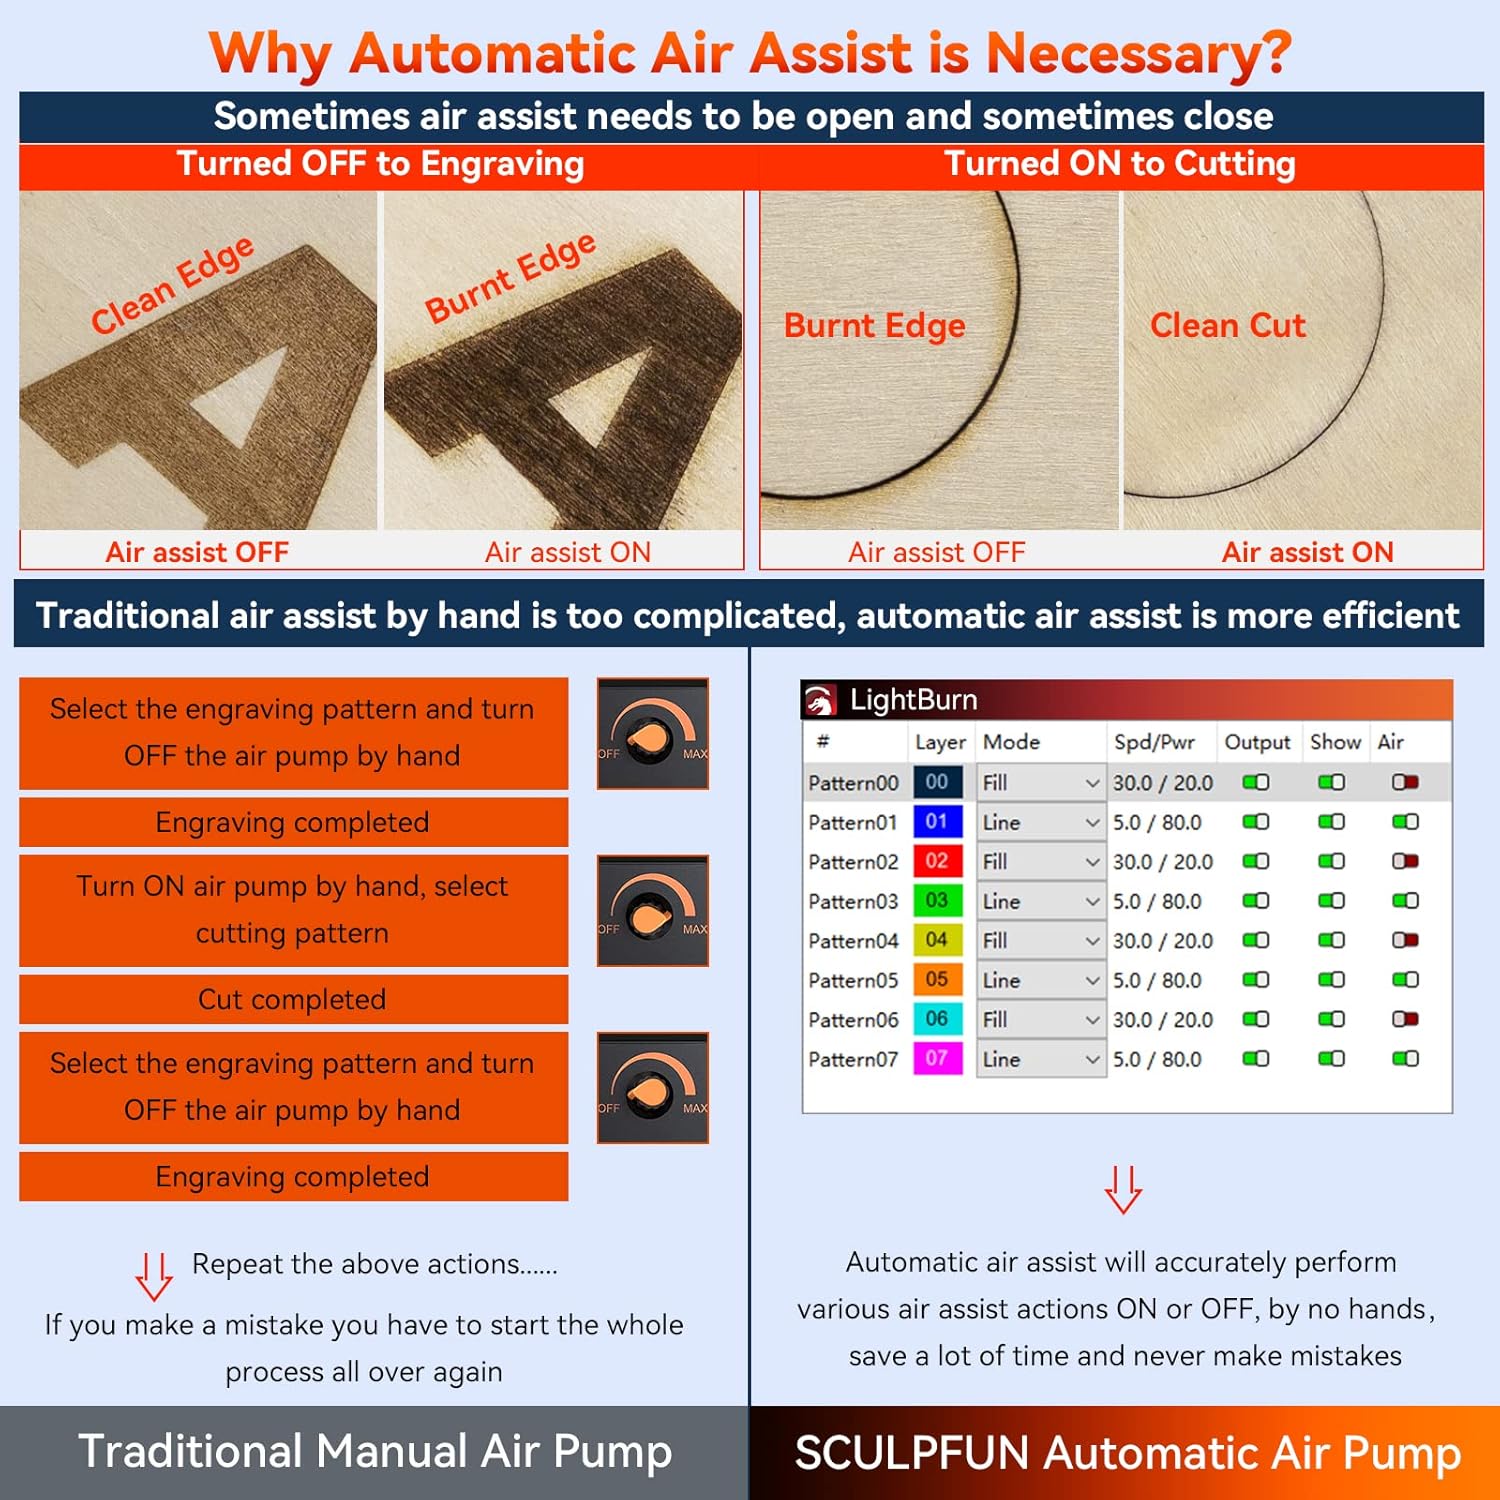
Figure 8: Comparison of Manual vs. Automatic Air Assist. This image illustrates the difference in results (clean edge vs. burnt edge) when air assist is ON or OFF for cutting and engraving, emphasizing the efficiency of automatic control.
4.2 Starting an Operation (PC/Mac Connected)
- Ensure the engraver is connected to your computer via USB.
- In your software, click the "Start" or "Run" button to begin the laser operation.
- Monitor the process closely.
4.3 Offline Operation (SCULPFUN TS1 Touch Screen)
The TS1 touch screen enables engraving without a direct computer connection.
- તૈયાર કરો File: Save your engraving file (e.g., G-code) to the SD card provided with the TS1.
- SD કાર્ડ દાખલ કરો: Insert the SD card into the TS1 touch screen.
- પસંદ કરો File: On the TS1 interface, navigate to the "Carving" or "Files" section and select your desired file.
- કોતરણી શરૂ કરો: Follow the on-screen prompts to initiate the engraving process.
4.4 Wi-Fi Connectivity (SCULPFUN TS1 and Mobile App)
For advanced control and real-time slicing, connect the TS1 to Wi-Fi and use the SCULPFUN mobile app.
- Connect TS1 to Wi-Fi: On the TS1, go to "Set Up" and configure Wi-Fi settings to connect to your local network.
- એપ્લિકેશન ડાઉનલોડ કરો: Download the SCULPFUN mobile app on your smartphone.
- ઉપકરણ જોડો: Open the app and follow instructions to pair with your TS1.
- Control and Slice: Use the app for wireless control, file management, and real-time slicing functions.
5. જાળવણી
Regular maintenance ensures optimal performance and extends the lifespan of your SCULPFUN S30 Pro.
- Clean Laser Lens: Periodically clean the laser lens using a soft, lint-free cloth and lens cleaning solution. A dirty lens can reduce laser power and engraving quality.
- Clean Air Assist Nozzle: Ensure the air assist nozzle is free from debris and residue to maintain optimal airflow.
- Lubricate Linear Rails: Apply a small amount of lubricant to the industrial-grade linear rails occasionally to ensure smooth movement of the laser module.
- Clean Machine Frame: Wipe down the machine frame to remove dust and debris.
- કનેક્શન્સ તપાસો: Periodically inspect all electrical and air pipe connections for looseness or damage.
- Laser Repair Kit: Utilize the provided laser repair kit for minor maintenance or replacement of specific laser components as instructed in the detailed manual.
6. મુશ્કેલીનિવારણ
આ વિભાગ તમને આવી શકે તેવી સામાન્ય સમસ્યાઓનું નિરાકરણ લાવે છે.
| સમસ્યા | સંભવિત કારણ | ઉકેલ |
|---|---|---|
| લેસર ફાયરિંગ ન થવું અથવા નબળું આઉટપુટ | Dirty laser lens; Incorrect focus; Low power setting; Loose connection. | Clean the laser lens; Adjust focus; Increase laser power in software; Check all cable connections. |
| Engraving/Cutting quality is poor | Incorrect speed/power settings; Material not flat; Air assist not optimized; Dirty lens. | Adjust speed and power settings; Ensure material is flat; Verify air assist is ON for cutting and OFF for engraving if needed; Clean lens. |
| Machine not responding to software | USB cable disconnected; Driver issue; Incorrect COM port selected. | Check USB connection; Reinstall drivers; Select correct COM port in software. |
| એર આસિસ્ટ કામ કરતું નથી | Air pump not connected; Air pipe kinked/blocked; M8 command not sent. | Check air pump connection to mainboard; Inspect air pipe for blockages; Ensure M8 command is enabled in LightBurn. |
| TS1 Touch Screen not connecting to engraver | USB cable loose; TS1 not powered on. | Ensure USB cable is firmly connected between TS1 and engraver; Verify TS1 is powered on. |
7. સ્પષ્ટીકરણો
7.1 SCULPFUN S30 Pro Laser Engraving Machine
- ઉત્પાદન મોડલ: SCULPFUN S30 પ્રો
- Diode Laser Output Power: 10W (light energy)
- લેસર ફોકસ: 0.06x0.08 મીમી
- લેસર તરંગલંબાઇ: 455 ± 5nm
- ધ્યાન કેન્દ્રિત કરવાની પદ્ધતિ: Fixed focus column + sliding device
- Laser Protection Cover: ડિટેચેબલ, એડજસ્ટેબલ
- પાવર ઇનપુટ: 100-240V AC, 50/60Hz
- પાવર આઉટપુટ: 12V 7A
- કોતરણીની ચોકસાઈ: 0.005 મીમી
- Engraving Area Size: Standard 410x400mm (expandable to 935x400mm or 935x905mm)
- Machine Electric Power: આશરે 60W
- Air Pump Type: Mainboard-controlled, 12V, flow 30L/min
- Air Hose Inner Diameter: 7.5 મીમી
- મેઇનબોર્ડ: 32-bit air-assisted, reserved for Bluetooth and SD card offline control (upgrade package sold separately)
- ઓપરેટિંગ સોફ્ટવેર: LightBurn (M8 air assist), LaserGRBL, LightBurn, Benbox, GrblController, LiteFire
- સપોર્ટેડ OS: વિન્ડોઝ, મેક
- આધારભૂત File ફોર્મેટ્સ: NC, BMP, JPG, PNG, DXF, વગેરે.
- ડેટા ટ્રાન્સમિશન: USB connection or Bluetooth wireless connection
- ઉત્પાદન પરિમાણો: 18.11 x 18.11 x 6.69 ઇંચ
- પેકેજ વજન: 6.85 કિગ્રા
- પ્રમાણપત્રો: CE, FCC, RoHS, FDA, ICE
7.2 SCULPFUN TS1 Touch Screen
- ઉત્પાદન સામગ્રી: ABS+PC
- સ્ક્રીનનું કદ: 3.5 ઇંચ
- સ્ક્રીન સામગ્રી: કેપેસિટીવ ટચ સ્ક્રીન
- સ્ક્રીન રીઝોલ્યુશન: 480x320
- ઉત્પાદન કદ: 126x89x25mm
- ઉત્પાદન વજન: 130 ગ્રામ
8. વોરંટી અને સપોર્ટ
For warranty information, technical support, or service inquiries, please refer to the official SCULPFUN webસાઇટ પર જાઓ અથવા તેમની ગ્રાહક સેવાનો સીધો સંપર્ક કરો. ખરીદીના પુરાવા તરીકે તમારી ખરીદી રસીદ રાખો.
ઉત્પાદક: સ્કુલફન
પ્રથમ ઉપલબ્ધ તારીખ: સપ્ટેમ્બર 3, 2024
વધુ સહાયતા માટે, મુલાકાત લો SCULPFUN Store on Amazon.


