1. પરિચય
This manual provides detailed instructions for the installation, operation, and maintenance of your Zalman P50 DS Medium Tower Panoramic PC Case. Please read this manual thoroughly before beginning installation to ensure proper assembly and safe usage. Retain this manual for future reference.
The Zalman P50 DS is designed to showcase your PC components with its panoramic view, featuring two tempered glass panels. It supports ATX, Micro ATX, and Mini ITX motherboards and graphics cards up to 435mm in length. The case includes a real-time CPU and GPU temperature display and comes equipped with four 120mm ARGB fans for efficient cooling.
2. સલામતી માહિતી
- Always disconnect the power supply from the wall outlet before installing or servicing any components inside the PC case.
- Handle tempered glass panels with care. They are fragile and can break if dropped or subjected to sharp impacts.
- સંવેદનશીલ ઇલેક્ટ્રોનિક ઘટકોને ઇલેક્ટ્રોસ્ટેટિક ડિસ્ચાર્જ (ESD) નુકસાન અટકાવવા માટે એન્ટિ-સ્ટેટિક મોજા પહેરો અથવા એન્ટિ-સ્ટેટિક કાંડા પટ્ટાનો ઉપયોગ કરો.
- નાના ભાગો અને સ્ક્રૂ બાળકોથી દૂર રાખો.
- પીસી કેસની આસપાસ યોગ્ય વેન્ટિલેશનની ખાતરી કરો જેથી ઓવરહિટીંગ ન થાય.
- Do not attempt to modify the case structure or electrical components, as this may void your warranty and pose safety risks.
3. પેકેજ સામગ્રી
ઇન્સ્ટોલેશન શરૂ કરતા પહેલા કૃપા કરીને ચકાસો કે બધા ઘટકો હાજર છે.
- Zalman P50 DS PC Case (Black)
- Accessory Box (Screws, standoffs, cable ties, etc.)
- વપરાશકર્તા માર્ગદર્શિકા (આ દસ્તાવેજ)
- Pre-installed 120mm ARGB Fans (4 units)
4. ફીચર્સ ઓવરview
- પેનોરેમિક View: Two tempered glass panels for a clear view આંતરિક ઘટકોનું.
- રીઅલ-ટાઇમ ડિસ્પ્લે: Integrated screen for CPU and GPU temperature monitoring.
- ઠંડક પ્રણાલી: Four pre-installed 120mm ARGB fans for optimal airflow.
- મધરબોર્ડ સુસંગતતા: Supports ATX, Micro ATX, and Mini ITX motherboards.
- GPU ક્લિયરન્સ: Accommodates graphics cards up to 435mm in length.
- Tool-less Design: Screwless concept for certain components, facilitating installation.
- ફ્રન્ટ I/O: Includes USB 3.0 ports, Type-C port, audio jacks, and power/reset buttons.

આકૃતિ 4.1: ફ્રન્ટ-સાઇડ view of the Zalman P50 DS PC case, showcasing the panoramic tempered glass panels and the illuminated ARGB fans. The front I/O panel is visible at the bottom.
5. સેટઅપ અને ઇન્સ્ટોલેશન
૪.૧ કેસ તૈયાર કરવો
- કેસને સપાટ, સ્થિર સપાટી પર મૂકો.
- Carefully remove the tempered glass side panels. These are typically secured with thumb screws or a clip mechanism. Refer to the specific mechanism on your case.
- Unpack the accessory box containing screws and other small parts.
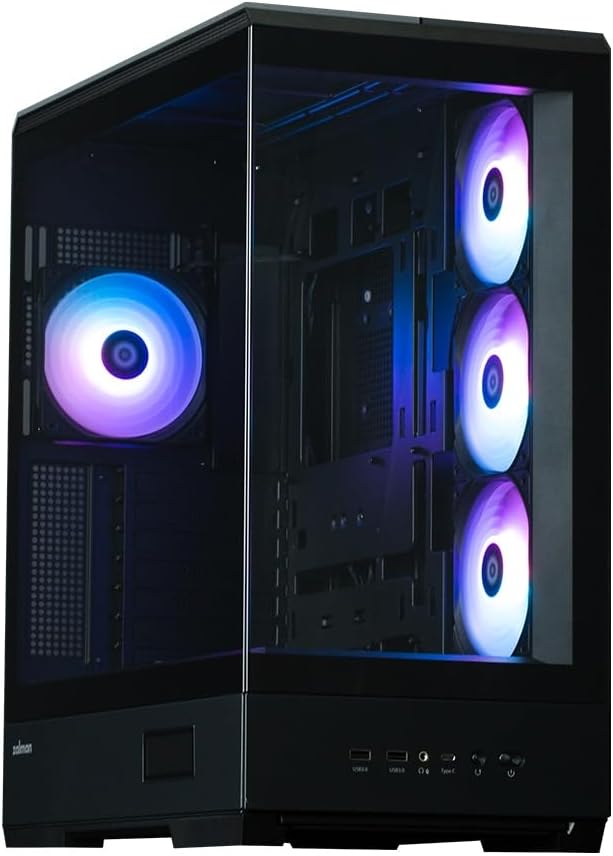
આકૃતિ 5.1: કોણીય view of the Zalman P50 DS PC case, highlighting the two tempered glass panels that provide a panoramic view of the internal components. The case is shown with its pre-installed ARGB fans.
5.2 મધરબોર્ડ સ્થાપન
- કેસના પાછળના ભાગમાં I/O શિલ્ડ ઇન્સ્ટોલ કરો.
- Align your ATX, Micro ATX, or Mini ITX motherboard with the pre-installed standoffs. Ensure the screw holes on the motherboard match the standoffs.
- સહાયક બોક્સમાંથી યોગ્ય સ્ક્રૂ વડે મધરબોર્ડને સુરક્ષિત કરો. વધારે કડક ન કરો.

આકૃતિ 5.2: આંતરિક view of the Zalman P50 DS PC case from the rear, showing the motherboard mounting area, expansion slots, and the rear exhaust fan. This image illustrates the layout for component installation.
૧.૬ ગ્રાફિક્સ કાર્ડ (GPU) ઇન્સ્ટોલેશન
- Remove the necessary expansion slot covers from the rear of the case, corresponding to your GPU's size.
- Insert the graphics card into the primary PCIe slot on your motherboard. Ensure it is fully seated.
- Secure the graphics card to the case using the provided screws or tool-less retention mechanism.

આકૃતિ 5.3: એક આંતરિક view of the Zalman P50 DS PC case with a fully assembled system, including a graphics card, CPU cooler, and memory modules. This demonstrates the ample space for high-performance components.
૫.૪ સ્ટોરેજ ડ્રાઇવ ઇન્સ્ટોલેશન (HDD/SSD)
The Zalman P50 DS offers various mounting options for 2.5" SSDs and 3.5" HDDs. Locate the drive cages or mounting points behind the motherboard tray or in the PSU shroud area.
- For 2.5" SSDs: Secure the SSDs to the designated mounting plates using small screws.
- For 3.5" HDDs: Slide the HDD into the drive cage bays and secure with screws or tool-less clips if available.

આકૃતિ 5.4: પાછળનો આંતરિક ભાગ view of the Zalman P50 DS PC case, revealing the cable management channels and dedicated bays for storage drives (SSDs and HDDs) behind the motherboard tray. This area is crucial for clean cable routing.
5.5 પાવર સપ્લાય યુનિટ (PSU) સ્થાપન
- Mount the PSU into its designated compartment at the bottom rear of the case.
- Secure the PSU with screws from the outside of the case.
- Connect the necessary power cables to your motherboard, graphics card, and storage drives. Utilize the cable management features of the case to route cables neatly.
5.6 Connecting Front I/O Cables
Connect the front panel cables (USB 3.0, USB Type-C, HD Audio, Power Switch, Reset Switch, Power LED, HDD LED) to their corresponding headers on your motherboard. Refer to your motherboard manual for exact header locations.

આકૃતિ 5.5: વિગતવાર view of the front I/O panel on the Zalman P50 DS PC case, showing two USB 3.0 ports, audio jacks, a USB Type-C port, and the power button. This panel provides convenient access to peripherals.
6. ઓપરેટિંગ સૂચનાઓ
6.1 Powering On Your PC
After all components are securely installed and cables connected, replace the tempered glass panels. Connect your monitor, keyboard, mouse, and power cable to the PC. Press the power button on the front I/O panel to start your system.
6.2 Real-time Temperature Display
The Zalman P50 DS features an integrated display that shows the CPU and GPU temperatures in real-time. This display is located on the front lower section of the case. No additional software is typically required for its basic function, as it often connects directly to motherboard sensors or via a dedicated internal USB header.

આકૃતિ 6.1: Close-up of the Zalman P50 DS PC case's integrated display, showing real-time CPU and GPU temperature readings. This feature allows users to monitor system thermals at a glance.
૬.૨ ARGB ફેન કંટ્રોલ
The pre-installed ARGB fans can be controlled via your motherboard's ARGB software (if connected to a compatible header) or through a dedicated controller if one is included or purchased separately. Refer to your motherboard manual or fan controller instructions for specific lighting effects and speed adjustments.
7. જાળવણી
7.1 Cleaning the Case
- બાહ્ય: સોફ્ટનો ઉપયોગ કરો, ડીamp cloth to wipe down the exterior surfaces, including the tempered glass panels. Avoid abrasive cleaners or solvents.
- આંતરિક: Periodically open the case and use compressed air to remove dust buildup from fans, heatsinks, and other components. Ensure the system is powered off and unplugged before cleaning the interior.
- ડસ્ટ ફિલ્ટર્સ: The case may include removable dust filters. Clean these regularly by rinsing them with water and allowing them to dry completely before reinstallation.
8. મુશ્કેલીનિવારણ
- PC does not power on:
- Ensure the power supply is switched on and properly connected to the wall outlet.
- Verify all power cables (24-pin ATX, 8-pin CPU, PCIe power) are securely connected to the motherboard and graphics card.
- Check the front panel power switch cable connection to the motherboard.
- Fans are not spinning or RGB is not working:
- Ensure fan power cables are connected to the motherboard or fan controller.
- Verify ARGB cables are connected to a compatible ARGB header on the motherboard or controller.
- Check motherboard BIOS/UEFI settings or ARGB software for fan control and lighting settings.
- તાપમાન પ્રદર્શન કામ કરી રહ્યું નથી:
- Ensure the display's internal connection (often a USB header) is properly seated on the motherboard.
- Check for any specific software or driver requirements for the display, though most are plug-and-play.
9. સ્પષ્ટીકરણો
| લક્ષણ | સ્પષ્ટીકરણ |
|---|---|
| મોડેલનું નામ | P50DS BK |
| કેસનો પ્રકાર | મિડ ટાવર |
| મધરબોર્ડ સુસંગતતા | એટીએક્સ, માઇક્રો એટીએક્સ, મીની આઇટીએક્સ |
| પરિમાણો (LxWxH) | 18.9 x 20.16 x 9.45 ઇંચ (480 x 512 x 240 mm) |
| સામગ્રી | Alloy Steel, Tempered Glass, Plastic |
| પ્રી-ઇન્સ્ટોલ કરેલ ચાહકો | 4 x 120mm ARGB ચાહકો |
| GPU ક્લિયરન્સ | 435 મીમી સુધી |
| ફ્રન્ટ I / O બંદરો | 2x USB 3.0, 1x USB Type-C, Audio In/Out, Power, Reset |
| પાવર સપ્લાય માઉન્ટિંગ | બોટમ માઉન્ટ |
| વસ્તુનું વજન | 30.1 પાઉન્ડ (13.7 કિગ્રા) |
10. વોરંટી અને સપોર્ટ
Zalman products are manufactured to high quality standards. For warranty information, technical support, or service inquiries, please refer to the official Zalman webસાઇટ પર જાઓ અથવા તમારા સ્થાનિક રિટેલરનો સંપર્ક કરો. વોરંટી દાવાઓ માટે ખરીદીનો પુરાવો રાખો.
સત્તાવાર Webસાઇટ: www.zalman.com


