1. પરિચય
SCULPFUN C1 મીની લેસર એન્ગ્રેવર એક કોમ્પેક્ટ અને પોર્ટેબલ 3W ડાયોડ લેસર મશીન છે જે વિવિધ પ્રકારની સામગ્રી પર ઉચ્ચ-ચોકસાઇ કોતરણી માટે રચાયેલ છે. તેનું અલ્ટ્રા-ફાઇન 0.04mm લેસર સ્પોટ વિગતવાર ઇમેજિંગ માટે પરવાનગી આપે છે, જે તેને DIY ઉત્સાહીઓ અને નવા નિશાળીયા માટે યોગ્ય બનાવે છે. આ માર્ગદર્શિકા સલામત અને અસરકારક ઉપયોગ માટે આવશ્યક માહિતી પ્રદાન કરે છે, જેમાં સેટઅપ, સંચાલન, જાળવણી અને મુશ્કેલીનિવારણનો સમાવેશ થાય છે.
2. સલામતી માહિતી
ચેતવણી: આ ઉત્પાદનમાં વર્ગ IV લેસર છે. લેસર બીમના સીધા સંપર્કમાં આવવાથી આંખોને ગંભીર નુકસાન થઈ શકે છે અને ત્વચા બળી શકે છે. મશીન ચલાવતી વખતે હંમેશા રક્ષણાત્મક ચશ્મા પહેરો. ક્યારેય સીધા લેસર બીમમાં ન જુઓ.
- લેસર ક્લાસ: IV
- લેસર આઉટપુટ: 3000mW
- કામ કરતી વખતે યોગ્ય વેન્ટિલેશનની ખાતરી કરો, કારણ કે કોતરણી ધુમાડો ઉત્પન્ન કરી શકે છે. સારી રીતે વેન્ટિલેટેડ વિસ્તારમાં અથવા એક્ઝોસ્ટ સિસ્ટમ સાથે ઉપયોગ કરો.
- યોગ્ય સાવચેતી વિના ખૂબ પ્રતિબિંબિત સામગ્રી કોતરણી કરશો નહીં.
- બાળકો અને પાલતુ પ્રાણીઓની પહોંચથી દૂર રાખો.
- મર્યાદિત શક્તિને કારણે, આ મશીનને કાપવાના કાર્યો અથવા ખાલી ધાતુઓ કોતરણી માટે ભલામણ કરવામાં આવતી નથી.
- રક્ષણાત્મક કવર (જો વપરાયેલ હોય તો) વર્ગ 1 લેસર કોતરણી મશીનના ધોરણોને પૂર્ણ કરવામાં મદદ કરે છે અને ખોલવામાં આવે ત્યારે કામગીરી બંધ કરીને સલામતીમાં વધારો કરે છે.
3. પેકેજ સામગ્રી
ખાતરી કરો કે બધી વસ્તુઓ તમારા પેકેજમાં હાજર છે:
- C1 મશીન બોડી
- લેસર હેડ
- મેટલ પ્રોટેક્ટિવ પ્લેટ
- એક્રેલિક ફોકસિંગ શીટ
- વપરાશકર્તા માર્ગદર્શિકા (આ દસ્તાવેજ)
- પાવર એડેપ્ટર
- સમારકામ સાધનો (એલન રેન્ચ, રેન્ચ)
- ડેટા કેબલ (USB-A થી USB-C)
- રક્ષણાત્મક ચશ્મા
- મેટલ બિઝનેસ કાર્ડ (ઓ)ampલે)
- ક્રાફ્ટ પેપર (ઓ)ampલે)
- પ્લાયવુડ (ઓ)ampલે)
- સફાઈ કાપડ

છબી: SCULPFUN C1 મીની લેસર એન્ગ્રેવર પેકેજમાં સમાવિષ્ટ બધા ઘટકો.
4. સેટઅપ અને ઇન્સ્ટોલેશન
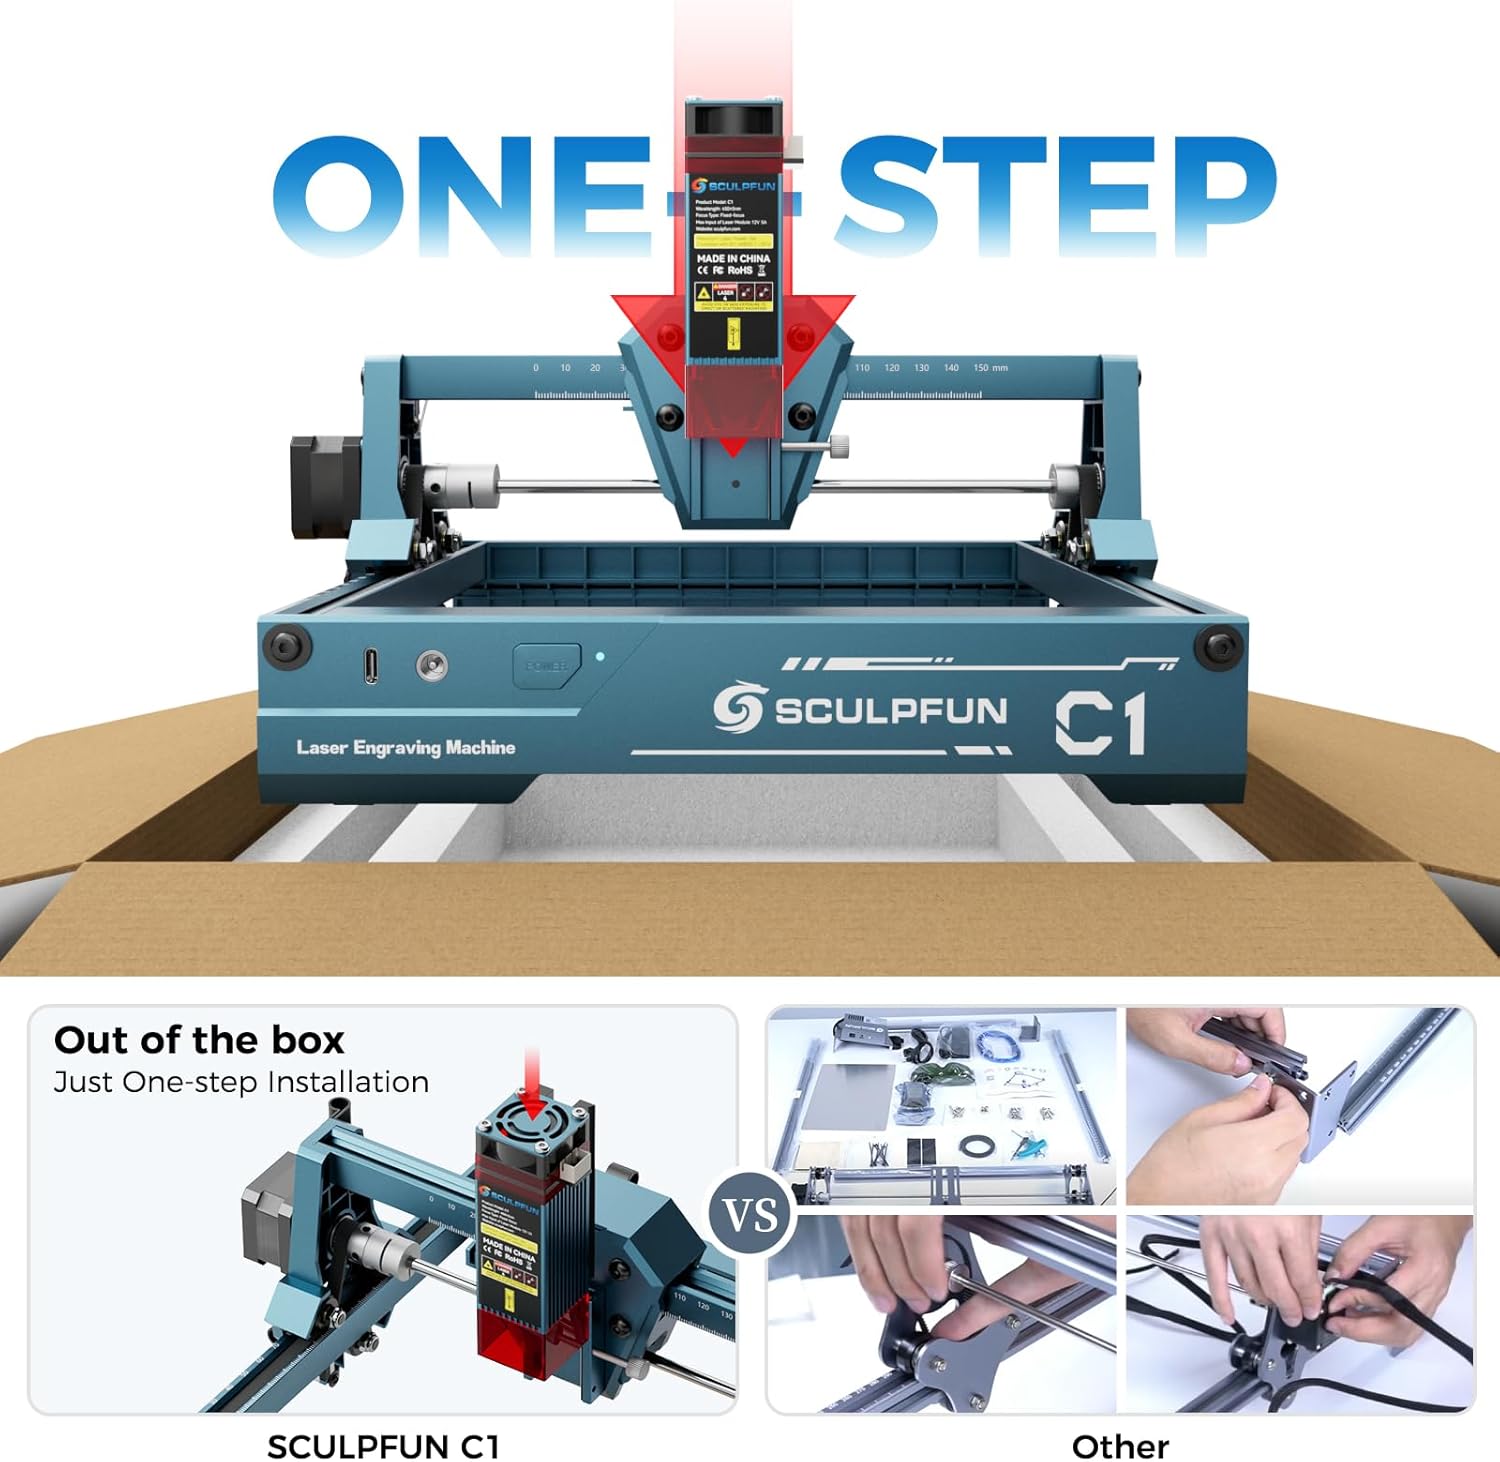
SCULPFUN C1 સરળ, એક-પગલાની ઇન્સ્ટોલેશન માટે રચાયેલ છે. તમારા કોતરનારને સેટ કરવા માટે આ પગલાં અનુસરો:
- અનબૉક્સિંગ: પેકેજિંગમાંથી બધા ઘટકો કાળજીપૂર્વક દૂર કરો. મુખ્ય મશીન બોડી પહેલાથી જ એસેમ્બલ કરવામાં આવે છે.
- લેસર હેડ ઇન્સ્ટોલ કરો: લેસર હેડ પરથી ચુંબકીય રક્ષણાત્મક કવર દૂર કરો. ગેન્ટ્રી પર તેના નિયુક્ત સ્લોટમાં લેસર હેડ દાખલ કરો. યોગ્ય રિપેર ટૂલનો ઉપયોગ કરીને પૂરા પાડવામાં આવેલ સ્ક્રૂથી તેને સુરક્ષિત કરો.
- કેબલ્સ કનેક્ટ કરો:
- લેસર હેડ કેબલને ગેન્ટ્રી પરના પોર્ટ સાથે જોડો.
- પાવર એડેપ્ટરને મશીન પરના પાવર પોર્ટ સાથે કનેક્ટ કરો અને તેને વોલ આઉટલેટમાં પ્લગ કરો.
- મશીનના ડેટા પોર્ટમાંથી ડેટા કેબલ (USB-A થી USB-C) ને તમારા કમ્પ્યુટર સાથે કનેક્ટ કરો.
- સૉફ્ટવેર ઇન્સ્ટોલેશન:
SCULPFUN C1 વ્યાવસાયિક લેસર કોતરણી સોફ્ટવેર જેમ કે LightBurn (વધારાની ખરીદી) અને LaserGRBL (મફત અને ઓપન-સોર્સ) સાથે સુસંગત છે. Windows 7 સિસ્ટમો માટે, ડ્રાઇવર ઇન્સ્ટોલ કરવું જરૂરી હોઈ શકે છે. Windows 10/11 અને MacOS માટે, મશીન સામાન્ય રીતે ડ્રાઇવર-મુક્ત હોય છે.
સોફ્ટવેર સેટઅપ અને ડ્રાઇવર ઇન્સ્ટોલેશન માટે સીધી ડાઉનલોડ લિંક્સ અને વિગતવાર સૂચનાઓ માટે યુઝર મેન્યુઅલ (PDF) જુઓ અથવા ભૌતિક મેન્યુઅલમાં આપેલા QR કોડને સ્કેન કરો.
- પ્રારંભિક પાવર ચાલુ અને હોમિંગ: હોમિંગ ક્રમ શરૂ કરવા માટે મશીન પરના પાવર બટન પર બે વાર ક્લિક કરો. લેસર હેડ તેની હોમ પોઝિશન પર જશે, જે દર્શાવે છે કે તે ઓપરેશન માટે તૈયાર છે.
વિડિઓ: SCULPFUN C1 મીની લેસર એન્ગ્રેવર માટે વિગતવાર ઇન્સ્ટોલેશન ટ્યુટોરીયલ, અનબોક્સિંગ, લેસર હેડ એટેચમેન્ટ, કેબલ કનેક્શન અને પ્રારંભિક સેટઅપને આવરી લે છે.
છબી: SCULPFUN C1 નું ક્લોઝ-અપ જેમાં ગેન્ટ્રીમાં લેસર હેડ દાખલ કરવામાં આવી રહ્યું છે.
છબી: SCULPFUN C1, પાવર અને ડેટા કેબલ સાથે જોડાયેલ, સોફ્ટવેર ઇન્ટરફેસ માટે તૈયાર.
5. ઓપરેટિંગ સૂચનાઓ
એકવાર સેટ થઈ ગયા પછી, SCULPFUN C1 કોતરણી માટે તૈયાર છે. ખાતરી કરો કે તમારી સામગ્રી કાર્યક્ષેત્ર પર સપાટ મૂકવામાં આવી છે.
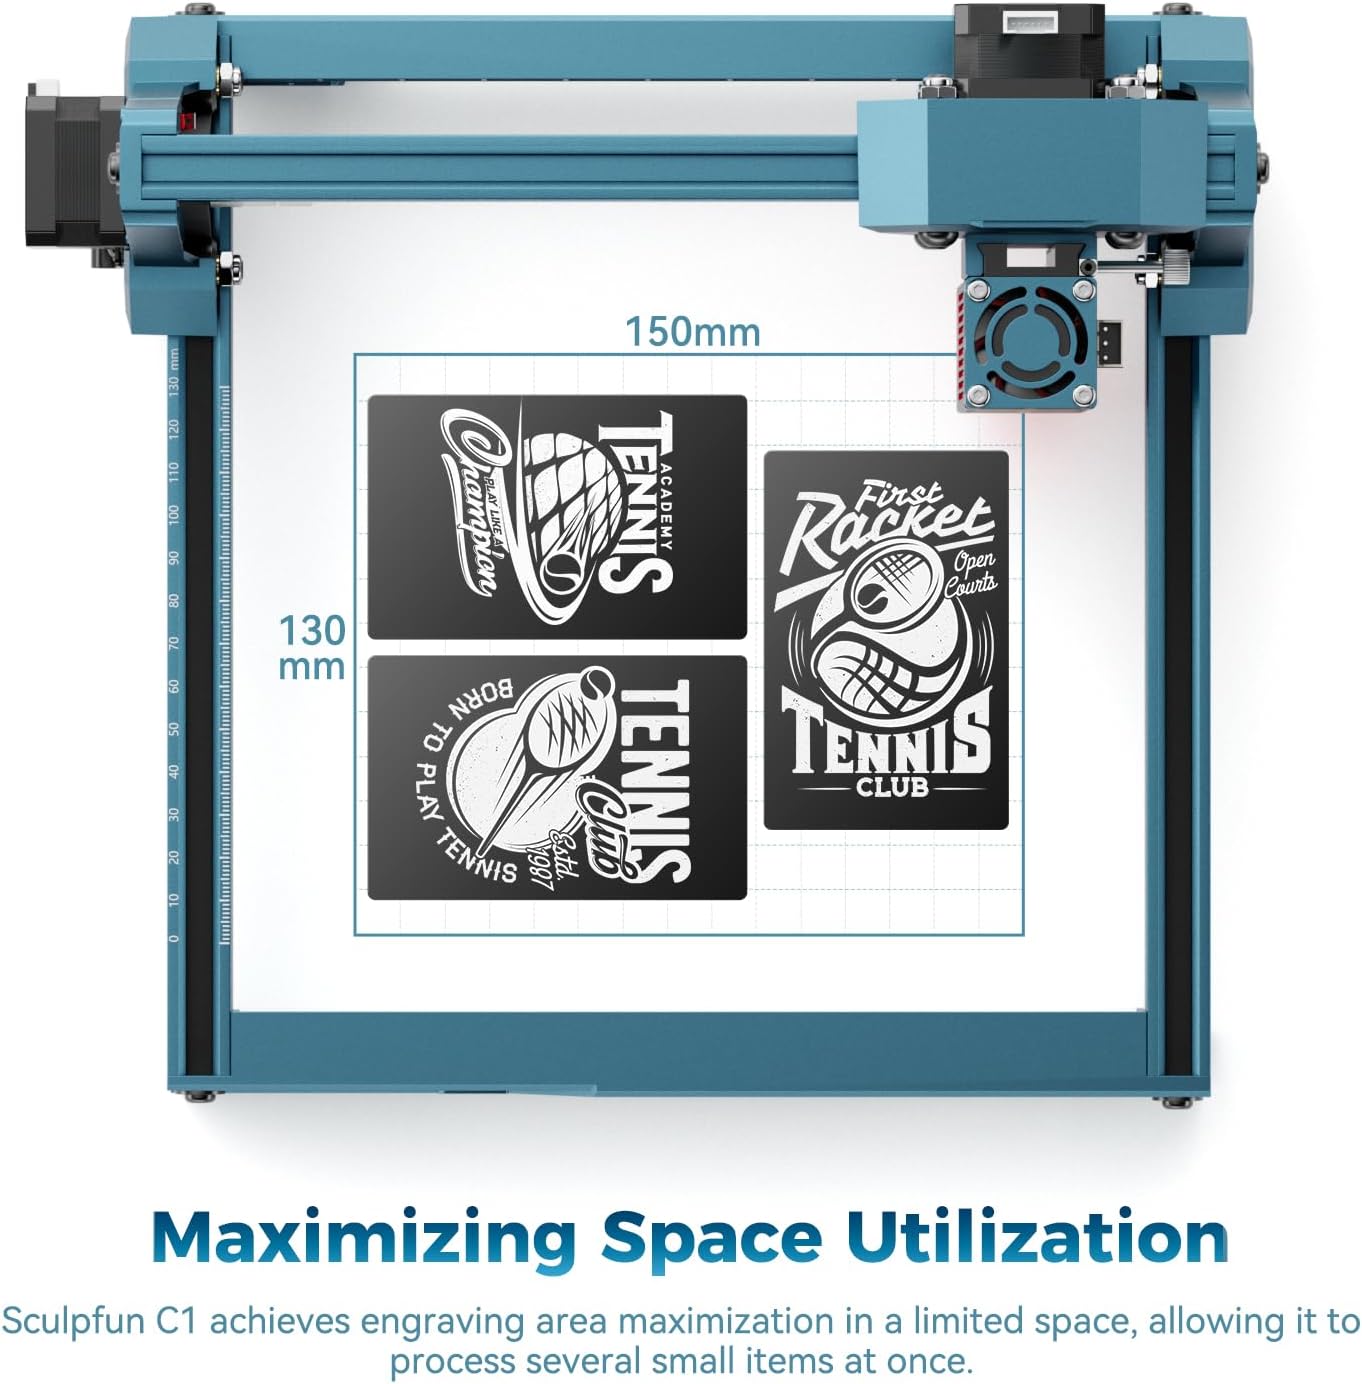
- સામગ્રી પ્લેસમેન્ટ: કોતરણી કરવા માટેની સામગ્રી 150x130mm કાર્યક્ષેત્રમાં મૂકો.
- ધ્યાન કેન્દ્રિત: લેસર માટે યોગ્ય ફોકલ અંતર સેટ કરવા માટે આપેલી એક્રેલિક ફોકસિંગ શીટનો ઉપયોગ કરો. લેસર હેડની નીચે શીટ મૂકો અને લેસર હેડની ઊંચાઈને સમાયોજિત કરો જ્યાં સુધી લેસર સ્પોટ સામગ્રી પર તેના શ્રેષ્ઠ બિંદુ પર ન આવે. લેસર હેડને સુરક્ષિત કરો.
- સોફ્ટવેર ઈન્ટરફેસ: તમારા પસંદ કરેલા સોફ્ટવેર (લાઇટબર્ન અથવા લેસરજીઆરબીએલ) ખોલો. તમારી ઇચ્છિત છબી આયાત કરો (જેપીજી, પીએનજી, બીએમપી, જીઆઈએફ, એસવીજી, એઆઈ, વગેરેને સપોર્ટ કરે છે).
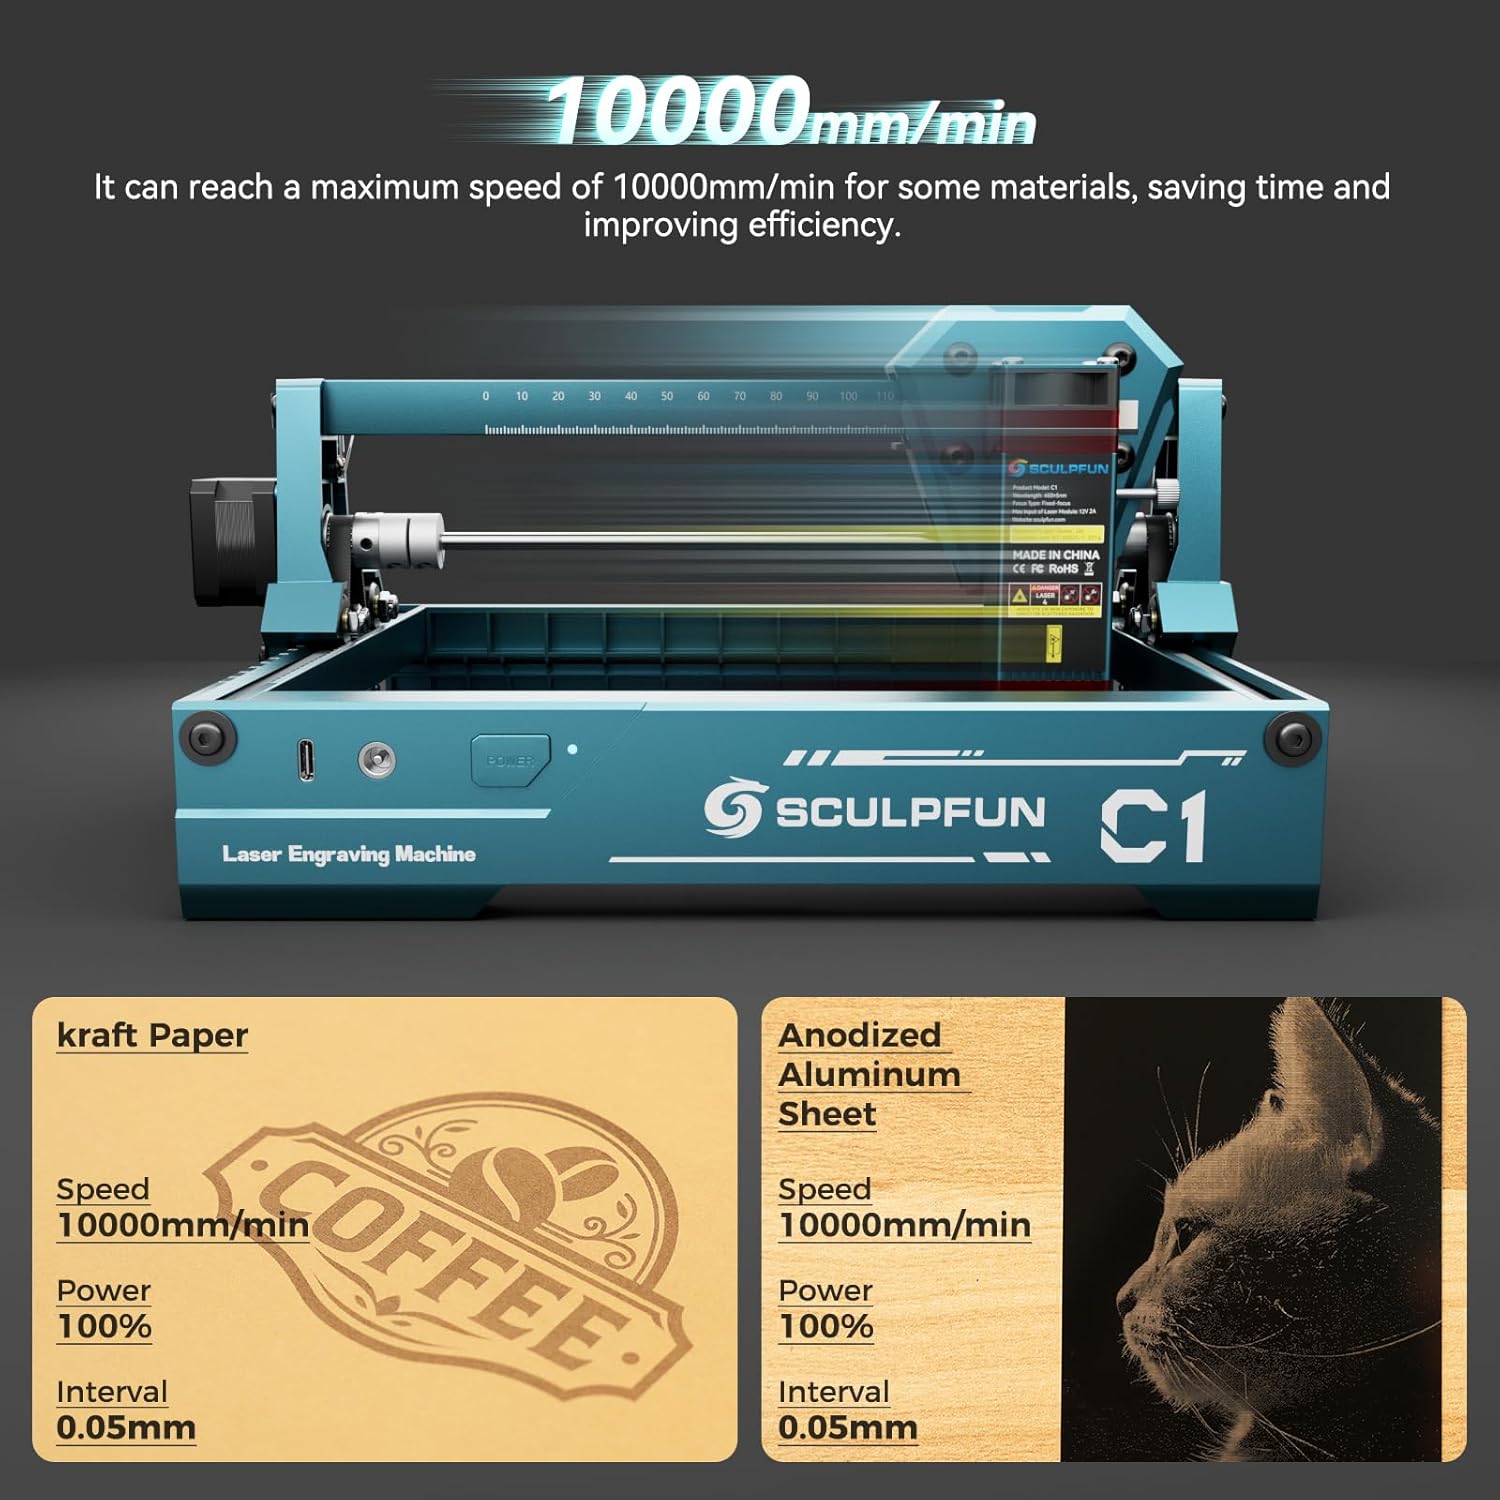
- પરિમાણ સેટિંગ્સ: તમારી સામગ્રી અને ઇચ્છિત અસરના આધારે કોતરણીના પરિમાણો જેમ કે ઝડપ, શક્તિ અને અંતરાલને સમાયોજિત કરો. કેટલીક સામગ્રી માટે C1 મહત્તમ 10000mm/મિનિટની ગતિ સુધી પહોંચી શકે છે.
- ફ્રેમિંગ: સોફ્ટવેરમાં "ફ્રેમ" ફંક્શનનો ઉપયોગ કરીને પ્રી-view તમારી સામગ્રી પર કોતરણી વિસ્તાર. આ યોગ્ય સ્થાન સુનિશ્ચિત કરવામાં મદદ કરે છે.
- કોતરણી શરૂ કરો: એકવાર સેટિંગ્સ અને ફ્રેમિંગથી સંતુષ્ટ થઈ જાઓ, પછી સોફ્ટવેરમાંથી કોતરણી પ્રક્રિયા શરૂ કરો.
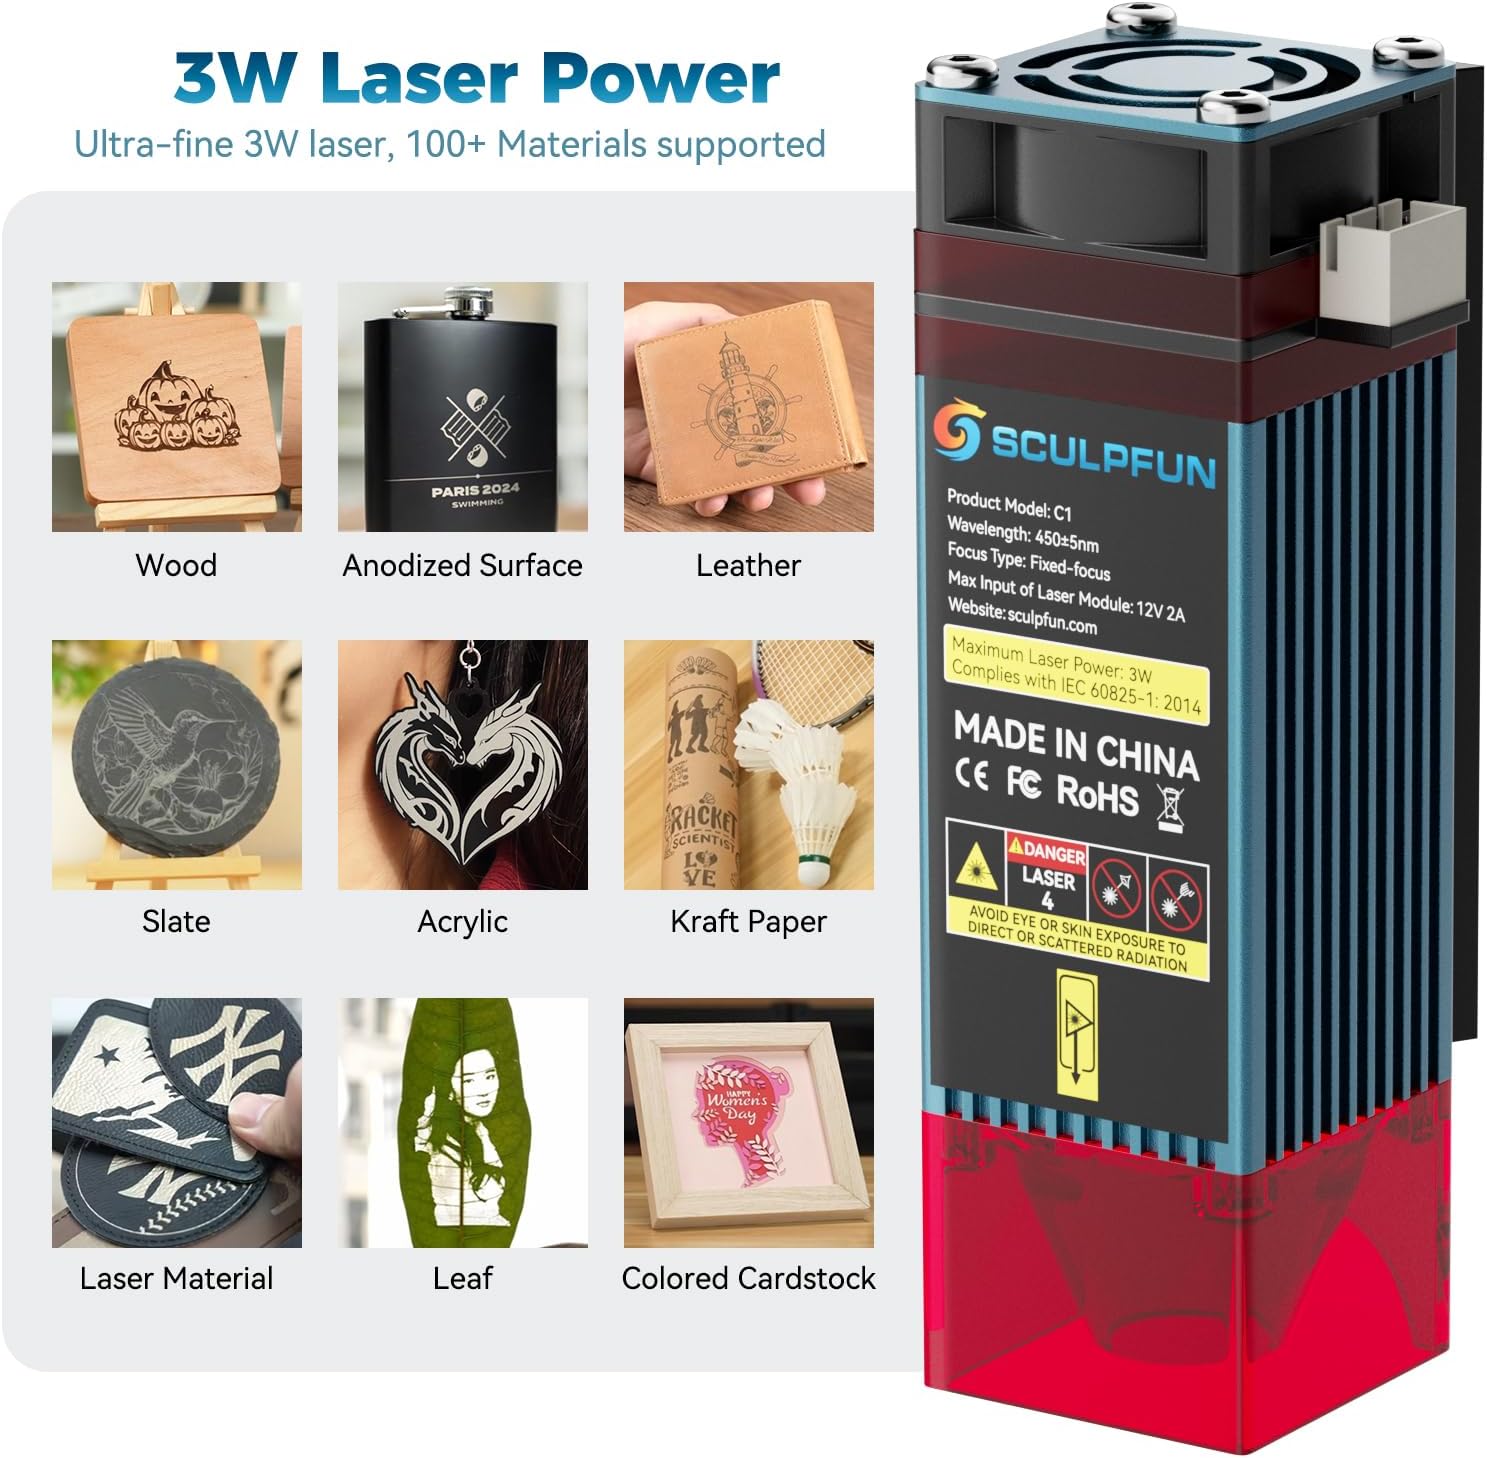
છબી: દા.તampSCULPFUN C1 થી કોતરણી કરી શકાય તેવી ઘણી બધી સામગ્રી, જેમાં લાકડું, એનોડાઇઝ્ડ સપાટીઓ, ચામડું, સ્લેટ, એક્રેલિક, ક્રાફ્ટ પેપર, પાંદડા અને રંગીન કાર્ડસ્ટોકનો સમાવેશ થાય છે.

છબી: 0.04mm અલ્ટ્રા-ફાઇન લેસર સ્પોટનું ચિત્ર, જે વિગતવાર કોતરણી માટે તેની ચોકસાઇને પ્રકાશિત કરે છે.
વિડિઓ: ઓવરview SCULPFUN C1 મીની લેસર કોતરણી મશીન કાર્યરત છે, જે તેના કોમ્પેક્ટ કદ અને કોતરણી ક્ષમતાઓનું પ્રદર્શન કરે છે.
વિડિઓ: SCULPFUN C1 લેસર એન્ગ્રેવરનો ઉપયોગ કરીને ચામડાના પાકીટને કસ્ટમાઇઝ કરવાનું પ્રદર્શન.
6. જાળવણી
નિયમિત જાળવણી શ્રેષ્ઠ કામગીરી સુનિશ્ચિત કરે છે અને તમારા SCULPFUN C1 નું આયુષ્ય લંબાવે છે.
૬.૧. લેસર લેન્સ સફાઈ
લેસર લેન્સ પર ધૂળ અને કચરો જમા થઈ શકે છે, જે કોતરણીની ગુણવત્તાને અસર કરે છે. લેન્સને નિયમિતપણે સાફ કરો:
- મશીન બંધ કરો અને અનપ્લગ કરો.
- લેસર હેડ પરથી ચુંબકીય રક્ષણાત્મક કવર કાળજીપૂર્વક દૂર કરો.
- લેસર હેડના તળિયેથી કાળા લેન્સ કેપને સ્ક્રૂ કાઢીને દૂર કરો.
- સ્વચ્છ કપાસના સ્વેબનો હળવા હાથે ઉપયોગ કરો.ampલેન્સ ક્લિનિંગ સોલ્યુશન (અથવા આઇસોપ્રોપીલ આલ્કોહોલ) થી લેન્સને હળવા હાથે સાફ કરો. વધુ પડતું દબાણ ટાળો.
- લેન્સ કેપ અને રક્ષણાત્મક કવર ફરીથી એસેમ્બલ કરતા પહેલા લેન્સને સંપૂર્ણપણે સુકાવા દો.
6.2. બેલ્ટ ગોઠવણ
લેસર હેડની ચોક્કસ હિલચાલ માટે ખાતરી કરો કે બેલ્ટ યોગ્ય રીતે ટેન્શન કરેલા છે.
- બેલ્ટમાં કોઈ ઢીલાપણું કે ઘસારો છે કે નહીં તે તપાસો.
- જો બેલ્ટ ઢીલો હોય, તો આપેલા રિપેર ટૂલ્સનો ઉપયોગ કરીને બેલ્ટ મિકેનિઝમ પરના ટેન્શનિંગ સ્ક્રૂને ગોઠવો જ્યાં સુધી બેલ્ટ કડક ન થાય પણ વધુ પડતો કડક ન થાય.
- બેલેન્સ એડજસ્ટમેન્ટ માટે, કપલિંગ પરના સ્ક્રૂ છૂટા કરો, ગેન્ટ્રીને ફ્રેમની સામે સંપૂર્ણપણે દબાણ કરો, અને પછી સ્ક્રૂને ફરીથી કડક કરો. આ ખાતરી કરે છે કે ગેન્ટ્રીની બંને બાજુઓ ગોઠવાયેલ છે.
વિડિઓ: એક ટૂંકી પૂર્વસૂચનview SCULPFUN C1 માટે લેન્સ સફાઈ અને બેલ્ટ ગોઠવણ પ્રક્રિયાઓ દર્શાવતો વિડિઓ.
7. મુશ્કેલીનિવારણ
- મશીન કમ્પ્યુટર સાથે કનેક્ટ થતું નથી:
- ખાતરી કરો કે ડેટા કેબલ મશીન અને કમ્પ્યુટર બંને સાથે સુરક્ષિત રીતે જોડાયેલ છે.
- ખાતરી કરો કે મશીન ચાલુ છે (લીલો પ્રકાશ સ્થિર અથવા ઝબકતો હોવો જોઈએ).
- વિન્ડોઝ 7 માટે, જરૂરી ડ્રાઇવરો ઇન્સ્ટોલ કરેલા છે કે નહીં તે તપાસો. સોફ્ટવેર ઇન્સ્ટોલેશન વિભાગનો સંદર્ભ લો.
- કોઈ અલગ USB પોર્ટ અથવા ડેટા કેબલ અજમાવી જુઓ.
- કોતરણીની ગુણવત્તા નબળી/હળવી છે:
- લેસર ફોકસ તપાસો. એક્રેલિક ફોકસિંગ શીટનો ઉપયોગ કરીને લેસરને ફરીથી ફોકસ કરો.
- જાળવણી વિભાગમાં વર્ણવ્યા મુજબ લેસર લેન્સ સાફ કરો.
- સોફ્ટવેર પરિમાણોને સમાયોજિત કરો (લેસર પાવર વધારો, ઝડપ ઘટાડો, અથવા અંતરાલ ઘટાડો).
- ખાતરી કરો કે સામગ્રી લેસર કોતરણી માટે યોગ્ય છે અને સપાટ મૂકવામાં આવી છે.
- મશીન યોગ્ય રીતે હલતું નથી/પીસવાનો અવાજ કરતું નથી:
- ગેન્ટ્રીના માર્ગમાં કોઈપણ અવરોધો છે કે નહીં તે તપાસો.
- જાળવણી વિભાગમાં વર્ણવ્યા મુજબ યોગ્ય તાણ માટે બેલ્ટનું નિરીક્ષણ કરો અને ગોઠવો.
- ખાતરી કરો કે મશીન સ્થિર, સમતલ સપાટી પર છે.
- કોતરણી દરમિયાન તીવ્ર ધુમાડો/ગંધ:
- ઘણી સામગ્રી માટે આ સામાન્ય છે. પર્યાપ્ત વેન્ટિલેશનની ખાતરી કરો. સારી રીતે વેન્ટિલેટેડ રૂમમાં, ખુલ્લી બારી પાસે કામ કરો, અથવા બાહ્ય ફ્યુમ એક્સ્ટ્રેક્ટરનો ઉપયોગ કરો.
8. સ્પષ્ટીકરણો
| લક્ષણ | વિગત |
|---|---|
| ઉત્પાદન પરિમાણો | 12.99 x 11.81 x 7.09 ઇંચ |
| આઇટમ મોડલ નંબર | xxl-C1 |
| ASIN | B0F845GHPS નો પરિચય |
| વસ્તુનું વજન | 2.31 પાઉન્ડ |
| ઉત્પાદક | સ્કુલફન |
| મૂળ દેશ | ચીન |
| લેસર આઉટપુટ પાવર | ૧૦,૦૦૦ મેગાવોટ (૧૦ વોટ) |
| લેસર સ્પોટ કદ | 0.04 મીમી |
| કોતરણી વિસ્તાર | 150 x 130 મીમી |
| મહત્તમ કોતરણી ઝડપ | 10000 મીમી/મિનિટ |
| સોફ્ટવેર સુસંગતતા | લાઇટબર્ન, લેસરજીઆરબીએલ |
| સિસ્ટમ સુસંગતતા | વિન્ડોઝ, MacOS |
| સપોર્ટેડ ઇમેજ ફોર્મેટ્સ | JPG, PNG, BMP, GIF, SVG, AI, વગેરે. |
છબી: વિગતવાર view SCULPFUN C1 નું ઉત્પાદન પરિમાણો અને પોર્ટ સ્થાનો દર્શાવે છે.
9. વોરંટી અને સપોર્ટ
વિગતવાર વોરંટી માહિતી અને તકનીકી સહાય માટે, કૃપા કરીને સત્તાવાર SCULPFUN નો સંદર્ભ લો. webસાઇટ અથવા તમારા ઉત્પાદન સાથે આપેલ સંપૂર્ણ વપરાશકર્તા માર્ગદર્શિકા PDF.
તમે સત્તાવાર યુઝર મેન્યુઅલ PDF ડાઉનલોડ કરી શકો છો. અહીં.


