1. પરિચય
Welcome to the AOOSTAR MACO AMD Ryzen 7 H255 Mini PC user manual. This guide provides essential information for setting up, operating, maintaining, and troubleshooting your new mini PC. Please read this manual thoroughly before using the device to ensure optimal performance and longevity.
2. ઉત્પાદન ઓવરview
2.1 મુખ્ય લક્ષણો
- AMD Ryzen 7 H255 Processor: High-end mobile processor with Zen 4 architecture, 4nm process, 8-core, 16-thread configuration, and up to 4.9 GHz boost frequency.
- Radeon 780M Graphics: Integrated RDNA 3 architecture for smooth graphics performance.
- Dual DDR5 & Dual PCIe4.0: Supports dual-channel DDR5 5600MHz RAM (expandable to 128GB) and dual M.2 2280 NVMe PCIe4.0x4 SSDs (expandable to 8TB).
- One-Touch Fingerprint Unlock: For instant access and enhanced security with enterprise-grade encryption.
- Four Display Support: Connect up to four 4K displays simultaneously for improved productivity.
- OCuLink Port: Extremely high bandwidth (64 Gbps) for external GPU solutions, offering faster support speeds and fewer transfer bottlenecks compared to Thunderbolt 4 and USB4.
- બહુવિધ ઇન્ટરફેસ: Includes OCuLink*1, USB4*2, USB3.2 Gen2*2, USB3.0*1, HD*1, DC*1, DP*1, Jack*1, 2.5G*2 for versatile peripheral compatibility.
- કાર્યક્ષમ ઠંડક પ્રણાલી: Designed for stable and cool full-power use.
2.2 પેકેજ સામગ્રી
The following items are included in your AOOSTAR MACO AMD Ryzen 7 H255 Mini PC package:
- 1 x AOOSTAR MACO AMD Ryzen 7 H255 Mini PC
- 1 x SSD Cooling Pad
- 1 x 120W 19V 6.32A Type-C Power Supply
2.3 Physical Components and Ports
Familiarize yourself with the various ports and components of your mini PC.
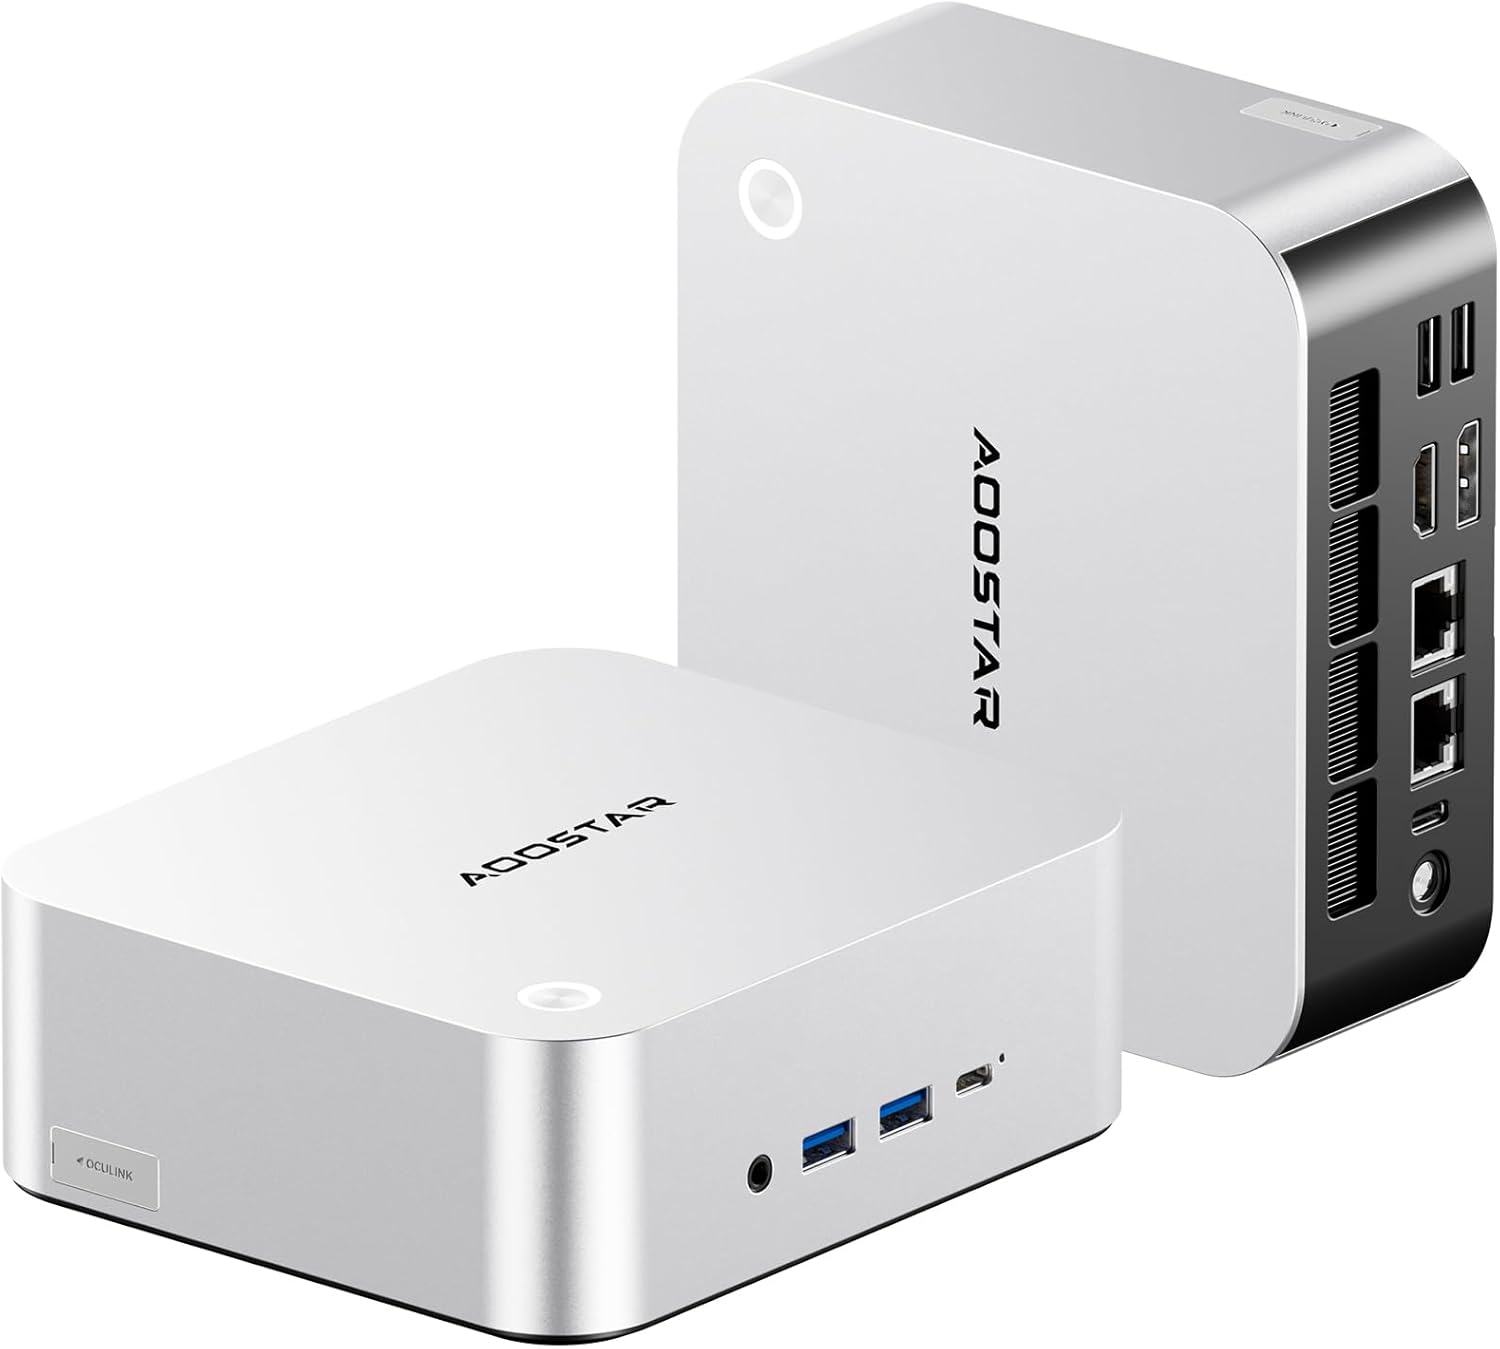
છબી: આગળ અને પાછળ view of the AOOSTAR MACO AMD Ryzen 7 H255 Mini PC, showcasing its compact design and various connectivity options.

છબી: એક ઓવરview of the AOOSTAR MACO Mini PC's key features, including the AMD Ryzen PRO processor, one-piece formed metal casing, and various ports.
ફ્રન્ટ પેનલ:
- Power Button with Fingerprint Sensor: For powering on/off and secure login.
- ઓડિયો જેક: For headphones or microphones.
- USB 3.2 Gen2 Ports (x2): હાઇ-સ્પીડ ડેટા ટ્રાન્સફર.
- USB4 પોર્ટ (x1): હાઇ-સ્પીડ ડેટા ટ્રાન્સફર અને ડિસ્પ્લે આઉટપુટ.
રીઅર પેનલ:
- ડીસી પાવર ઇનપુટ: શામેલ પાવર એડેપ્ટરને કનેક્ટ કરો.
- USB4 પોર્ટ (x1): હાઇ-સ્પીડ ડેટા ટ્રાન્સફર અને ડિસ્પ્લે આઉટપુટ.
- 2.5G LAN Ports (x2): વાયર્ડ નેટવર્ક કનેક્શન માટે.
- HDMI પોર્ટ (x1): For display output.
- DisplayPort (DP) (x1): For display output.
- OCuLink Port (x1): For connecting external GPUs.
- USB 3.0 પોર્ટ્સ (x2): પેરિફેરલ્સને કનેક્ટ કરવા માટે.
2.4 કૂલિંગ સિસ્ટમ
The AOOSTAR MACO H255 Mini PC features an advanced cooling architecture to ensure stable performance even under heavy loads.

Image: Diagram illustrating the internal cooling system of the AOOSTAR MACO Mini PC, including the turbo fan, FIN heat dissipation, and VC heat spreader.
3. સેટઅપ
૩.૧ પ્રારંભિક જોડાણ
- કનેક્ટ ડિસ્પ્લે: Connect your monitor(s) to the HDMI, DisplayPort, or USB4 ports using appropriate cables. The mini PC supports up to four displays.
- પેરિફેરલ્સ કનેક્ટ કરો: તમારા કીબોર્ડ, માઉસ અને અન્ય USB ઉપકરણોને ઉપલબ્ધ USB પોર્ટમાં પ્લગ ઇન કરો.
- નેટવર્ક કનેક્ટ કરો (વૈકલ્પિક): For a wired connection, connect an Ethernet cable to one of the 2.5G LAN ports. For wireless, ensure your WiFi network is available.
- પાવર કનેક્ટ કરો: Plug the Type-C power adapter into the DC power input port on the rear panel, then connect the adapter to a power outlet.
૨.૩ પહેલું બુટ
Press the power button on the front panel. The mini PC will power on, and the power indicator will illuminate. The device typically comes pre-configured with Windows 11.
૩ ઓપરેટિંગ સિસ્ટમ સેટઅપ
Follow the on-screen instructions to complete the initial Windows 11 setup, including language, region, network connection, and user account creation. If prompted, you can set up the fingerprint unlock feature during this process or later via Windows settings.
4. ઓપરેટિંગ સૂચનાઓ
4.1 પાવર ચાલુ/બંધ
- પાવર ચાલુ: એકવાર પાવર બટન દબાવો.
- બંધ કરો: વિન્ડોઝ સ્ટાર્ટ બટન પર ક્લિક કરો, પછી પાવર > શટ ડાઉન પસંદ કરો.
- પુનઃપ્રારંભ કરો: વિન્ડોઝ સ્ટાર્ટ બટન પર ક્લિક કરો, પછી પાવર > રીસ્ટાર્ટ પસંદ કરો.
- ઊંઘ: વિન્ડોઝ સ્ટાર્ટ બટન પર ક્લિક કરો, પછી પાવર > સ્લીપ પસંદ કરો.
૫.૨ ફિંગરપ્રિન્ટ અનલોક
The integrated fingerprint sensor allows for quick and secure login. Ensure your fingerprint is registered in Windows Hello settings. Simply touch the power button with your registered finger to unlock the system.

Image: A hand demonstrating the one-touch fingerprint unlock feature on the AOOSTAR MACO Mini PC.
૫.૩ બાહ્ય ઉપકરણોને જોડવા
- યુએસબી ઉપકરણો: Connect USB keyboards, mice, external drives, and other peripherals to the available USB 3.2 Gen2 or USB 3.0 ports.
- OCuLink External GPU: For enhanced graphics performance, connect a compatible external GPU enclosure to the OCuLink port. Note: OCuLink connections are not hot-swappable. Ensure the system is powered off before connecting or disconnecting an OCuLink device.
- બહુવિધ ડિસ્પ્લે: Utilize the HDMI, DisplayPort, and USB4 ports to connect up to four monitors. Adjust display settings in Windows for extended or mirrored desktop modes.
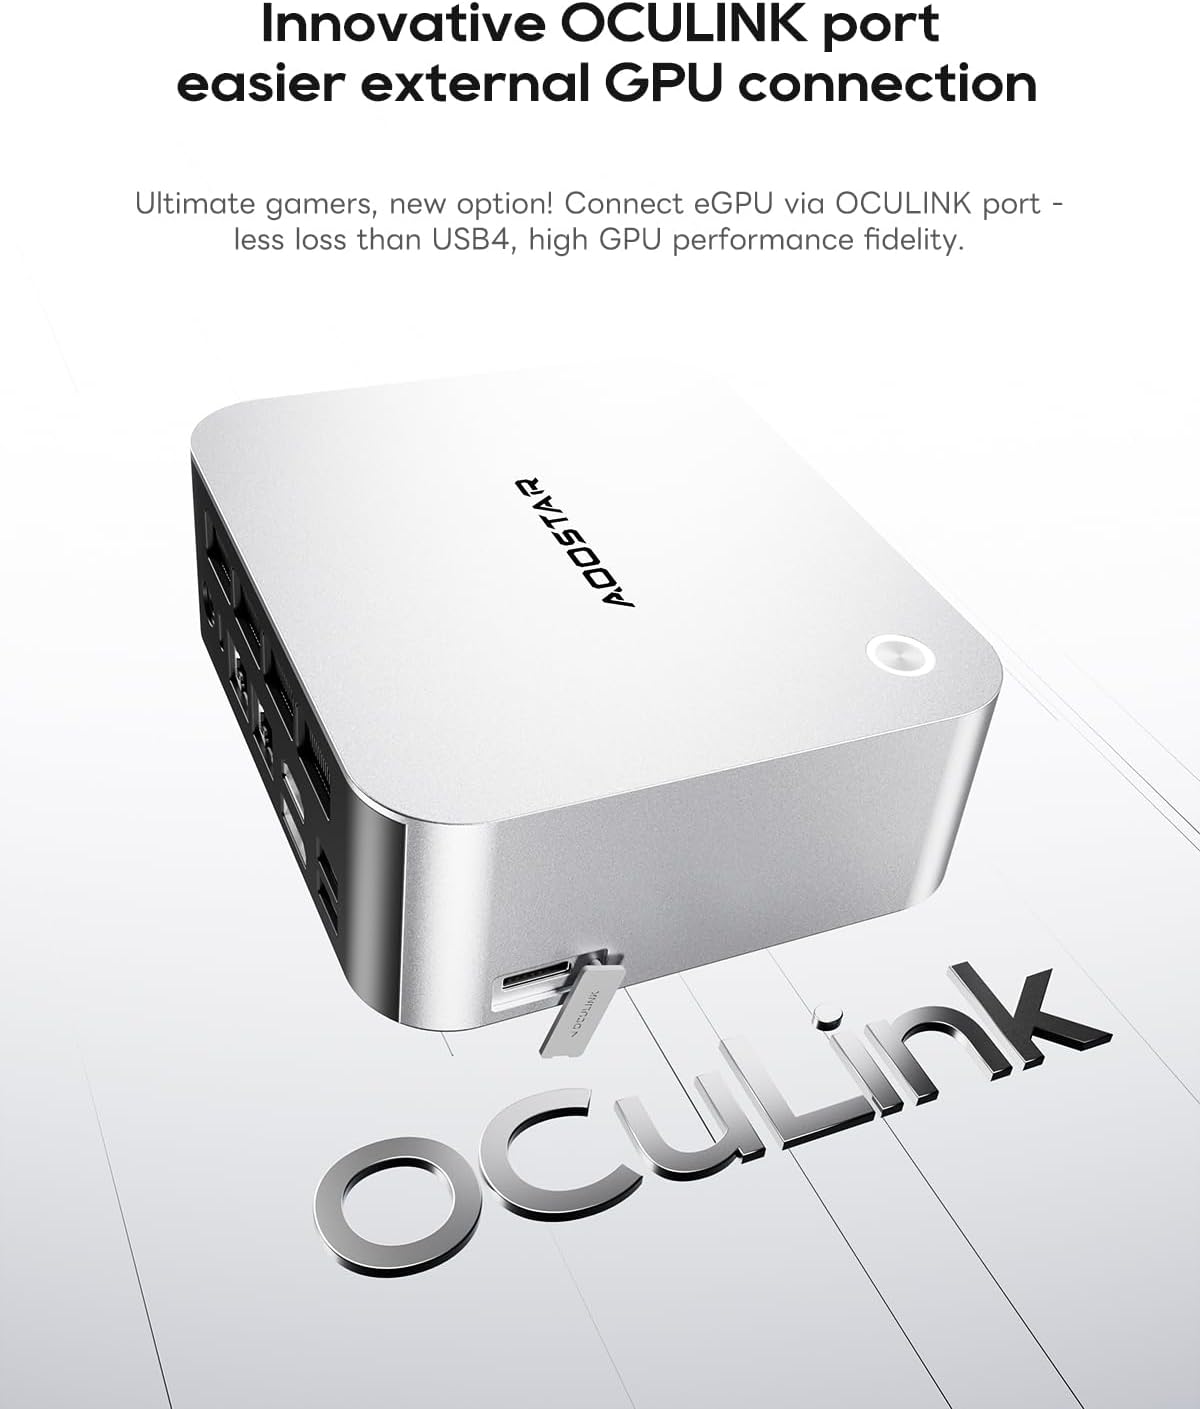
Image: Close-up of the OCuLink port on the AOOSTAR MACO Mini PC, designed for external GPU connections.

Image: Illustration showing the AOOSTAR MACO Mini PC connected to and supporting up to four external displays.
૪.૨ નેટવર્ક કનેક્ટિવિટી
- વાયર્ડ કનેક્શન: Connect an Ethernet cable to either of the 2.5G LAN ports for a high-speed wired network connection.
- વાયરલેસ કનેક્શન: The mini PC supports WiFi 6. To connect to a wireless network, go to Windows Settings > Network & Internet > Wi-Fi, then select your network and enter the password.
5. જાળવણી
5.1 સફાઈ
Regular cleaning helps maintain optimal performance and extends the lifespan of your mini PC.
- બાહ્ય: Use a soft, dry, lint-free cloth to wipe the exterior. For stubborn marks, slightly dampપાણીથી ભરેલું કાપડ. કઠોર રસાયણો ટાળો.
- વેન્ટ્સ: Use compressed air to gently clear dust from the ventilation grilles to ensure proper airflow and cooling. Perform this periodically.
5.2 સોફ્ટવેર અપડેટ્સ
Keep your operating system and drivers updated to ensure security, stability, and optimal performance.
- વિન્ડોઝ અપડેટ્સ: Go to Windows Settings > Update & Security > Windows Update to check for and install the latest OS updates.
- ડ્રાઇવર અપડેટ્સ: Periodically check the AOOSTAR official website for updated drivers for your specific model, especially for graphics and chipset.
૪.૨ સ્ટોરેજ વિસ્તરણ
The AOOSTAR MACO H255 Mini PC supports dual M.2 2280 NVMe PCIe4.0x4 SSDs for storage expansion.
- પાવર બંધ: Ensure the mini PC is completely powered off and disconnected from the power supply.
- પ્રવેશ: Refer to the product's physical design for accessing the internal M.2 slots. Typically, this involves removing screws from the bottom panel.
- SSD ઇન્સ્ટોલ કરો: Carefully insert the new M.2 NVMe SSD into an available slot and secure it with the provided screw or retention mechanism.
- ફરીથી એસેમ્બલ કરો: Securely reattach the bottom panel.
- પ્રારંભ કરો: After booting, you may need to initialize and format the new SSD through Windows Disk Management before it can be used.

છબી: આંતરિક view of the AOOSTAR MACO Mini PC, highlighting the dual M.2 NVMe PCIe 4.0 SSD slots and dual-channel DDR5 memory.
6. મુશ્કેલીનિવારણ
This section addresses common issues you might encounter with your AOOSTAR MACO H255 Mini PC.
| સમસ્યા | સંભવિત કારણ | ઉકેલ |
|---|---|---|
| No power / PC does not turn on | Power cable not connected, faulty power adapter, power outlet issue. | Ensure the power adapter is securely connected to the PC and a working power outlet. Test the outlet with another device. |
| મોનિટર પર કોઈ ડિસ્પ્લે નથી | Monitor not connected, incorrect input source, faulty cable, display driver issue. | Check display cable connections (HDMI, DP, USB4). Ensure monitor is on and set to the correct input source. Try a different cable or monitor. |
| ઇન્ટરનેટ કનેક્શન નથી | Ethernet cable disconnected, WiFi disabled, router issue, driver issue. | For wired: Check Ethernet cable. For wireless: Ensure WiFi is enabled in Windows settings and connected to the correct network. Restart your router. Update network drivers. |
| Fingerprint unlock not working | Fingerprint not registered, sensor dirty, temporary software glitch. | Ensure your fingerprint is correctly registered in Windows Hello. Clean the sensor. Restart the PC. Try logging in with your PIN or password. |
| System slow or unresponsive | Too many applications running, low storage space, outdated drivers, overheating. | Close unnecessary applications. Free up disk space. Update drivers. Ensure proper ventilation and clean vents. |
7. સ્પષ્ટીકરણો
Detailed technical specifications for the AOOSTAR MACO AMD Ryzen 7 H255 Mini PC.
| લક્ષણ | વિગત |
|---|---|
| પ્રોસેસર | AMD Ryzen 7 H255 (8C/16T, up to 4.9GHz) |
| ગ્રાફિક્સ કોપ્રોસેસર | Radeon 780M |
| રેમ | 32GB DDR5 5600MHz (Dual-channel, expandable to 128GB) |
| સંગ્રહ | 1TB PCIe4.0 SSD (Dual M.2 2280 NVMe PCIe4.0x4, expandable to 8TB) |
| ઓપરેટિંગ સિસ્ટમ | OS (Typically Windows 11 pre-installed) |
| કનેક્ટિવિટી | WiFi 6, Dual 2.5G LAN |
| બંદરો | OCuLink*1, USB4*2, USB3.2 Gen2*2, USB3.0*1, HDMI*1, DisplayPort*1, Audio Jack*1, DC Power*1 |
| ડિસ્પ્લે સપોર્ટ | Up to Four 4K Displays |
| પરિમાણો (LxWxH) | 5.12 x 5.12 x 2.36 ઇંચ (13 x 13 x 6 સેમી) |
| વજન | 1.46 પાઉન્ડ (0.66 કિગ્રા) |
8. વોરંટી અને સપોર્ટ
AOOSTAR products are designed for reliability and performance. For warranty information, please refer to the documentation included with your purchase or visit the official AOOSTAR website. For technical support, product inquiries, or service requests, please contact AOOSTAR customer support through their official channels.
૫.૩. પ્રોડક્ટ વિડિઓઝ
વિઝ્યુઅલ ઓવર માટે સત્તાવાર પ્રોડક્ટ વિડિઓ જુઓview of the AOOSTAR MACO H255 Mini PC.
વિડિઓ: સત્તાવાર ઉત્પાદન વિડિઓ શોasing the AOOSTAR MACO R7 H255 Mini PC, its design, features, and connectivity options. This video is provided by AOOSTAR Direct.


